- Simple examples of Fork elements
- Configuring Fork elements
- Fork Collections
- A template workflow example
Fork
Fork (![]() ) elements are used to offer choices at launch time about the path to follow through a workflow. Using Fork elements, certain analyses can be made optional, or different settings can be applied depending on choices made when launching the workflow.
) elements are used to offer choices at launch time about the path to follow through a workflow. Using Fork elements, certain analyses can be made optional, or different settings can be applied depending on choices made when launching the workflow.
Fork elements can optionally be placed in Fork Collections. All Fork elements within a collection share the same configuration and are controlled by a single choice made at launch, potentially determining the paths taken through many arms of the workflow.
Including Fork elements in a workflow can help decrease maintenance overheads, as they allow a single workflow to cater for multiple analysis scenarios.
Simple examples of Fork elements
When launching a workflow containing Fork elements, the paths to take during that workflow run are configured in the "Specify workflow path" wizard step (figures 15.56 and 15.57). The information presented in this wizard step reflects the configurations of the Fork elements.
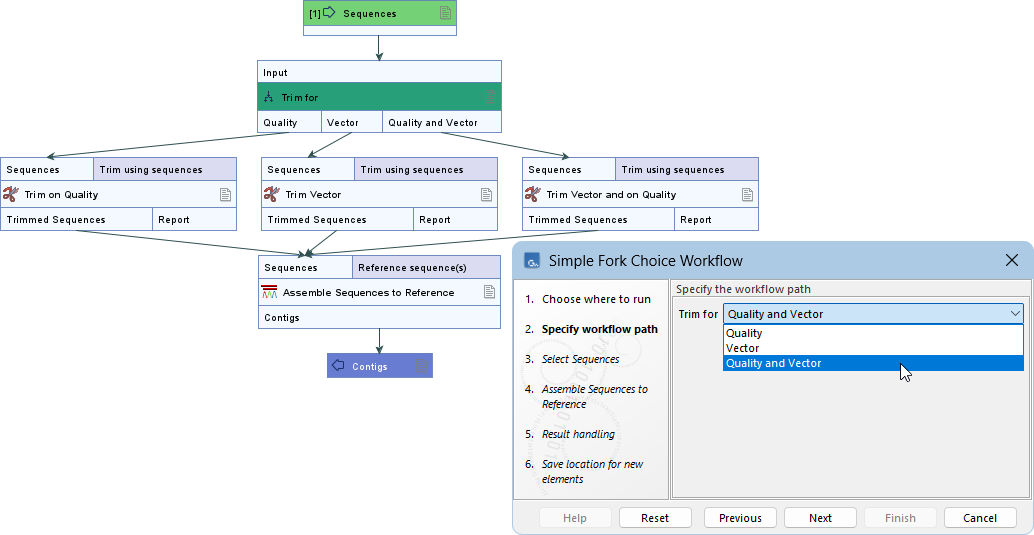
Figure 15.56: A workflow containing a single Fork element named "Trim for" with three potential downstream paths (top, left). The Fork element name and path names are used in the "Specify workflow path" launch wizard step (bottom right).
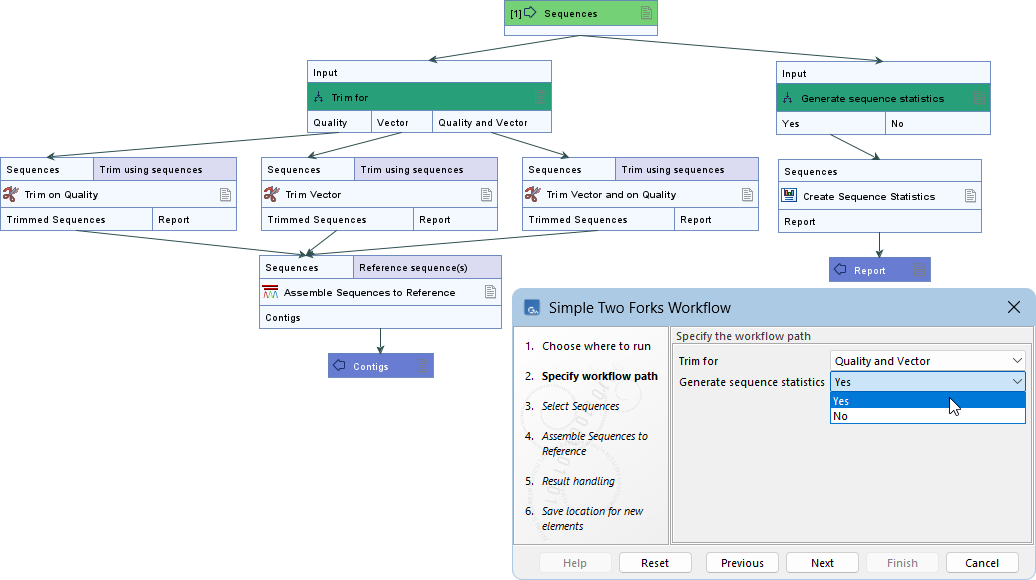
Figure 15.57: The choices associated with the two Fork elements, "Trim for" and "Generate sequence statistics", are made in the "Specify workflow path" launch wizard step. Selecting "No" for "Generate sequence statistics" means that workflow arm would not be used as there are no downstream elements connected to the "No" output channel.
Configuring Fork elements
Fork elements are configured with (figure 15.58):
- Element name For Fork elements not in a collection (described below), the name of the element is used in the launch wizard as the description of the choice to be made.
- Path names Names of the potential downstream paths that can be taken when running the workflow. Each name added to the comma-delimited list creates an output channel for the Fork element. These names appear in a drop-down list in the workflow launch wizard.
Note that updating path names after connections have been made from the corresponding output channel removes those connections.
- Selected path (Optional) The path used as the default, pre-selected in the launch wizard. If left empty, the first entry in the Path names list is pre-selected instead.

Figure 15.58: The "Trim for" Fork element is configured with three path names, so there are, correspondingly, three output channels with these names assigned. The "Quality and Vector" path has been entered in the "Selected path" field, thereby specifying it as the default.
General information about renaming and configuring workflow elements is provided in Basic configuration of workflow elements.
If an output channel is not connected to any downstream elements, selecting the corresponding option in the launch wizard terminates the workflow path at that point (figure 15.57).
At least one output channel from a Fork element must be connected to a downstream element. Fork elements with no connections from them are reported in the validation messages at the bottom of the editor.
Fork Collections
Fork elements can be placed in a Fork Collection. A single option is presented in the launch wizard for each collection (figure 15.59).

Figure 15.59: The "Specify workflow path" launch wizard step contains two settings: one for specifying the path to take from each of the Fork elements in the "Perform analysis" Collection, "First fork" and "Second fork", and the other for specifying the path to take from the "Third fork" element, which is not part of a collection.
Click the More... button at the bottom right corner of the Workflow Editor and select Configure Fork Collections... (figure 15.60) to open a dialog with the following actions are available:

Figure 15.60: Click the More... button at the bottom right of the Workflow Editor to reveal the "Configure Fork Connections..." option.
- Creating a Fork Collection
Initially, a Fork element added to a workflow is not the member of any collection. To create a collection, click the Move to... button to the right of a Fork's name and select New Collection (figure 15.61). The new collection has the same settings as the Fork element used to create it.
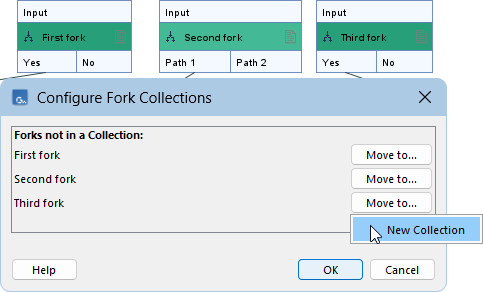
Figure 15.61: A workflow contains three configured Fork elements. The "Configure Fork Collections" dialog is open. None of the Fork elements are in a collection. Clicking the "Move to..." button reveals an option to move the corresponding element to a new collection.- Configuring a Fork Collection
Similar to Fork elements, a Fork Collection is configured with the options Collection name, Path names, and Selected path (figure 15.62), which are used in the launch wizard in the same manner as for Fork elements (figure 15.59).
To update a collection's name, click and type directly on the name, or click the edit icon (
 ) to select the full name before editing.
Changing the path names or the selected path for a collection applies to all Fork elements within that collection.
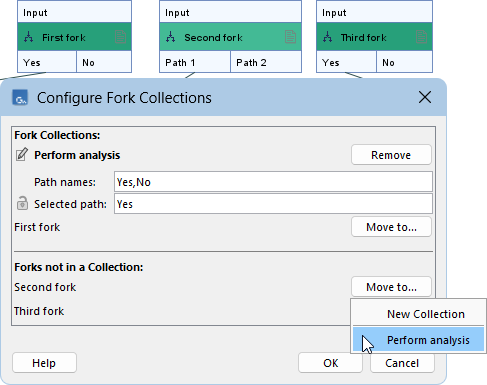
Figure 15.62: "First fork" is in a collection named "Perform analysis". Clicking the "Move to..." button next to "Second fork" reveals an option to move the element to this collection.- Adding or removing Fork elements in collections
Fork elements can be moved out of a collection or into a new or existing collection using the Move to... buttons in the "Configure Fork Collections" dialog (figures 15.62 and 15.63).
All Forks in a collection must have identical path names. When a Fork element is moved into a collection with different paths, a warning is shown (figure 15.64). Clicking Cancel closes the dialog without applying those changes.
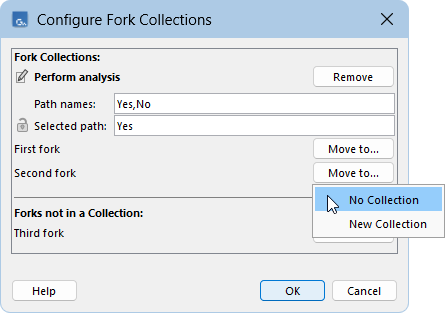
Figure 15.63: Fork elements can be moved out of a collection or into a new or existing collection using the "Move to.." buttons. Clicking the "Remove" button next to a collection name moves all Fork elements out of it and deletes the collection.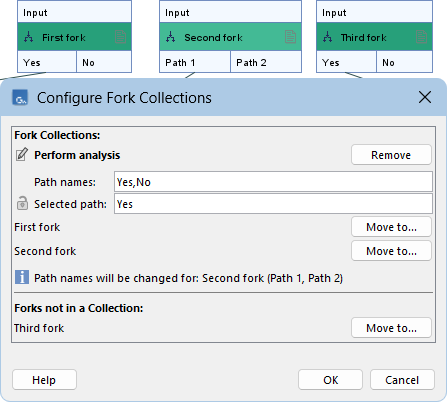
Figure 15.64: When "Second fork" is added to the "Perform analysis" collection, a warning indicates that its path names will be updated.- Removing collections
To delete a collection, click the Remove button to the right of its name (figure 15.63). Fork elements in a collection that is removed are not deleted.
If all Fork elements are removed from a collection, the collection is automatically deleted.
A template workflow example
The Analyze QIAseq DNA Ultra Somatic (Illumina) template workflow, provided by the Biomedical Genomics Analysis plugin, allows analyses to be selected at launch time through multiple choices corresponding to both individual Fork elements and Fork Collections.
To view this template workflow in the Workflow Editor:
- Install the Biomedical Genomics Analysis plugin, if it is not already installed.
- Locate the workflow by searching it name in the Template Workflows folder under the Workflows tab in the Toolbox.
- Open a copy of the workflow.
- In the Workflow Editor, open the "Configure Fork Collections" dialog for information about the Fork elements and collections in the workflow.
- Use the Find functionality in the Side Panel to locate a Fork element by its name.