Edit alignments
Selection in alignments
When editing alignments, it can be useful to make custom selections across the sequences. This can be done in a number of different ways.
Selecting entire sequences
To select an entire sequence, click once on its label on the left-hand side of the Alignment view. This will cause the label and all residues in the sequence to be highlighted. To select multiple sequences, hold down the Ctrl key (![]() on Mac) while clicking on the desired sequences or hold down the Shift key while clicking on first one then another sequence, to select all sequences in between them. To easily select all sequences, hold down Ctrl + A (
on Mac) while clicking on the desired sequences or hold down the Shift key while clicking on first one then another sequence, to select all sequences in between them. To easily select all sequences, hold down Ctrl + A (![]() + A on Mac).
+ A on Mac).
It is also possible to select multiple sequences by checking the Show selection boxes option in the Side Panel palette Sequence layout (figure 25.10). Then, clicking the selection box next to the sequence label will select that sequence. If you have many sequences to select, it may be easier to select the few that are not of interest, and then invert the selection by right-clicking on any of the checkboxes and choosing the option Invert All Marks.
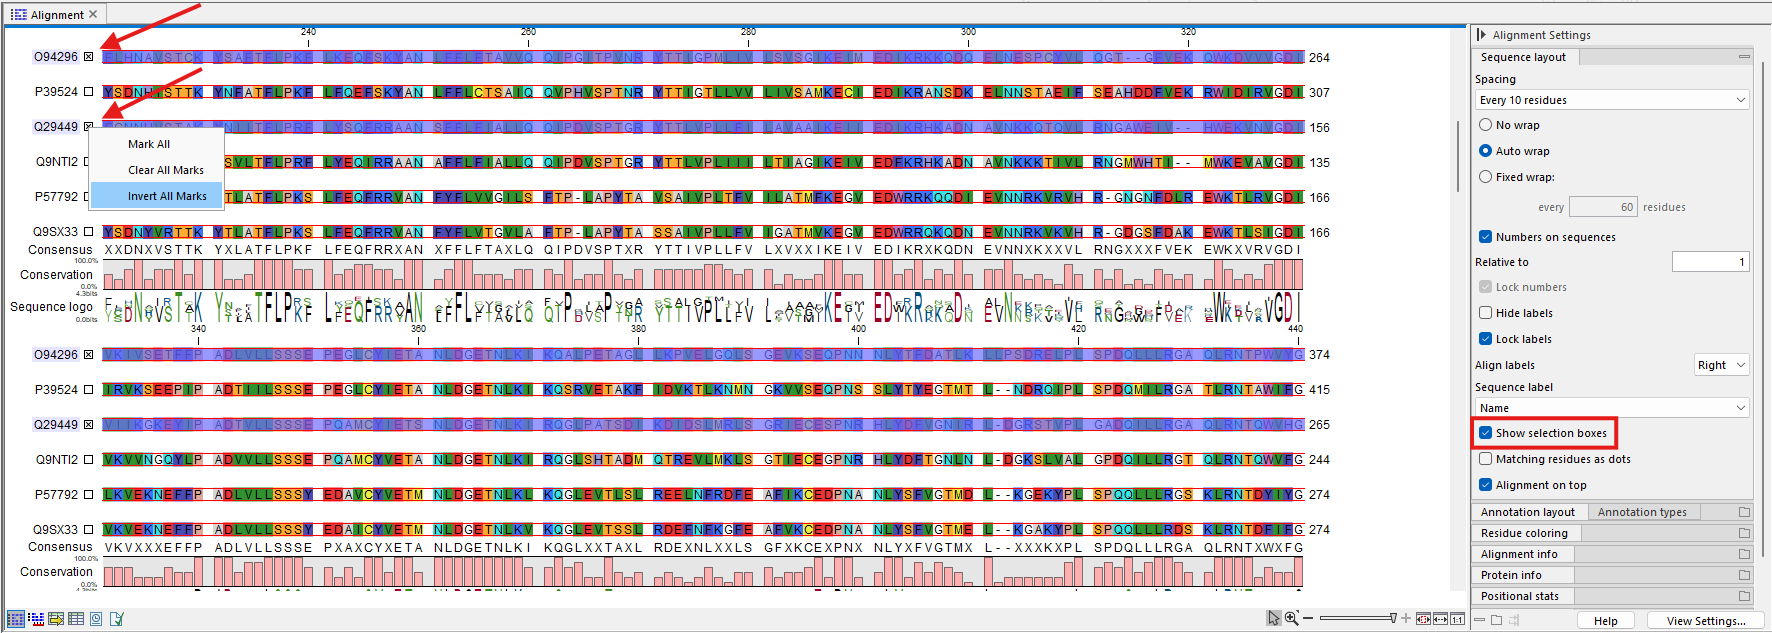
Figure 25.10: Sequences in the alignment can be selected using the selection boxes. With "Invert All Marks", it is possible to quickly select all but a few sequences.
Selecting a region
To select a specific region of a sequence or an alignment, click and drag the mouse across the desired residues in the sequence. For small regions in a small number of sequences, it may be easier to do while zoomed in fully, such that each residue is visible. For longer regions, it is also possible to select the first or a few residues in the beginning of the region, followed by holding down the Shift key while clicking on the last residue in the region. This selects all residues in between the selected and clicked position.
To select the region across multiple sequences, it is similarly done by clicking and dragging, but while also dragging vertically across sequences next to each other. The Shift + click method can be used by selecting the first or a few residues at the beginning of the region on the topmost sequence, followed by holding down the Shift key while clicking on the last residue in the region on the bottommost sequence. This selects all residues in between the selected and clicked position across all sequences in between the topmost and bottommost sequence.
To select the region across multiple sequences that are not next to each other in the alignment, start by selecting the entire region on one sequence as described above. When the region is selected, hold down the Ctrl key (![]() on Mac) while clicking anywhere on the desired sequences.
on Mac) while clicking anywhere on the desired sequences.
It is also possible to select multiple non-contiguous regions in the alignment. To do this, hold down the Ctrl key (![]() on Mac) while clicking and dragging across multiple regions. To select the regions across multiple sequences, hold down the Ctrl key (
on Mac) while clicking and dragging across multiple regions. To select the regions across multiple sequences, hold down the Ctrl key (![]() on Mac) while clicking anywhere on the desired sequences.
on Mac) while clicking anywhere on the desired sequences.
Move residues and gaps
The placement of gaps in the alignment depends on the parameters set when creating the alignment. However, gaps and residues next to gaps can also be moved after the alignment is created:
- Select one or more gaps or residues in the alignment.
- Drag the selection to move.
This can be done for both single and multiple sequences using the methods described above in selection in alignments.
Note! Residues can only be moved when they are next to a gap (see figure 25.11).
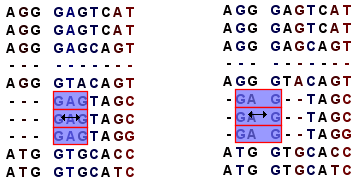
Figure 25.11: Moving a part of an alignment. Notice how the selected residues in the left part of the image have moved four positions to the left in the right part of the image.
Insert gaps
Gaps can also be added manually after the alignment is created:
- Select a part of the alignment.
- Right-click on the selection.
- Choose Add Gaps After or Add Gaps Before.
This can be done for both single and multiple sequences using the methods described above in selection in alignments.
The number of inserted gaps depends on the number of selected residues. If you have made a selection covering e.g. five residues, a gap of five will be inserted. In this way you can easily control the number of gaps to insert.
Edit residues in a sequence
Individual sequences can be edited to change residues or add additional residues in the sequence:
- Select the part of the sequence you want to edit.
- Right-click on the selection.
- Choose Edit Selection... (
 ).
).
The sequence shown in the dialog will be replaced by the text you enter. If residues are added this way, gaps will be inserted into the other sequences in the alignment. Conversely, if residues are removed this way, gaps will be inserted into the sequence itself.
Delete residues and gaps
Residues or gaps can be deleted for individual sequences or for all sequences in the alignment:
- Select the part of the sequence you want to delete.
- Right-click on the selection.
- Choose Delete Selection (
 ).
).
This can be done for both single and multiple sequences using the methods described above in selection in alignments.
Deleting residues in this way will not insert gaps, but instead cause the selected sequences to move to the right in the alignment.
Copy annotations to other sequences
To work with annotations in an alignment, use the Side Panel palette Annotation layout to display annotations. Then, annotations on one sequence can be transferred to other sequences in the alignment:
- Right-click on the annotation.
- Choose Copy Annotation to Other Sequences...
This will display a dialog listing all the sequences in the alignment. Click the checkbox next to each sequence that the annotation should be copied to. Then click on Copy.
If you wish to copy all annotations on the sequence, use the Copy All Annotations to Other Sequences... option in the right-click menu instead.
Copied/transferred annotations will contain the same qualifier text as the original, i.e., the text is not updated. As an example, if the annotation contains 'translation' as qualifier text, this translation will be copied to the new sequence and will thus reflect the translation of the original sequence, not the new sequence.
Delete, rename, and add sequences
Sequences can be removed from the alignment:
- Right-click on the sequence label.
- Choose Delete Sequence(s) (
 ).
).
This can be done for both single and multiple sequences, using the methods described above in selection in alignments.
A sequence can also be renamed:
- Right-click on the sequence label.
- Choose Rename Sequence....
This will show a dialog, letting you rename the sequence. This will always change the "Name" attribute of a sequence, regardless of which "Sequence label" is currently chosen in the Side Panel palette Sequence layout.
To add sequences to an existing alignment, rerun the Create Alignment tool and use the existing alignment as input together with the desired new sequence(s) and/or alignment(s).
Move sequences up and down
Sequences can be moved up and down in the alignment:
- Select the sequence to move.
- Drag the name of the sequence up or down to the desired position.
This can be done for both single and multiple sequences using the methods described above in selection in alignments.
When you hover the mouse pointer over the sequence label, the pointer will turn into a vertical arrow, indicating that the sequence can be moved.
The sequences can also be moved automatically:
- To easily move one or more sequences to the top of the alignment:
- Right-click on the sequence label.
- Choose Move Sequence(s) to Top.
- To sort the sequences alphabetically:
- Right-click on the sequence label.
- Choose Sort Alphabetically on Name.
- To sort the sequences based on whether they have been selected:
- Right-click on the sequence label.
- Choose Sort by Marked Status.
- To sort the sequences by similarity, grouping similar sequences together:
- Right-click on the sequence label.
- Choose Sort by Similarity.
Subsections