Side Panel
When an element is open for viewing, options for configuring that view are available in the Side Panel. The settings for a given view can be saved and re-used, as described in Side Panel view settings.
The Side Panel is organized into palettes, where related settings are grouped (figure 2.10). The specific palettes and options depend on the data type and the view that is open. The buttons in the top right side of each palette can be used for expanding the contents for viewing (![]() ), or collapsing (
), or collapsing (![]() ). Using the buttons at the bottom left side of the Side Panel, all the palettes can be expanded (
). Using the buttons at the bottom left side of the Side Panel, all the palettes can be expanded (![]() ) or collapsed (
) or collapsed (![]() ).
).
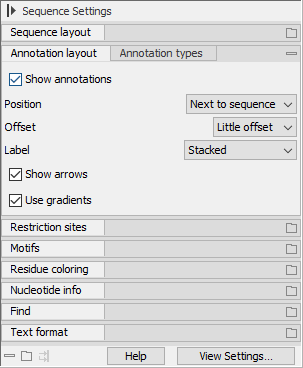
Figure 2.10: Side Panel settings for a nucleotide sequence. The Annotation layout palette is expanded, while the remaining palettes are collapsed. In the bottom left corner of the Side Panel are buttons for expanding, collapsing and re-docking all palettes.
Palettes can be placed at a different level in the Side Panel or undocked to be viewed anywhere on the screen (figure 2.11). For this, click on the palette name and while keeping the mouse depressed, drag the palette up and down, or drag it outside the CLC Workbench.
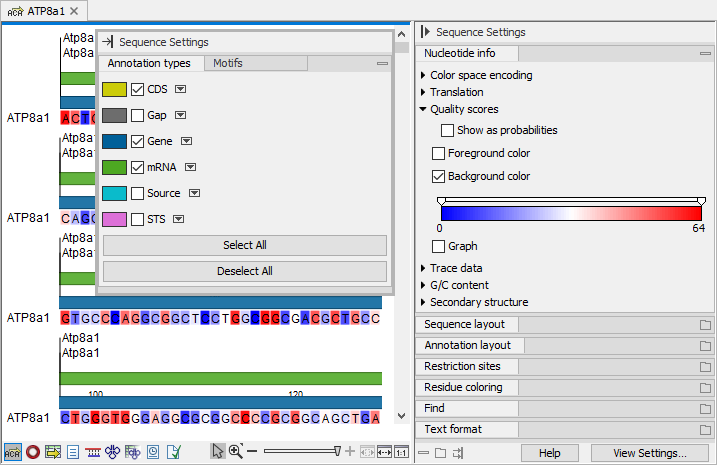
Figure 2.11: The Annotation types and Motifs palettes have been undocked. The Nucleotide info palette has been moved at the top of the Side Panel. The background color of the nucleotides reflects the G/C content.
A palette can be re-docked by clicking on its tab name and dragging it back into the Side Panel. A red highlight indicates where it will be placed. Alternatively, clicking on the (![]() ) button at the top left of the floating palette will place it at the bottom of the Side Panel. All floating palettes can be re-docked by clicking on the (
) button at the top left of the floating palette will place it at the bottom of the Side Panel. All floating palettes can be re-docked by clicking on the (![]() ) button at the bottom of the Side Panel.
) button at the bottom of the Side Panel.
The whole Side Panel can be hidden or revealed using buttons at the top right: (![]() ) to hide the Side Panel and (
) to hide the Side Panel and (![]() ) to reveal it, if it was hidden. The keyboard shortcut Ctrl + U (
) to reveal it, if it was hidden. The keyboard shortcut Ctrl + U (![]() + U on Mac) can also be used for these actions.
+ U on Mac) can also be used for these actions.
Changing the colors
Where color settings are offered, you have the option to use a fixed color or a gradient. For example, in figure 2.11, each annotation type is displayed using a fixed color, while the quality scores are displayed using a gradient. The color/gradient used can be changed by clicking on it.
A fixed color can be chosen from a predefined set of swatches (figure 2.12) or defined by setting the:
- Hue, saturation, and value (HSV).
- Hue, saturation, and lightness (HSL).
- Red, green, and blue combination (RGB).
- Cyan, magenta, yellow, and black combination (CMYK).
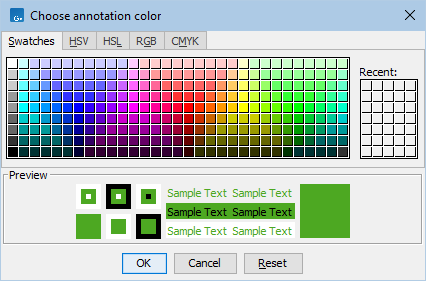
Figure 2.12: Clicking on the color of the mRNA annotation type opens a dialog where the color can be changed.
A gradient can be chosen from a predefined set of gradients (figure 2.13) or customized by setting:
- The type of the gradient.
- Continuous: the color gradually changes from one set color and location to the next.
- Discrete: only the set colors are used and they change abruptly at the specified locations.
- Each color in the gradient and its location within the gradient.
- The location can be provided as a percentage, ranging from 0% to 100%, or as an absolute value, with the minimum and maximum determined by the underlying data.
For example, the range of the gradient from figure 2.13 is 0 - 64. Setting the location to 50% corresponds to the absolute value of 32 (0 + (64 - 0) * 0.5).
Add locations by clicking on (
 ) or (
 ). Remove intermediate locations by clicking on (
 ).
).
- The color can be chosen as described above.
- The location can be provided as a percentage, ranging from 0% to 100%, or as an absolute value, with the minimum and maximum determined by the underlying data.
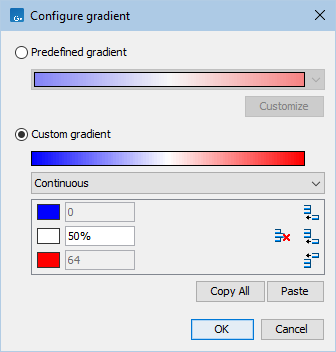
Figure 2.13: Clicking on the gradient of the quality scores opens a dialog where the gradient can be changed.
Gradients settings can be reused, making it easy to apply the same gradient consistently across different views. This is done using buttons in the 'Configure gradient' dialog (figure 2.13):
- Click on Copy All to copy the gradient configuration. You can paste this into a text file for later use.
- Click on the Paste button to apply copied gradient settings. Colors and locations present in the 'Configure gradient' dialog are overwritten by this action.