Launching workflows individually and in batches
When a workflow is launched, a wizard opens that will take takes you step by step through launching the workflow, including supplying the data to be analyzed, configuring any available options, specifying where outputs should be saved, etc.
Workflows stored in a CLC data location, i.e. available from the Navigation Area, can be launched by opening them, and then clicking on the Run Workflow button at the bottom right side of the Workflow Editor.
Installed workflows and template workflows can be launched in the following ways:
- Double click on the workflow name in the Workflows tab in the Toolbox panel, which is in the bottom left side of the Workbench.
- Select the workflow from the Workflows menu at the top of the Workbench.
- Use the Quick Launch (
 ) tool (see Using the Quick Launch tool to start jobs).
Workflow inputs
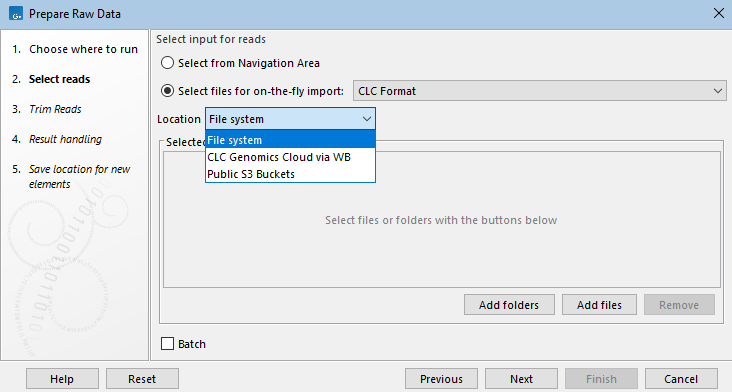
Data to be used in a workflow analysis can be selected from the Navigation Area or can be imported on-the-fly from files stored elsewhere. The specific options available depend on how the workflow was configured by the author. Using on-the-fly import, the first action taken when the workflow is run is to import the specified data.
When Select files for on-the-fly import is selected, the format of the data files must be specified using the drop-down menu beside this option. If configuration options are available for the selected importer, they will be shown in the lower part of the dialog.
If remote locations are available, such as CLC Server import/export directories, or AWS S3 buckets, a Location drop-down menu will be visible above the file selection area, either in the launch wizard (figure 14.71) or in the Select files dialog that opens when a Browse button is clicked on.
Note:
- To use CLC data stored in an AWS S3 bucket in a workflow analysis, you must choose the option Select files for on-the-fly import and choose the format CLC Format.
- If you select data from an AWS S3 bucket for an analysis that will be run on your CLC Workbench or CLC Server, the data will be downloaded from AWS before the analysis begins. For large datasets, this may take some time. Downloading from AWS S3 to a local file system may incur charges from AWS. See AWS S3 pricing.

Figure 14.71: Input data is specified when launching a workflow. CLC data can be selected from the Navigation Area. Data stored elsewhere can be selected after choosing the option "Select files for on-the-fly import" and specifying the format of that data.
For information about configuring workflow Input elements when creating or editing a workflow, see Configuring Workflow Input elements.
Workflow outputs
Output and Export elements in workflows specify the analysis results to be saved. In addition to analysis results, a Workflow Result Metadata table can be output. This contains a record of the workflow outputs, as described in Workflow Result Metadata tables.
The history of data elements generated as workflow outputs contains the name and version the workflow that created it. When an installed workflow was used, the workflow build id is also included. See History view) for further details.
Launching batches of analyses
When multiple inputs are provided, you can choose to run the workflow multiple times, one time for each input, or for defined sets of inputs that should be analyzed together. This is referred to as running in Batch mode, with the inputs to be analyzed together being referred to as batch units. This is described in Running workflows in batch mode.
In addition, using Iterate and Collect and Distribute control flow elements within a workflow allows for part of a workflow being run once per batch unit, while other parts are run on all the data together. This is described in Running part of a workflow multiple times.
Workflow intermediate results
Workflow intermediate results are generated during the workflow execution. These data elements are needed for use by downstream steps but are then deleted when the analysis successfully completes. While they exist, workflow intermediate results are stored in a dedicated subfolder of the folder that is selected to store outputs when the workflow is launched.
Where intermediate results are stored for jobs run on a CLC Server depends on settings on the server.
Subsections
- Workflow Result Metadata tables
- Running workflows in batch mode
- Running part of a workflow multiple times
- Specifying reference data in the launch wizard
