The Copy Number Variant Detection (Targeted) tool
To run the Copy Number Variant Detection (Targeted) tool, go to:
Tools | Resequencing Analysis (![]() ) | Variant Detection (
) | Variant Detection (![]() ) | Copy Number Variant Detection (Targeted) (
) | Copy Number Variant Detection (Targeted) (![]() )
)
Select the case read mapping and click Next.
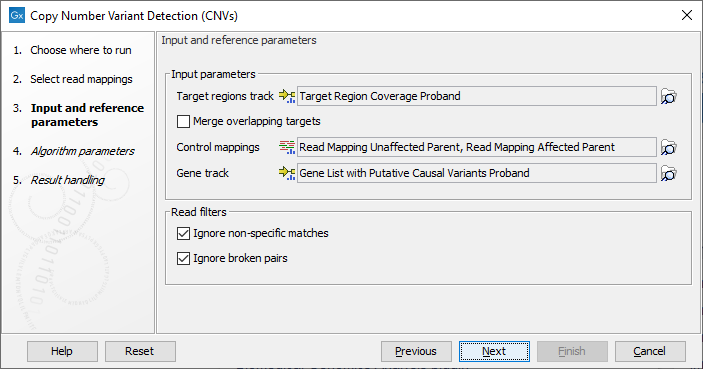
You are now presented with choices regarding the data to use in the CNV prediction method, as shown in figure 31.22.

Figure 31.22: The first step of the CNV detection tool.
- Target regions track An annotation track containing the regions targeted in the experiment must be chosen. This track must not contain overlapping regions, or regions made up of several intervals, because the algorithm is designed to operate on simple genomic regions.
- Merge overlapping targets When enabled, overlapping target regions will be merged into one larger target region by expanding the first region to include all the bases of the overlapping targets, regardless of their strandedness. CNV calls are made on this larger region of merged amplicons, considered to be of undefined strand if it originated from both + and - stranded targets.
- Controls You must specify at least one read mapping or coverage table. The controls will be used to create a baseline by the algorithm. Coverage tables can be generated using the QC for Targeted Sequencing tool, see QC for Targeted Sequencing. When using coverage tables, it is important to use the same settings for handling non-specific matches and broken pairs in this tool and in QC for Targeted Sequencing. The coverage tables must cover all positions in the target regions track. Tables covering positions outside the target regions will also work, i.e. tables generated from a set of larger regions that fully includes the target regions. For the best results, the controls should be matched with respect to the most important experimental parameters, such as gender and technology. If using non-matched controls, the CNVs reported by the algorithm may be less accurate.
- Gene track Optional: If you wish, you can provide a gene track, which will be used to produce gene-level output as well as CNV-level output.
- Ignore non-specific matches If checked, the algorithm will ignore any non-specifically mapped reads when counting the coverage in the targeted positions. Note: If you are interested in predicting CNVs in repetitive regions, this box should be unchecked.
- Ignore broken pairs If checked, the algorithm will ignore any broken paired reads when counting the coverage in the targeted positions.

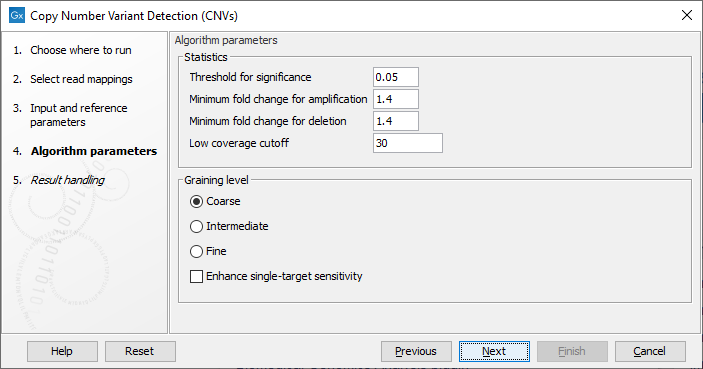
Figure 31.23: The second step of the CNV detection tool
Click Next to set the parameters related to the target-level and region-level CNV detection, as shown in as shown in figure 31.23.
- Threshold for significance P-values lower than the threshold for significance will be considered "significant". The higher you set this value, the more CNVs will be predicted.
- Minimum fold change for amplification and Minimum fold change for deletion You must specify the minimum fold changes for a CNV call for amplification and deletion.
If the absolute value of the fold change of a CNV is less than the value specified in this parameter, then the CNV will be filtered from the results, even if it is otherwise statistically significant.
For example, if a minimum fold-change of 1.5 is chosen for amplification, then the adjusted coverage of the CNV in the case sample must be 1.5 times higher than the coveage in the baseline for it to pass the filtering step.
Similarly, if a minimum fold-change of 1.5 is chosen for deletion, then the adjusted coverage of the CNV in the case sample must be 1.5 times lower than the coverage in the baseline.
If you do not want to filter on the fold-change, enter 0.0 in these fields. Also, if your sample purity is less than 100%, it is necessary to take that into account when adjusting the fold-change cutoff. This is described in more detail in How to set the fold-change cutoff when the sample purity is not 100%. Note: This value is used to filter the Region-level CNV track. The Target-level CNV track will always include full information for all targets.
- Low coverage cutoff If the average coverage of a target is below this value in the control read mappings, it will be considered "low coverage" and it will not be used to set up the statistical models, and p-values will not be calculated for it in the target-level CNV prediction.
Note: Targets with low control coverage are included when targets are binned to identify region level copy numbers. Hence the number of targets supporting a region-level CNV can be very low if some targets have low control coverage and having many targets with low control coverage should be avoided. This can be achieved by setting an appropriate low coverage cutoff or by removing targets from the target regions file that are known to have low coverage. - Graining level The graining level is used for the region-level CNV prediction. Coarser graining levels produce longer CNV calls and less noise, and the algorithm will run faster. However, smaller CNVs consisting of only a few targets may be missed at a coarser graining level.
- Coarse: prefers CNVs consisting of many targets. The algorithm is most sensitive to CNVs spanning over 10 targets. This is the recommended setting if you expect large-scale deletions or insertions, and want a minimal false positive rate.
- Intermediate: prefers CNVs consisting of an intermediate number of targets. The algorithm is most sensitive to CNVs spanning 5 or more targets. This is the recommended setting if you expect CNVs of intermediate size.
- Fine: prefers CNVs consisting of fewer targets. The algorithm is most sensitive to CNVs spanning 3 or more targets. This is the recommended setting if you want to detect CNVs that span just a few targets, but the false positive rate may be increased.
- Enhance single-target sensitivity All of the graining levels assume that a CNV spans more than one target. If you are also interested in very small CNVs that affect down to a single target in your data, check the 'Enhance single-target sensitivity' box. This will increase the sensitivity of detection of very small CNVs, and has the greatest effect in the case of the coarser graining levels. Note however that these small CNV calls are much more likely to be false positives. If this box is unchecked, only larger CNVs supported by several targets will be reported, and the false positive rate will be lower.
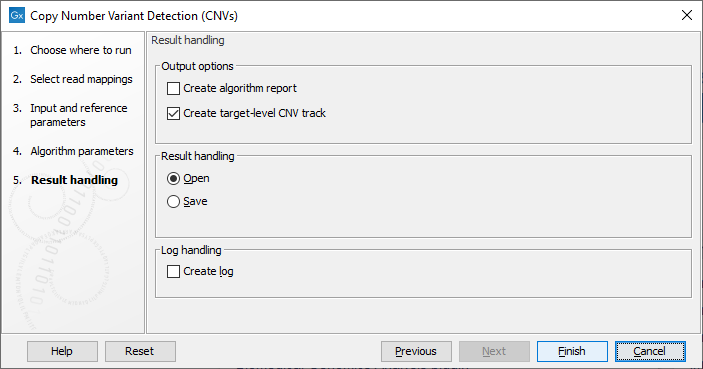
Clicking Next, you are presented with options about the results (see figure 31.24). In this step, you can choose to create an algorithm report by checking the Create algorithm report box. Furthermore, you can choose to output results for every target in your input, by checking the Create target-level CNV track box.

Figure 31.24: Specifying whether an algorithm report and a target-level CNV track should be created.
When finished with the settings, click Next to start the algorithm.
Subsections
