Circular DNA
To show a nucleotide sequence as a circular molecule:
- Select a sequence in the Navigation Area and right-click on the file name.
- Hover the mouse cursor over Show to see a list of options.
- Select Circular View (
 ).
).
Or, if the sequence is already open, click on the Show Circular View (![]() ) button found at the bottom of the view.
This will open a view of the molecule similar to the one in figure 16.4.
) button found at the bottom of the view.
This will open a view of the molecule similar to the one in figure 16.4.
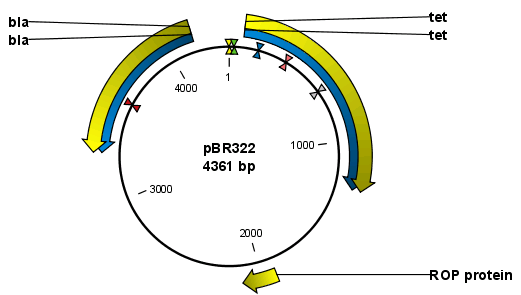
Figure 16.4: A molecule shown in a circular view.
The Circular Sequence View shares some of the properties of the linear view of sequences as described in sequence view, but there are also some differences:
- Similarities:
- The editing options.
- Options for adding, editing, and removing annotations.
- The Side Panel palettes Annotation Types, Positional stats, Find, and Text Format.
- Differences:
- You cannot zoom in to see the residues in the Circular view. If you wish to see these details, split the view with a linear view of the sequence (see details below).
- In the Side Panel palette Sequence Layout, only the following options are available in the Circular view:
- Numbers on sequences.
- Numbers on plus strand.
- Sequence label.
- In the Side Panel palette Annotation Layout:
- Under "Position", only On sequence and Next to sequence are available in the Circular view.
- Under "Label", only the No labels and Stacked options are available in the Circular view.
However, the two extra options Radial and Stacked in order are available in the Circular view.
- In the Side Panel palettes Motifs and Restriction sites:
- Under "Labels", only the No labels and Stacked options are available in the Circular view.
However, the two extra options Radial and Stacked in order are available in the Circular view.
- Under "Labels", only the No labels and Stacked options are available in the Circular view.
- The Side Panel palettes Residue coloring and Nucleotide info are not available in the Circular view.
Using split views to see details of the circular molecule
To see the nucleotides of a circular molecule you can open a new view displaying a linear view of the molecule:
- Press and hold the Ctrl key (
 on Mac).
- Click on Show Sequence (
 ) at the bottom of the view.
This will open a linear view of the sequence below the circular view. When you zoom in on the linear view you can see the residues (figure 16.5).
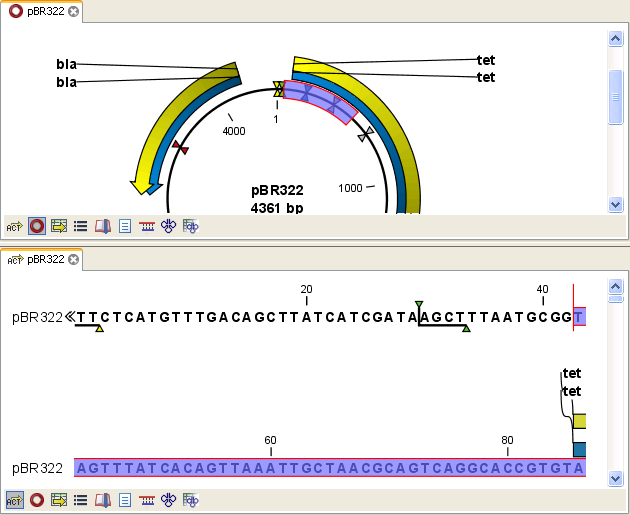
Figure 16.5: Two views showing the same sequence. The bottom view is zoomed in.
Note! If you make a selection in one of the views, the other view will also make the corresponding selection, providing an easy way for you to focus on the same region in both views.
Mark molecule as circular and specify starting point
You can mark a molecule as circular or linear by right-clicking on its name in either the Sequence view (![]() ) (
) (![]() ) or the Circular view (
) or the Circular view (![]() ). If the sequence is circular, you will see the option to Make Sequence Linear and vice versa (figure 16.5).
). If the sequence is circular, you will see the option to Make Sequence Linear and vice versa (figure 16.5).
In the Sequence view, a sequence marked as circular is indicated by the use of double angle brackets at the start and end of the sequence. The linear or circular status of a sequence can also be seen in the Locus line of the Text view (![]() ) for a Sequence (figure 16.6), or in the Linear column of the Table view (
) for a Sequence (figure 16.6), or in the Linear column of the Table view (![]() ) of a Sequence List.
) of a Sequence List.
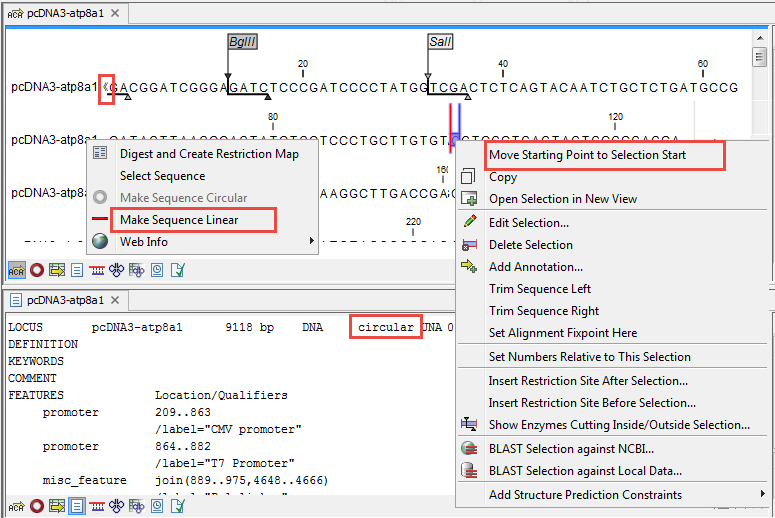
Figure 16.6: Double angle brackets mark the start and end of a circular sequence in linear view (top). The first line in the text view (bottom) contains information that the sequence is circular.
The starting point of a circular sequence can be changed by selecting the position of the new starting point and right-clicking on that selection to choose the option Move Starting Point to Selection Start (figure 16.6).