Adding elements to a workflow
Workflow elements and the connections between them define what activities will be carried out in an analysis and the flow of data through that analysis.
This section provides general information about adding and connecting workflow elements. The types of workflow elements available are described in Workflow elements.
Adding elements to a workflow
To add elements to a workflow:
- Drag tools from the Tools tab in the Toolbox panel in the bottom left side of the Workbench into the editor, or
- Use the Add to Workflow dialog (figure 15.4). This can be opened in a number of ways:
- Click on the Add to Workflow... button at the bottom of the Workflow Editor.
- Right-click on an empty area of the canvas and select the Add to Workflow... (
 ) option.
- Click on the A key.
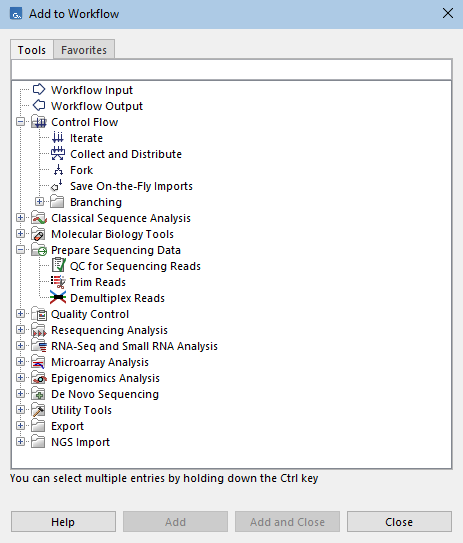
Figure 15.4: The Add to Workflow dialog can be used to add elements to a workflow. The search field near the top can be used to limit the list to just elements containing a specified term in their name or description.Select one or more elements in the dialog. Multiple elements can be selected by keeping the Ctrl key (
 on mac) depressed while making selections.
Selected elements can be added from the Add to Workflow... dialog by:
- Clicking the Add button.
- Dragging from the dialog onto the editor canvas.
- Clicking the Add and Close button, to both add the selected elements and close the dialog.
In addition, double-clicking on an item in the dialog will add it to the workflow and close the dialog.
- Use the Add to Group dialog. This is available in workflows containing one or more Groups. It has the same functionality as the Add to Workflow dialog described above, except that the elements are added as members of a Group directly. This dialog is opened by right-clicking a Group in the workflow and choosing the Add to Group option in the context menu.
- Use an option in the right-click menu over an input or output channel of a workflow element (figure 15.5). Using any of these options both adds and makes a connection to the elements added.

Figure 15.5: Connection options are available in right-click menus from input or output channels of a workflow element.- Connect Input Element (available for input channels) or Connect Output Element (available for output channels).
- Connect Control Flow Element
- Connect Element... This opens the Connect Element dialog, which is similar to the Add to Workflow dialog, but it lists only elements that a valid connection can be made to. If a valid connection could be made to more than one channel of a newly added element, you are prompted to specify the relevant one.
A search field is available at the top of dialogs for adding elements (figure 15.4). Entered in this field to limit the list of elements to only those with that term in their name or description.
Removing elements from a workflow
To delete workflow elements, select them, and then click on the Delete/Backspace key, or right-click the element name and choose Delete Selected from the context menu (figure 15.6).
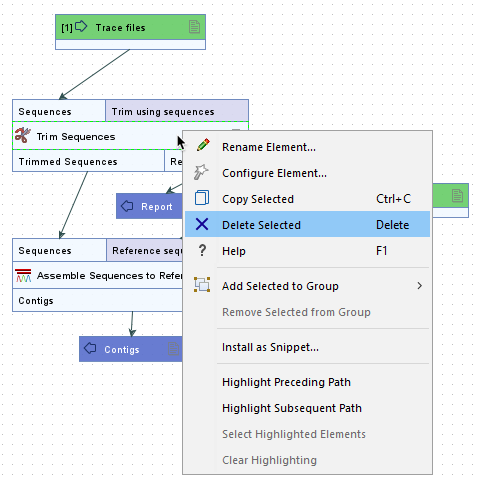
Figure 15.6: Right-click an element's name to open a context menu that includes the option Delete Selected.
If multiple elements or connections are selected, right-clicking on any of the selected items and choosing the option Delete Selected will delete all of them.
Multiple elements and connections can be selected by keeping the Ctrl key (![]() on mac) depressed, while clicking on the desired items. Alternatively, depress the left mouse key, and keeping it depressed, drag the cursor around the area containing the elements and connections to be selected.
on mac) depressed, while clicking on the desired items. Alternatively, depress the left mouse key, and keeping it depressed, drag the cursor around the area containing the elements and connections to be selected.
To select all the elements and connections in the Workflow Editor, use the Ctrl + A (![]() + A on mac) keyboard shortcut to select all elements and connections in the Workflow Editor.
+ A on mac) keyboard shortcut to select all elements and connections in the Workflow Editor.
All elements in a workflow can also be deleted using the keyboard short cut Alt + Shift + R.
If you wish to undo deletions, click on the Undo (![]() ) button in the top toolbar, or use the Ctrl + Z (
) button in the top toolbar, or use the Ctrl + Z (![]() + Z on mac) keyboard shortcut.
+ Z on mac) keyboard shortcut.