Manual cloning
Cloning steps can be done manually. For this, create a sequence list using Restriction Based Cloning and use the cloning actions provided via right-click menus. The general workflow is the same as that described in cloning workflow, but carried out manually.
Manipulate the whole sequence
Right-click the sequence label to the left to see the menu shown in figure 24.32.
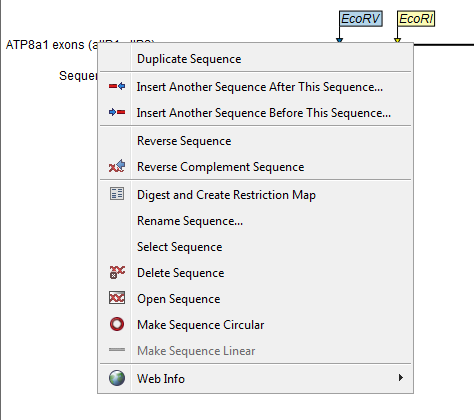
Figure 24.32: Right click on the sequence in the cloning view.
- Duplicate sequence. Adds a duplicate of the selected sequence to the sequence list accessible from the drop down menu on top of the Cloning view.
- Insert sequence after this sequence (
 ). The sequence to be inserted can be selected from the sequence list via the drop down menu on top of the Cloning view. The inserted sequence remains on the list of sequences. If the two sequences do not have blunt ends, the ends' overhangs have to match each other.
- Insert sequence before this sequence (
 ). The sequence to be inserted can be selected from the sequence list via the drop down menu on top of the Cloning view. The inserted sequence remains on the list of sequences. If the two sequences do not have blunt ends, the ends' overhangs have to match each other.
- Reverse sequence. Reverses the sequence and replaces the original sequence in the list. This is sometimes useful when working with single stranded sequences. Note that this is not the same as creating the reverse complement of a sequence.
- Reverse complement sequence (
 ). Creates the reverse complement of a sequence and replaces the original sequence in the list. This is useful if the vector and the insert sequences are not oriented the same way.
- Digest and Create Restriction Map (
 ). See Separate fragments on gel.
- Rename sequence. Renames the sequence.
- Select sequence. Selects the entire sequence.
- Delete sequence (
 ). Deletes the given sequence from the Cloning Editor.
- Open sequence (
 ). Opens the selected sequence in a normal sequence view.
- Make sequence circular (
 ). Converts a sequence from a linear to a circular form. If the sequence have matching overhangs at the ends, they will be merged together. If the sequence have incompatible overhangs, a dialog is displayed, and the sequence cannot be made circular. The circular form is represented by
  and
and  at the ends of the sequence.
- Make sequence linear (
 ). Converts a sequence from a circular to a linear form, removing the and at the ends.
Manipulate parts of the sequence
Right-click on a selected region of the sequence to see the menu shown in figure 24.33.
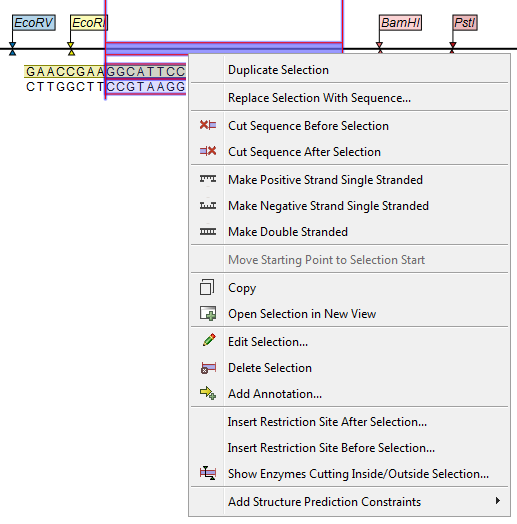
Figure 24.33: Right click on a sequence selection in the cloning view.
- Duplicate Selection. If a selection on the sequence is duplicated, the selected region will be added as a new sequence to the Cloning Editor. The new sequence name representing the length of the fragment. When double-clicking on a sequence, the region between the two closest restriction sites is automatically selected.
- Replace Selection with sequence. Replaces the selected region with a sequence selected from the drop down menu listing all sequences in the Cloning Editor.
- Cut Sequence Before Selection (
 ). Cleaves the sequence before the selection and will result in two smaller fragments.
- Cut Sequence After Selection (
 ). Cleaves the sequence after the selection and will result in two smaller fragments.
- Make Positive Strand Single Stranded (
 ). Makes the positive strand of the selected region single stranded.
- Make Negative Strand Single Stranded (
 ). Makes the negative strand of the selected region single stranded.
- Make Double Stranded (
 ). This will make the selected region double stranded.
- Move Starting Point to Selection Start. This is only active for circular sequences. It will move the starting point of the sequence to the beginning of the selection.
- Copy (
 ). Copies the selected region to the clipboard, which will enable it for use in other programs.
- Open Selection in New View (
 ). Opens the selected region in the normal sequence view.
- Edit Selection (
 ). Opens a dialog box in which is it possible to edit the selected residues.
- Delete Selection (
 ). Deletes the selected region of the sequence.
- Add Annotation (
 ). Opens the Add annotation dialog box.
- Insert Restriction Sites After/Before Selection. Shows a dialog where you can choose from a list restriction enzymes (see Insert Restriction Sites).
- Show Enzymes Cutting Inside/Outside Selection (
 ). Adds enzymes cutting this selection to the Side Panel.
- Add Structure Prediction Constraints. This is relevant for RNA secondary structure prediction:
- Force Stem Here is activated after choosing 2 regions of equal length on the sequence. It will add an annotation labeled "Forced Stem" and will force the algorithm to compute minimum free energy and structure with a stem in the selected region.
- Prohibit Stem Here is activated after choosing 2 regions of equal length on the sequence. It will add an annotation labeled "Prohibited Stem" to the sequence and will force the algorithm to compute minimum free energy and structure without a stem in the selected region.
- Prohibit From Forming Base Pairs will add an annotation labeled "No base pairs" to the sequence, and will force the algorithm to compute minimum free energy and structure without a base pair containing any residues in the selected region.
Insert one sequence into another
When you choose to insert one sequence into another, as described above, you will be presented with a dialog where all sequences in the sequence list are present (see figure 24.34).
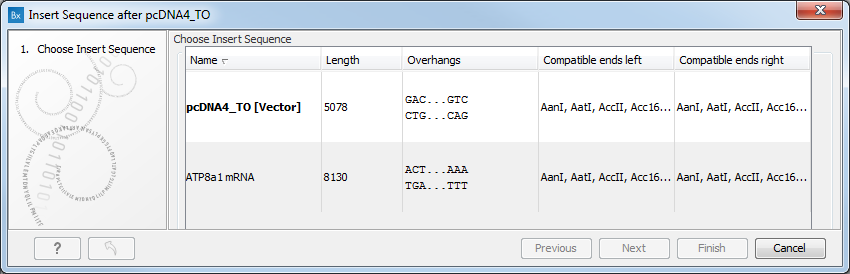
Figure 24.34: Select a sequence for insertion.
The sequence that you have chosen to insert into will be marked with bold and the text [vector] is appended to the sequence name. Note that this is completely unrelated to the vector concept in the cloning workflow.
Furthermore, the list includes the length of the fragment, an indication of the overhangs, and a list of enzymes that are compatible with this overhang (for the left and right ends, respectively). If not all the enzymes can be shown, place your mouse cursor on the enzymes, and a full list will be shown in the tool tip.
Select the sequence you wish to insert and click Next to adapt insert sequence to vector dialog (figure 24.35).
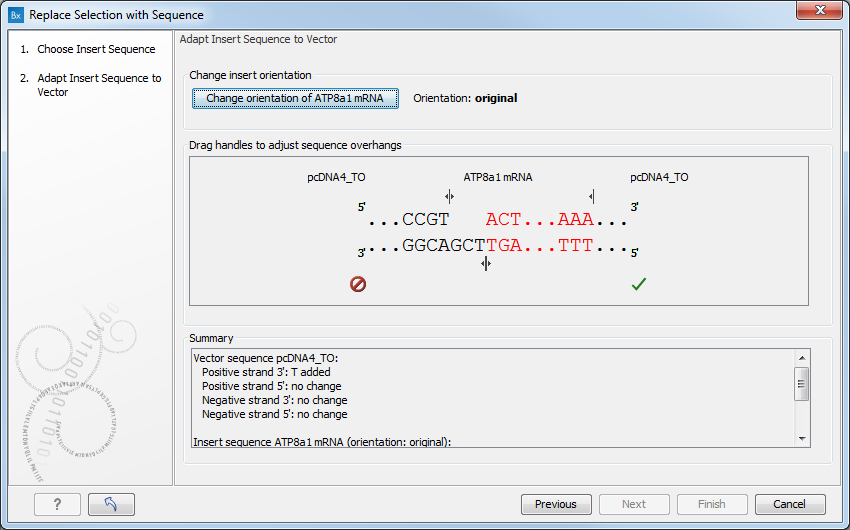
Figure 24.35: Drag the handles to adjust overhangs.
At the top is a button to reverse complement the inserted sequence.
Below is a visualization of the insertion details. The inserted sequence is at the middle shown in red, and the vector has been split at the insertion point and the ends are shown at each side of the inserted sequence.
If the overhangs of the sequence and the vector do not match (![]() ), you can blunt end or fill in the overhangs using the drag handles (
), you can blunt end or fill in the overhangs using the drag handles (![]() ) until it does (
) until it does (![]() ).
).
At the bottom of the dialog is a summary field which records all the changes made to the overhangs. This contents of the summary will also be written in the history (![]() ) of the cloning experiment.
) of the cloning experiment.
When you click Finish, the sequence is inserted and highlighted by being selected.
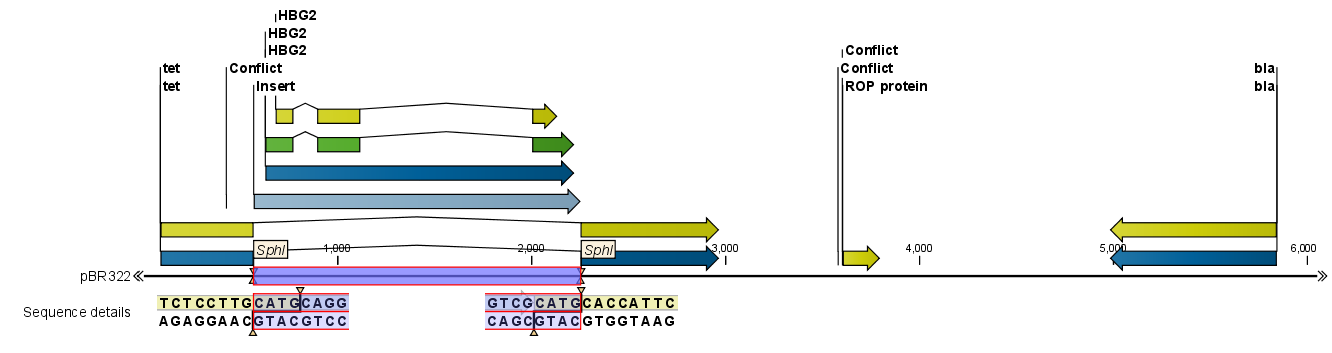
Figure 24.36: One sequence is now inserted into the cloning vector. The sequence inserted is automatically selected.