Secondary peak calling
CLC Genomics Workbench is able to detect secondary peaks - a peak within a peak - to help discover heterozygous mutations. Looking at the height of the peak below the top peak, the CLC Genomics Workbench considers all positions in a sequence, and if a peak is higher than the threshold set by the user, it will be "called".
The peak detection investigates any secondary high peaks in the same interval as the already called peaks. The peaks must have a peak shape in order to be considered (i.e. a fading signal from the previous peak will be ignored). Note! The secondary peak caller does not call and annotate secondary peaks that have already been called by the Sanger sequencing machine and denoted with an ambiguity code.
Regions that are trimmed (i.e. covered by Trim annotations) are ignored in the analysis (Trim sequences).
When a secondary peak is called, the residue is changed to an ambiguity character to reflect that two bases are possible at this position, and optionally an annotation is added at this position.
To call secondary peaks, go to:
Tools |
Molecular Biology Tools (![]() ) | Sanger Sequencing Analysis (
) | Sanger Sequencing Analysis (![]() )| Call
Secondary Peaks (
)| Call
Secondary Peaks (![]() )
)
This opens a dialog where you can add the sequences to be analyzed. If you had already selected sequence in the Navigation Area, these will be shown in the 'Selected Elements' box. However you can remove these, or add others, by using the arrows to move sequences between the Navigation Area and Selected Elements boxes.
When the sequences are selected, click Next.
This opens the dialog displayed in figure 23.21.
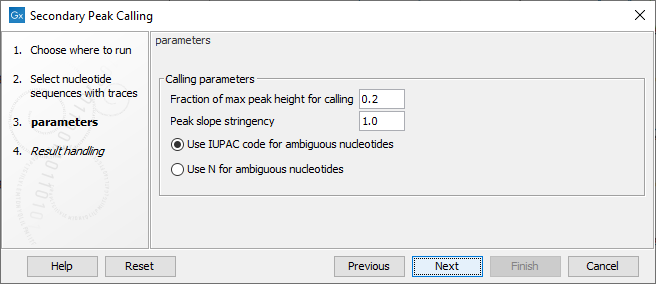
Figure 23.24: Setting parameters secondary peak calling.
The following parameters can be adjusted in the dialog:
- Fraction of max peak height for calling. Adjust this value to specify how high the secondary peak must be to be called.
- Peak slope stringency. Control how pronounced each nucleotide peak must be. Decreasing this will detect more peaks. Increasing it will detect fewer.
- Use IUPAC code / N for ambiguous nucleotides. When a secondary peak is called, the residue at this position can either be replaced by an N or by a ambiguity character based on the IUPAC codes (see the Appendix).
Clicking Next allows you to add annotations. In addition to changing the actual sequence, annotations can be added for each base that has been called. The annotations hold information about the fraction of the max peak height.
Click on Finish to launch the analysis. This will start the secondary peak calling. A detailed history entry will be added to the history specifying all the changes made to the sequence. Secondary peaks are marked in the output sequence as can be seen in figure 23.22. When the mouse is hovered over a secondary peak, Before and Peak ratio values are shown. The Before value refers to the original residue that was present in the sequence, while the Peak ratio shows the ratio between the original peak and the secondary peak signal strength values (the base associated with the secondary peak is shown in parentheses next to the peak ratio). In the case of figure 23.22, it can be seen that the original residue is G while the residue C yields a secondary peak. This then results in the ambiguity character S shown in the sequence.
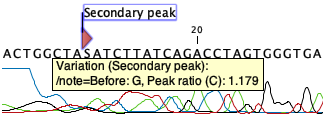
Figure 23.25: Secondary peaks are marked in the output sequence.