View Annotations in sequence views
Figure 16.14 shows an annotation displayed on a sequence.
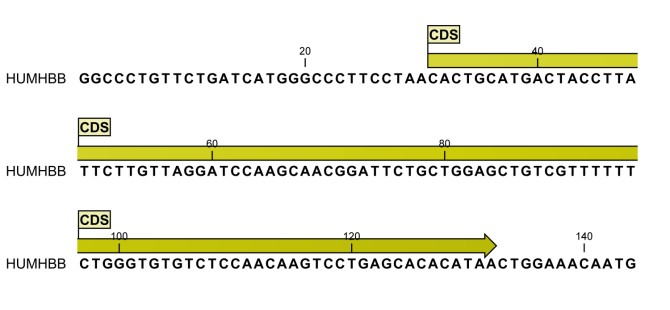
Figure 16.14: An annotation showing a coding region on a genomic DNA sequence.
The various sequence views (for sequences, sequence lists, alignments, etc.) have different default settings for showing annotations. However, they all have two palettes in the Side Panel in common (figure 16.15):
- Annotation layout
- Annotation types
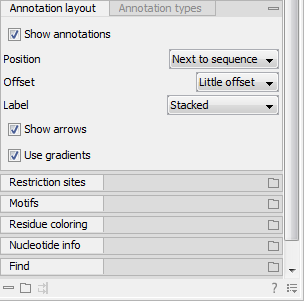
Figure 16.15: The "Annotation layout" palette in the Side Panel. The annotation types can be shown by clicking on the "Annotation types" palette.
In the Annotation layout palette, you can specify how the annotations are displayed (notice that there are some minor differences between the different sequence views):
- Show annotations. Determines whether the annotations are shown.
- Position.
- On sequence. The annotations are placed on the sequence. The residues are visible through the annotations (if you have zoomed in).
- Next to sequence. The annotations are placed above the sequence.
- Separate layer. The annotations are placed above the sequence and above any restriction sites (only applicable for nucleotide sequences).
- Offset. If several annotations cover the same part of a sequence, they can be spread out.
- Piled. The annotations are piled on top of each other. Only the annotation in front is visible.
- Almost piled. The annotations are piled on top of each other, but they are slightly offset so that parts of the annotation(s) in the background are visible.
- Least offset. The annotations are piled on top of each other, but they are offset so that most parts of the annotation(s) in the background are visible.
- Little offset. The annotations are placed above each other with a little space between.
- More offset. The annotations are placed above each other with some space between.
- Most offset. The annotations are placed above each other with a lot of space between. This can take up a lot of space on the screen.
- Label. The name of the annotation can be shown as a label. Additional information about the sequence is shown if you hover the mouse cursor over the annotation.
- No labels. No labels are displayed.
- On annotation. The labels are displayed in the annotation's box.
- Over annotation. The labels are displayed above the annotations.
- Before annotation. The labels are placed just to the left of the annotation.
- Flag. The labels are displayed as flags at the beginning of the annotation.
- Stacked. The labels are offset so that the text of all labels is visible. This means that there is varying distance between each sequence line to make room for the labels.
- Show arrows. Displays the end of the annotation as an arrow. This can be useful to see the orientation of the annotation (for nucleotide sequences). Annotations on the negative strand will have an arrow pointing to the left.
- Use gradients. Fills the boxes with gradient color.
In the Annotation types palette, you can choose which kinds of annotations that should be displayed:
- Annotation types lists all the types of annotations that are attached to the sequence(s) in the view. For sequences with many annotations, it can be easier to get an overview if you deselect the annotation types that are not relevant.
- Unchecking the checkboxes in Annotation types will not remove those types of annotations from the sequence - it will just hide them from the view.
- The color of each annotation type can be changed by clicking the colored square next to the relevant annotation type. This will display a dialog with five tabs: Swatches, HSV, HSI, RGB, and CMYK. They represent five different ways of specifying colors. Apply your settings and click on OK. Note that the Reset function only works for changes made before pressing OK.
- In the right-hand side, it is possible to easily browse the annotations of a given type by clicking on the arrow to jump between annotations, and the small button (
 ) next to the arrow to display a list of the annotations of that type (figure 16.16).
Clicking an annotation in the list will select this region on the sequence. In this way, you can quickly find a specific annotation on a long sequence.
) next to the arrow to display a list of the annotations of that type (figure 16.16).
Clicking an annotation in the list will select this region on the sequence. In this way, you can quickly find a specific annotation on a long sequence.
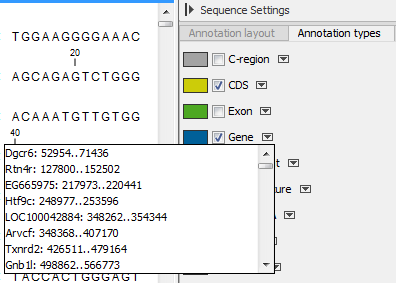
Figure 16.16: Browsing the CDS annotations on a sequence.
Note! A waved end on an annotation (figure 16.17) means that the annotation is torn, i.e., it extends beyond the sequence displayed. An annotation can be torn when a new, smaller sequence has been created from a larger sequence. A common example of this situation is when you select a section of a stand-alone sequence and open it in a new view. If there are annotations present within this selected region that extend beyond the selection, then the selected sequence shown in the new view will exhibit torn annotations.
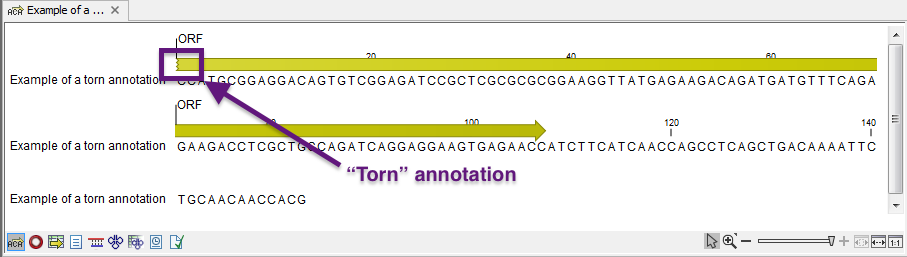
Figure 16.17: Example of a torn annotation at the beginning of a sequence.