Configuring input and output elements
Configuring Workflow Input elements
Workflow Input elements are the main element type for bringing data into a workflow. At least one such element must be present in a workflow. By default, when a workflow is launched, the workflow wizard will prompt for data to be selected from the Navigation Area, or for data files to be imported on-the-fly using any compatible importer.
Workflow Input elements support the input of CLC format data, raw NGS data formats, such as fastq and fasta format files, and some other formats. When launching the workflow, data outside CLC locations is selected by choosing the "Select files for import" option. Doing this is referred to as on-the-fly import.
Like other workflow elements, Input elements can be configured to restrict the options available for configuration when launching the workflow. See Basic configuration of workflow elements for more on locking and unlocking element options.
Configuring import options
Selection of input data from the Navigation Area (already imported data) or import of raw data using on-the-fly import can be enabled or disabled in Input elements. (figure 14.39).
When on-the-fly import is enabled, you can choose whether to limit the importers available when the workflow is launched, and you can configure settings for importers that are selected. On-the-fly import options are:
- Allow any compatible importer All compatible importers will be available when launching the workflow and all the options for each importer will be configurable.
- Allow selected importers When selected, one or more importers can be specified as the ones to be available when launching the workflow. Options for each selected importer can be configured by clicking on the Configure Parameters button.
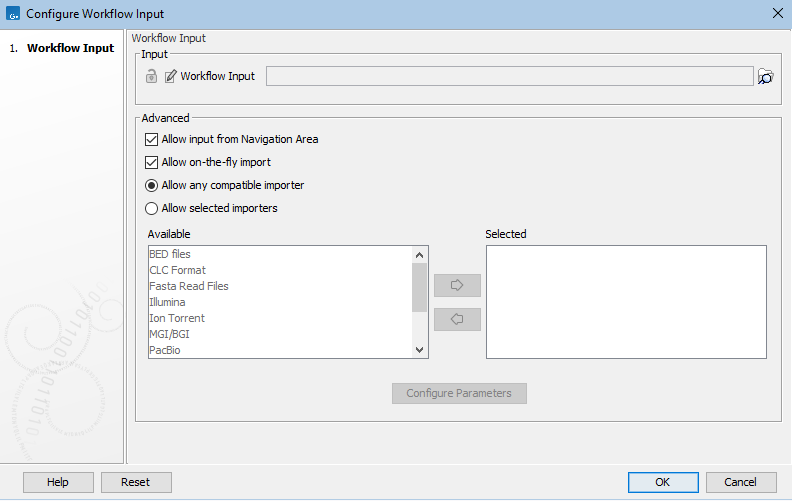
Figure 14.39: Workflow Input elements can be configured to limit where data can be selected from and what importers can be used for on-the-fly import.
Where reference data is needed as input to a tool, it can be configured directly in the relevant input channel, or an Input element can be connected to that input channel. Reference data can be preconfigured in a workflow element, so that when launching the workflow, that data is used by default.
Further details about reference data and workflows
Input channels where reference data is expected can have a data element explicitly selected or a "workflow role" can be specified (figure 14.40).
Specifying a workflow role can be useful in workflows requiring various reference data elements (e.g. a reference sequence, annotation tracks, variant tracks, etc.) and where that workflow will be run using different sets of reference data. Workflow roles prevent the need to explicitly specify each reference data element when launching the workflow using different reference data from the previous run. Workflow roles are used in combination with Reference Data Sets, which are managed using the Reference Data Manager (Reference Data Manager).
In a Reference Data Set, a workflow role is defined for each element in that Set (QIAGEN Sets). A workflow role can be assigned to each element of your own data imported to the Reference Data Manager, (Custom Sets).
You can specify both a reference data element and a role for a given input:
- Doing this for a single element means that the Reference Data Set that the data element is a member of will be selected as the default Reference Data Set when launching the workflow.
- Doing this for all reference data inputs allows you to choose between using the specified "default" data elements or using a Reference Set, with the workflow roles defining the data to use (figure 14.41).
- Doing this for some, but not all inputs, where inputs are locked, means that the selected data elements only serve to indicate a default Reference Set. You will not have the option to launch the workflow using the default data elements.
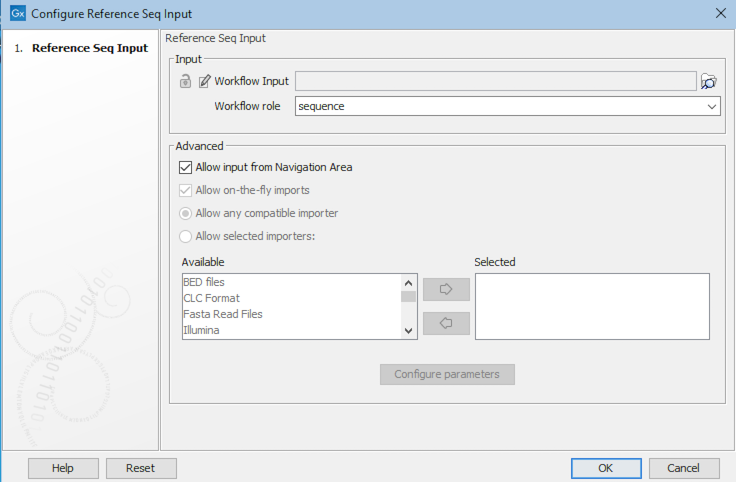
Figure 14.40: A workflow role has been configured in this workflow Input element. When launching this workflow, a Reference Data Set would be prompted for by the wizard. The data element with the specified role in that Reference Data Set would then be used as input.
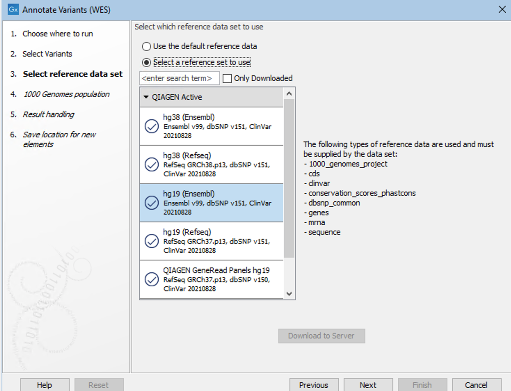
Figure 14.41: When one or more workflow elements has been configured with a workflow role, you are prompted to select a Reference Set. The elements from that set with the relevent roles are used in the analysis. Here, the option to use default reference data - i.e. the specified elements, is also available. This reflects the fact that this workflow has at least one workflow element configured with both a workflow role and a data element, and there are no locked inputs relying only on a workflow role.
On-the-fly import versus using workflow elements for specific importers
For importing data as the first step of a workflow, on-the-fly importer, as described above, is the most flexible and commonly used option. However, workflow input elements for specific NGS importers are also available.
Examples using each of these options are shown in figure 14.42. How these translate when launching the workflow is shown in figure 14.43. The relative merits of each option are outlined in table 14.1.
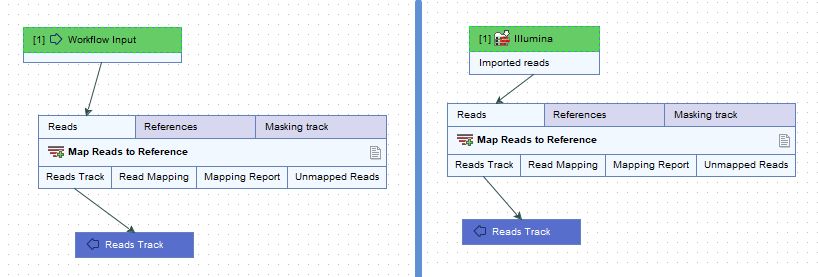
Figure 14.42: Raw data can imported as part of a workflow run in 2 ways. Left: Include an Input element. and use on-the-fly import. Right: Use a specific Import element. Here, the Illumina import element was included.
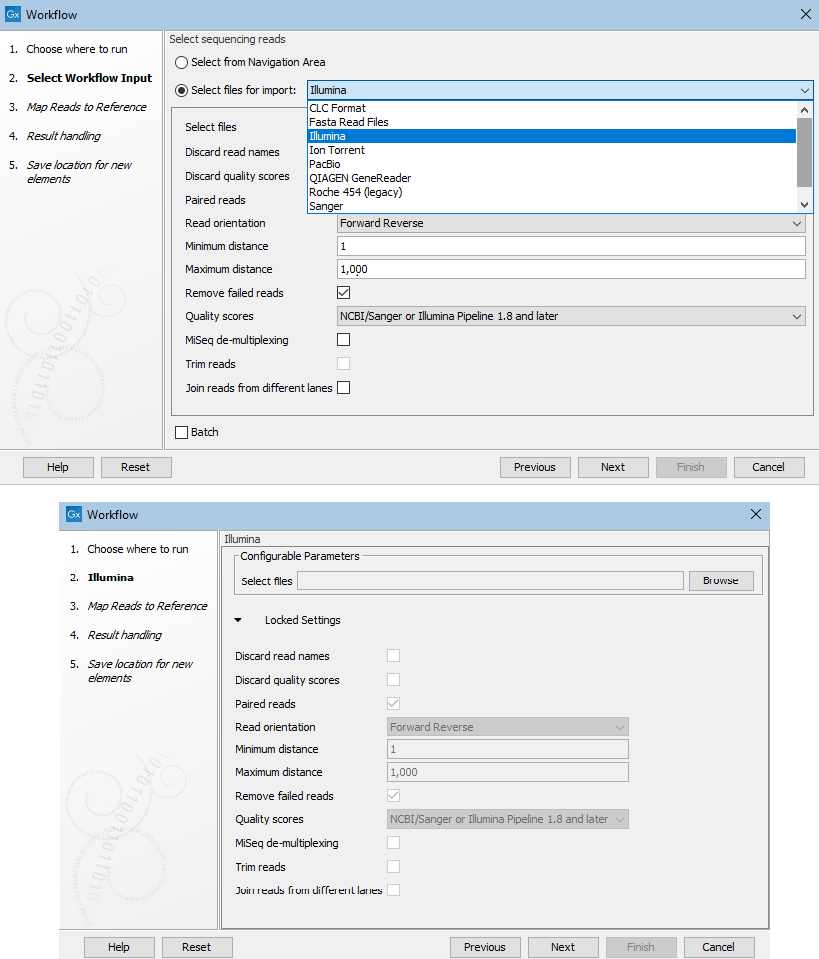
Figure 14.43: Top: Launching a workflow with an Input element and choosing to select files to import on-the-fly. Bottom: Launching a workfow with a dedicated import element, in this case, an Illumina import element.
|
Notes:
- Modified copies of imported data elements can be saved, no matter which of the import routes is chosen. For example, an Output element attached to a downstream Trim Reads element would result in Sequence Lists containing trimmed reads being saved.
- The use of Iterate elements to run all or part of a workflow in batches is described in Running part of a workflow multiple times.
- Configuration options for NGS importers are described in Import high-throughput sequencing data14.1.
Configuring Workflow Output and Export elements
|
Results generated by a workflow are only saved if the relevant output channel of a workflow element is connected to a Workflow Output element or an Export element. Data sent to output channels without an Output or Export element attached are not saved.
Terminal workflow elements with output channels must have at least one Workflow Output element or Export element connected. |
Configuring custom names for workflow results
The names to assign to outputs and exported files from workflows can be configured to include specific text as well as information taken from a workflow run, for example, the names of inputs to the analysis, dates and times the results were generated, etc.
To configure the naming pattern for a Output or Export workflow element, double-click on it, or right-click on it and then select the option Configure... from the menu. The naming pattern in Output elements is defined in the Custom output name field (figure 14.44). In Export elements, it is defined in the Custom file name field.
Hover the mouse cursor over the configuration field to reveal a tooltip containing a list of available placeholders (figure 14.45). Placeholders are terms within curly brackets used to indicate that particular information from a workflow run should be included in the output name or exported file name. Terms in placeholders are not case specific.
Note: Placeholders used by export tools run directly (not via a workflow) are described in Specifying export file names using export tools. Other settings relating to export, relevant both for exports run directly or in a workflow context, are described in Export tool parameters.
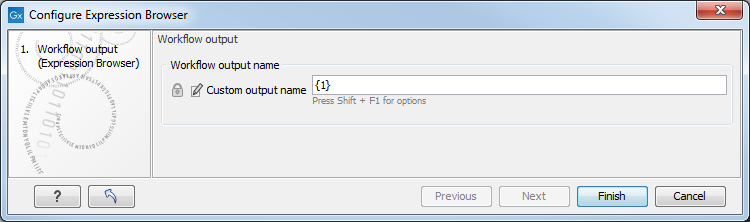
Figure 14.44: Defining the name to assign to an output from a workflow. The default naming pattern for Output elements uses the placeholder {1}, which is a synonym for the placeholder {name}.
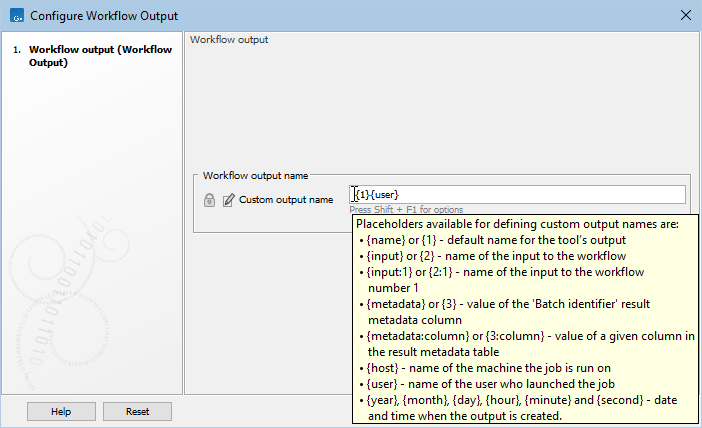
Figure 14.45: Hover the mouse cursor over the field where a custom name can be configured to reveal a tooltip with a list of available placeholders.
Placeholders available for Output and Export workflow elements are:
- {name} or {1} The default name for that output from that tool, i.e. the name that would be used if the tool was run outside a workflow context.
- {input} or {2} The name of the primary workflow input(s) for the path of the workflow being traversed.
"Primary workflow input" generally refers to the data being analyzed, i.e. inputs expecting sample data, as opposed to inputs expecting reference data.
For a workflow with multiple primary inputs to an arm of the workflow, {input}, or its equivalent {2}, would result in the name of each of these primary inputs being included in the names of the outputs from that workflow arm (figure 14.46).
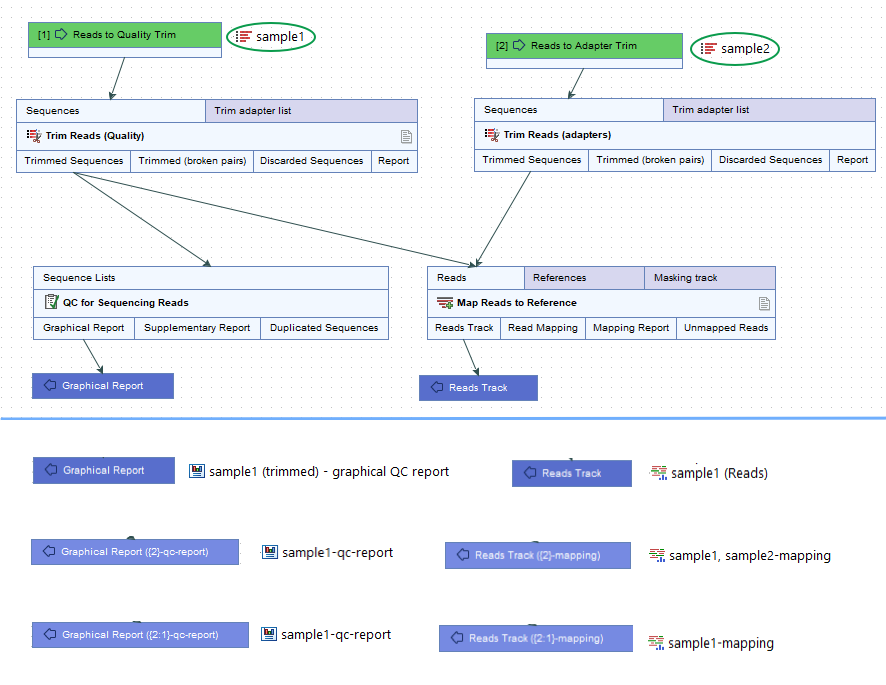
Figure 14.46: Top: A contrived workflow with two primary inputs (green boxes). The QC for Sequencing Reads step receives data only from the first input, "Reads to Quality Trim". The Map Reads to Reference step receives data originating from both primary inputs. Bottom: The effect of different naming patterns on result names when a sequence list called "sample1" was supplied for the first input and a sequence list called "sample2" was supplied for second input. The first row shows the Output elements and results using the default naming pattern, {1}. The middle row shows the Output elements and results when the naming pattern included the placeholder {2}, and the last row shows them when the naming pattern included the placeholder {2:1}. - {input:N} or {2:N} The name of the Nth input to the workflow. E.g. {2:1} specifies the first input to the workflow, while {2:2} specifies the second input (figure 14.46).
Unlike the general form described above, i.e.{input} or {2}, reference data inputs can be included in names using this placeholder form (figure 14.47).
For a workflow with only one primary input, {input} or {2} is equivalent to the more specific form {input:1} or {2:1}.
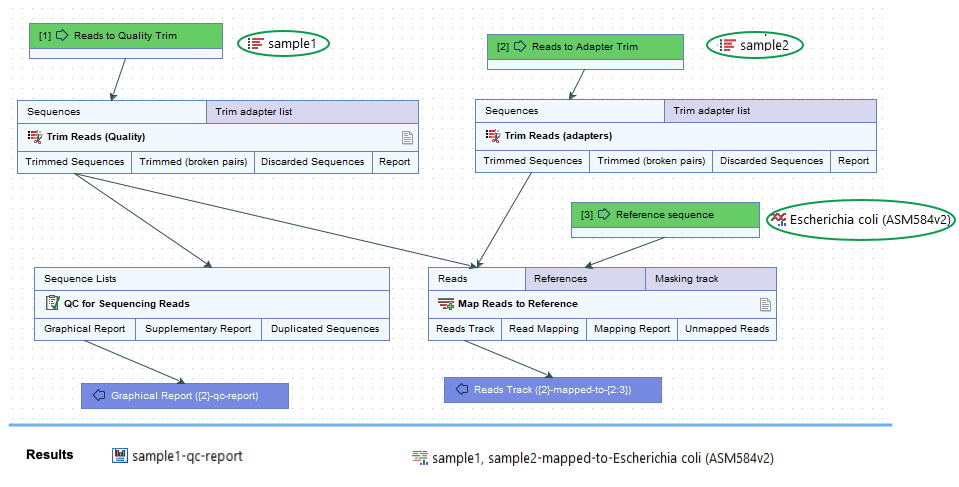
Figure 14.47: Top: A contrived workflow with two primary inputs and a reference data input (green boxes). Bottom: The names of the results generated in a given workflow run. The naming pattern for the Reads Track output includes {2}, which adds the names of all primary inputs to that analysis step, (sample1, sample2), and {2:3}, which adds the name of the third input, whatever the role that input has. In this case, it is a reference data input and an element called Escherichia coli (ASM584v2) was supplied .For workflows containing control flow elements, the specific placeholder form,
{2:N}, is recommended.See Ordering inputs for information about workflow input ordering, and Batching part of a workflow for information about control flow elements.
- {metadata} or {3} The batch unit identifier for workflows executed in batch mode. Depending on how the workflow was configured at launch, this value may be obtained from metadata. For workflows not executed in batch mode or without Iterate elements, the value will be identical to that substituted using {input} or {2}.
Note: For workflows containing control flow elements, the more specific form of placeholder, i.e. the
metadata:columnnameor{3:columnname}form, described below, is recommended. - {metadata:columnname} or {3:columnname} The value for the batch unit in the column named "columnname" of the metadata selected when launching the workflow. Pertinent for workflows executed in batch mode or workflows that contain Iterate elements. If a column of this name is not found, or a metadata table was not provided when launching the workflow, then the value will be identical to that substituted using {input} or {2}.
- {user} The username of the person who launched the job
- {host} The name of the machine the job is run on
- {year}, {month}, {day}, {hour}, {minute}, and {second} Timestamp information based on the time an output is created. Using these placeholders, items generated by a workflow at different times can have different file names.
In addition to the placeholders above, the placeholder {extension} is available for exported file names. This is replaced by the default file extension for the exported file's format, e.g. .pdf, .txt.
Saving results to subfolders
Workflow outputs and exported files can be saved into subfolders by adding a forward slash / at the start of the custom name definition.
For example, with an Output element configured with /variants/{name}, the resulting output would be saved to a subfolder called variants, placed within the folder selected for outputs when the workflow is launched. If a specified subfolder does not already exist, it is created when the outputs are saved.
When defining subfolders for outputs or exported files, terms between all forward slash characters are interpreted as subfolders. For example, a name like /variants/level2/level3/myoutput would put the data item called myoutput into a folder called level3 within a folder called level2, which itself is inside a folder called variants. The variants folder would be placed under the location selected for storing the workflow outputs.
Temporary, intermediate workflow results
During a workflow run, temporary, intermediate results may be generated, including for output channels that aren't connected to an Output or Export element.
Such intermediate results are normally deleted automatically after the workflow run completes. If a problem arises such that the workflow does not complete normally, intermediate results may not be deleted and will be in a folder named after the workflow with the word "intermediate" in its name.
Footnotes
- ...sec:importNGS14.1
- Paired read handling for workflows launched in batch mode, or workflows with Iterate elements, is the same as for the importer tools themselves: If the Paired option is checked, files are handled as described in the manual section on NGS importers. In CLC Genomics Workbench21.x, this was also the case in most circumstances. However, if batch units were based on data organization and all files were in the same folder, each file was treated as a separate batch unit irrespective of whether the Paired option was checked.