Filling in values
When a set of attributes has been created (as shown in 3.10), the end users can start filling in information.

Figure 3.10: A set of attributes defined in the attribute manager.
This is done in the element info view:
right-click a sequence or another element in the Navigation Area | Show
(![]() ) | Element info
(
) | Element info
(![]() )
)
This will open a view similar to the one shown in figure 3.11.

Figure 3.11: Adding values to the attributes.
You can now enter the appropriate information and Save. When you have saved the information, you will be able to search for it. Note that the sequence needs to be saved in the data location before you can edit the attribute values.
When nobody has entered information, the attribute will have a "Not set" written in red next to the attribute (see figure 3.12).
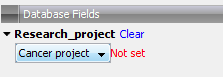
Figure 3.12: An attribute which has not been set.
This is particularly useful for attribute types like checkboxes and lists where you cannot tell from the displayed value if it has been set or not. Note that when an attribute has not been set, you can't search for it, even if it looks like it has a value. In figure 3.12, you will not be able to find this sequence if you search for research projects with the value "Cancer project", because it has not been set. To set it, simply click in the list and you will see the red "Not set" disappear.
If you wish to reset the information that has been entered for an attribute, press "Clear" (written in blue next to the attribute). That will return it to the "Not set" state.
The Folder editor provides quick way of changing the attributes of many elements in one go (see Show folder elements in a table).
Subsections