Create Report from Table
The Create Report from Table tool allows any element that can be exported to "Tab delimited text" to be turned into a report with a single table.
Many element types are accepted as input, including:
- variant track (
 )
)
- annotation track (
 )
)
- expression track (
 )
)
- statistical comparison track (
 )
)
Note that tables with many rows will create very long reports. Consider filtering tables first using tools such as Filter on Custom Criteria, Filter Based on Overlap, Filter Against Known Variants, etc. Tables can also be filtered manually when in a table view, see https://resources.qiagenbioinformatics.com/manuals/clcgenomicsworkbench/current/index.php?manual=Filtering_tables.html.
To run Create Report from Table, go to:
Toolbox | Utility Tools (![]() ) | Reports (
) | Reports (![]() ) | Create Report from Table (
) | Create Report from Table (![]() )
)
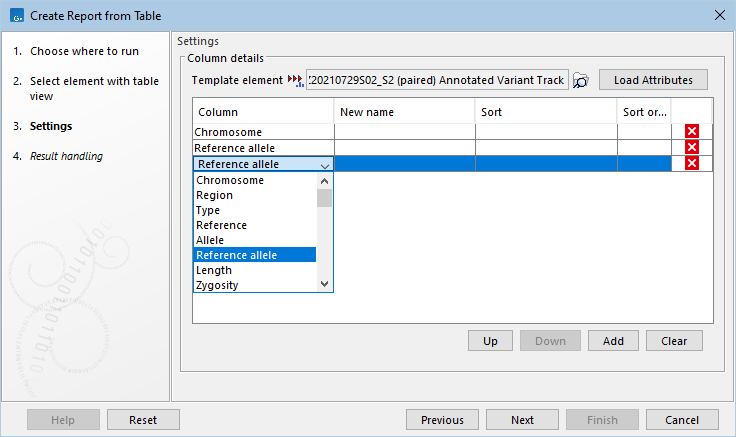
After selecting the input element, the columns to include in the report must be defined. Column definitions consist of four parts:
- Column. The original name of the column in the table.
- New name. The name this column should have in the report. Shorter names are often preferred in reports, because PDF exports have limited width. If the name is left blank, the column will not be renamed.
- Sort. Whether the column in the table should be sorted in ascending or descending order. When left blank, the sorting will match that of the input table.
- Sort order. The order in which sorting should be applied (only relevant when sorting on multiple columns). Sorting is applied to columns in order from smallest to largest sort order i.e., column with sort order 1 is sorted on before column with sort order 2, and so on. It is not possible to manually enter a sort order. Instead the order is populated automatically according to the order in which columns are chosen for sorting. To change an existing sort order, toggle sorting of the affected columns off and on, such that they receive new sort orders.

Figure 19.1: Define the columns to be included in the report.
To make defining columns easier, the Load Attributes button can be used to populate a dropdown list of the columns found in the element selected in the Template element field (figure 19.1). By default, the tool's input is preselected. Use the browse (![]() ) button to select a different element.
) button to select a different element.
If a template element is not used for populating a dropdown list, columns can be entered by typing directly in the Column field.
The Add button adds additional columns while pressing the X (![]() ) button to the right of a column removes it. It is possible to reorder columns using the Up and Down buttons. The Clear button removes all defined columns.
) button to the right of a column removes it. It is possible to reorder columns using the Up and Down buttons. The Clear button removes all defined columns.
If a column is defined that is not present in the input element, then an empty column with that name will be placed in the report.
Sample and combined reports
The report from this tool can be used in Create Sample Report. The name of the section in the sample report can be customized by running the Modify Report Type tool (https://resources.qiagenbioinformatics.com/manuals/clcgenomicsworkbench/current/index.php?manual=Modify_Report_Type.html) prior to running Create Sample Report.
Report sections from this tool cannot be used in Combine Reports, because the contents of the tables may be specific to each sample (an example would be variants found in each sample, where one of the selected table columns is the allele frequency).
