
Configuring and checking online licensing
The information and files necessary for configuring online licensing are generated using the QIAGEN Digital Insights Admin Tool (QDIAT) and the QIAGEN Digital Insights OAuth2 Server, and then entered into the CLC Server web client.
Obtaining the information needed for online licensing
Three elements are needed for configuring online licensing: a server key, a client ID and a private key. To obtain these:
- Log into QDIAT as a user with the Administrator role in the QDI licensing group for the CLC Server.
- Open the CLC Genomics Server page by clicking on the CLC Genomics Server heading at the top of the page.
- Generate the server key. Click the icon of a key in the Server Key column to generate (or regenerate) the server key (figure 2.4). The base CLC Server license is the only one that has icons in the Server Key column.
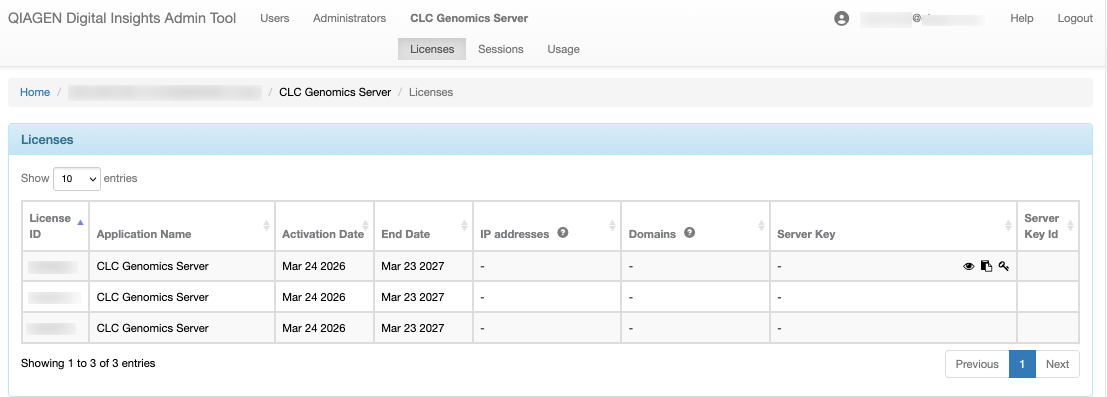
Figure 2.4: The Licenses table under the Licensing tab is available after clicking the CLC Genomics Server heading at the top of the page. In the Server Key field for the CLC Server base license are three clickable icons used for viewing, copying and generating the server key.Rows for the "CLC Genomics Server" application that do not have icons in the Server key field relate to licensing of premium server extensions and execution nodes. Separate licensing actions are not needed for these.
- Copy the server key. This can be done at this point, or later, when entering licensing details into the CLC Server web client.
- Generate the client id and public/private key pair. Follow the link to setting up OAuth credentials provided in the instructions in the Server configuration section just below the Licensing table in QDIAT.
Important: The private key generated will be available only immediately after creation. It is not stored by QIAGEN and cannot be retrieved again later. If it is lost, and new key pair will need to be generated.
- Save the private key and copy the client ID. If prompted, confirm that the private key has been saved securely.
The client ID can be copied from the the dialog that supports download of the private key, or it can be copied later from the QIAGEN Digital Insights OAuth2 Server.
For further details about working with QDIAT, please refer to the QDIAT manual.
Configure online licensing in the CLC Server
- Log into the CLC Server web client as an administrative user.
- Navigate to:
Management (
 ) | Licensing (
 )
)
- Expand the Online licensing section (figure 2.5).
- Click Enter Client ID..., enter the client id in the "QiaOAuth Client ID" field, and click Save.
- Click Enter Server Key..., enter the server key that was copied from QDIAT, and click Save.
- Click Add Private Key..., select the private key file, and click Open.
Note: the private key is stored as encrypted information.
- Expand the Licensing mechanism section, select "Use online licensing" and click Save (figure 2.5).
- Restart the CLC Server to have changes to the licensing configuration take effect.
Note: The CLC Server needs to be restarted after any changes relating to licensing are made, including changes to the licenses available from QDI Licensing.
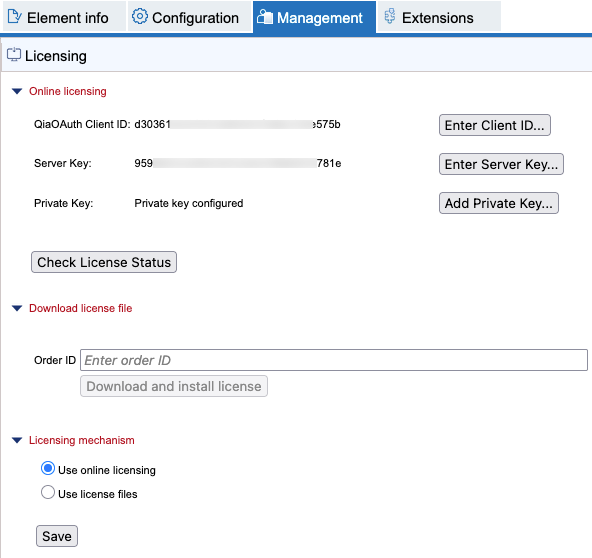
Figure 2.5: Online licensing configured and being used by the CLC Server.
Checking the license status
Click the Check License Status button at the bottom of the "Online licensing" section (figure 2.5) to get information about the license(s) available from the QDI Licensing Service for this CLC Server.
Communication with the QDI Licensing Service
When using online licensing, a single server or master node connnects periodically to the QDI Licensing Service to start or renew the license session. Connections to the QDI Licensing Service (*.ingenuity.com) must thus be allowed.
Normally, the certificate chain returned will be signed by a trusted root certificate and the connection to the service will succeed.
Note that if man-in-the-middle software, for example software for package inspection or reverse proxy, is present and the certificate or certificate chain presented is not trusted by the CLC Server, the connection will fail. Two possible approaches to address this are:
- Whitelist the addresses for the QDI Licensing Service (
*.ingenuity.com) and do not let the man-in-the-middle software act on whitelisted addresses.OR
- Add the relevant certificates, signed by an internal CA or self-signed, to the truststore for the CLC Server, which is located under the the single server or master node installation folder at
jre/lib/security/cacerts.The Java keytool shipped with the CLC Server can be used to add a certificate to the truststore, using a command of this form:
		CLC_SERVER_BASE/jre/bin/keytool -import -alias \
		CERTALIAS -file CERTIFICATE.cer -keystore \
		CLC_SERVER_BASE/jre/lib/security/cacerts -storepass changeit
In the command above, replace the generic information with information relevant for your setup. Specifically:
- Replace CLC_SERVER_BASE with the path to the CLC Server installation directory.
- Replace CERTALIAS with the a certificate alias.
- Replace CERTIFICATE with the path to the certificate.
- Replace changeit with the password for the truststore. ("changeit" is the default password.)
Important:
- When the CLC Server is updated or the software is re-installed, all imported certificates will be removed, and must be imported again.
- Certificates have an expiration date. A new certificate should be added in advance of that date.