Example: Kraken2 (containerized external application)
In this section, a containerized external application for Kraken2 is described. This example illustrates the use of a publicly available Docker image in combination with an "Included script", as well as how reference databases, in this case, the pre-built Kraken 2/Bracken databases from https://benlangmead.github.io/aws-indexes/k2, can be accessed from an external application.
More information about the Kraken2 taxonomic sequence classifier can be found at
https://github.com/DerrickWood/kraken2/wiki.
Using this external application, users select a single-end, nucleotide sequence list and a public Kraken2 database to use in the analysis. The outputs include a Kraken2 report, a file containing other classification information, sequences lists for classified and unclassified sequences, and a Docker log. See Extending the Kraken2 external application for paired data for information about extending this external application configuration to create one able to handle paired sequences.
All activity takes place in a Docker container. No local installation of scripts or reference databases is done for this example.
Defining the Kraken2 command line and configuring the parameters
A command line and general configuration of a Kraken2 external application are shown in figure 16.30.
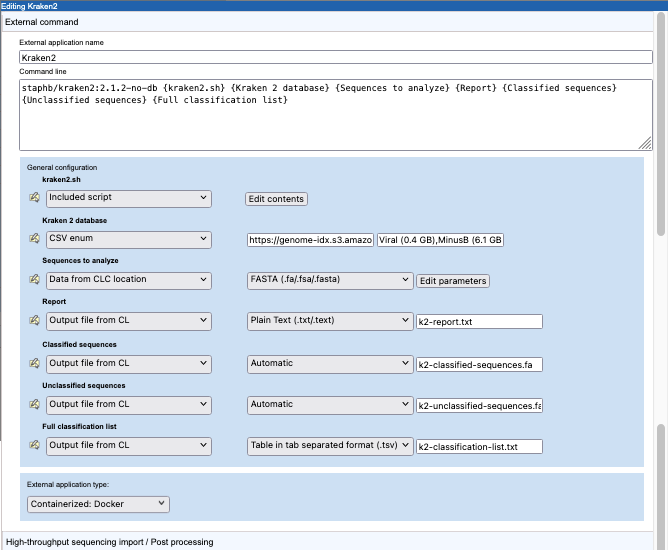
Figure 16.30: Configuration a containerized external application for Kraken2.
The external application type is set to "Containerized: Docker". Thus, the information in the "Command line" field will be appended to the command specified in the Containerized execution environment settings for the CLC Server. The Docker image from GitHub staphb/kraken2:2.1.2-no-db is the Kraken2 2.1.1 (no db) image . Further details about this can be found at https://hub.docker.com/r/staphb/kraken2.
The parameters in curly brackets in the command line are substituted at run time, either with values specified by the user or values specified in the configuration. Here, this includes an "Included script", which contains commands run within the container, and parameters relating to the input data, results and Docker logging information.
Further details about parameters with values substituted at run time:
- kraken2.sh Configured as an "Included script". The script is executed in the Docker container.
Script contents are entered by clicking on the Edit contents button in the General configuration area.
Key activities defined in this script include downloading and unpacking the relevant Kraken2 database, as specified by the user when launching the application, and running the Kraken2 program (figure 16.32). Other steps include reading in information provided by other variables in the command line, and ensuring that results are written to the location expected by the CLC Server so that the results can be successfully imported.
Note the lines starting with the copy command
cpat the end of the script: it is here that the outputs from Kraken2 are copied to the location expected by the external application. We determined the relevant directory earlier (OUTPUT_DIR=`dirname "$OUT_REPORT"`) and set up a variable per output file in the commands under# Expected resultfiles to be written. Note that this means the filenames specified in the Kraken2 command (e.g.k2-classified.txt) are not relevant in the long term.In this script, the database file is downloaded using
wgetand an https URL configured in the Kraken 2 database parameter, described below. Later in this section we describe other options that can be considered for using external files. - Kraken 2 database Configured as a "CSV enum" parameter type. A comma separated list of public URLs for Kraken2 databases is entered in the first field, and a corresponding comma separate list of names for those databases, which is what is presented to users, is entered in the second field. The user specifies one of these databases when launching the application. How this looks in a CLC Workbench is shown in figure 16.33.
- Sequences to analyze The Kraken2 command in the
kraken2.shscript expects a single FASTA file. Thus, in the "Sequences to analyze" configuration, we specify that data will be selected from a CLC location, and exported to FASTA format.By default, the FASTA exporter creates one file for each sequence list. This is alright if users will only ever select one sequence list as input. However, to account for users selecting multiple sequence lists for a single Kraken2 analysis, the export settings should be adjusted (figure 16.31).

Figure 16.31: The FASTA export option "Output as single file" has been enabled. If 2 or more sequence lists are selected as input, they will be exported to a single file, which is then used by the Kraken2 command.Note: To run a Kraken2 analysis for each sequence list individually, create a workflow containing a Kraken2 external application element and then run that workflow in batch mode. Running workflows in batch mode is described at https://resources.qiagenbioinformatics.com/manuals/clcgenomicsworkbench/current/index.php?manual=Running_workflows_in_batch_mode.html.
The remaining 4 parameters, described below, are configured with the type Output from CL. This is used for outputs generated by the application. How each output should be handled is part of the configuration. This can include configuring import, some types of post-processing as well as choosing not to do anything with that output. In this example, we choose to import each of the 4 outputs created by the kraken2 command line in the kraken2.sh script.
- Kraken2 Report By specifying "Plain Text (.txt/.text)", we indicate that the file should be imported as text. This will be viewable in a CLC Workbench, but there is no scope for interaction with the contents.
- Classified sequences and Unclassified sequences The handling is set to "Automatic", meaning the standard importer should be used, and it should automatically detect the relevant importer to use. Kraken2 outputs these sequences in FASTA format. The output file names specified in the configuration use the suffix
.fa, which is one of the accepted suffixes for FASTA files. (See https://resources.qiagenbioinformatics.com/manuals/clcgenomicsworkbench/current/index.php?manual=Standard_import.html.) - Full classification list The format of the file is explicitly configured to ensure that the tab delimited text output by Kraken2 is imported as a table. To import the file as a table, a header line is needed. The output from Kraken2 doesn't include a header line, so this is added using a command in the kraken2.sh script. Once imported, standard functionality for working with tables can be used. (See https://resources.qiagenbioinformatics.com/manuals/clcgenomicsworkbench/current/index.php?manual=Working_with_tables.html.)
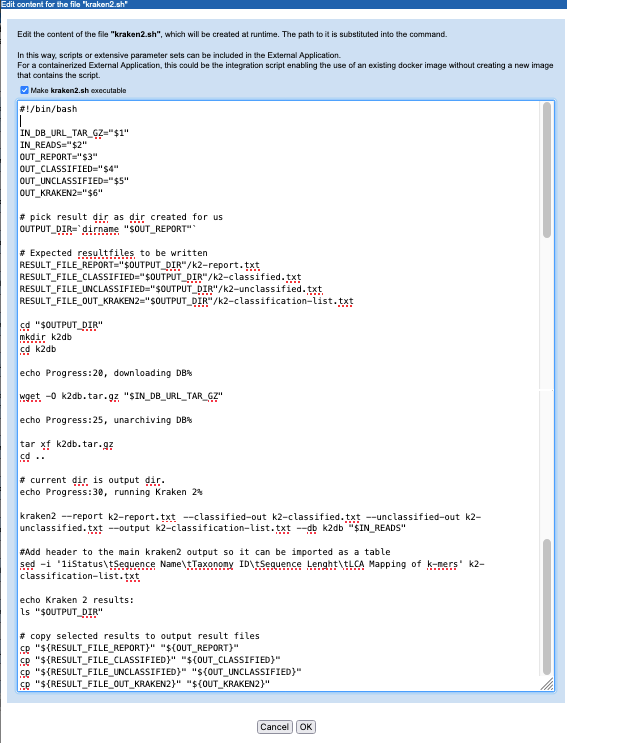
Figure 16.32: A script is defined that will be run in the Docker container. This version includes the commands to download and unpack the Kraken2 database specified by the user when launching the application.

Figure 16.33: The CSV enum parameter type used for the Kraken 2 database parameter results in a drop-down list of options in the Workbench wizard for the application.
Some other options for working with reference database from an external application
In this example, a user specifies the database to use from a drop-down list, and that database is then obtained from a corresponding URL, as defined in a "CSV enum" type parameter. Some other methods that support the use of external files include:
- Place a copy of the database files of interest in your AWS S3 account or a CLC Server import/export directory. The Kraken 2 database parameter could then be configured as an "External file". If desired, the parameter can be configured so a particular file is pre-selected.
This option may be of particular interest if you are using custom databases.
If the external application will be run on the cloud, placing the file on AWS S3 is the more efficient option. However, you will pay for storage there. If you chose to store the database in a CLC Server import/export directory, then the database file would be uploaded to AWS every time the external application was run.
- Configure the parameter type as "Text". This creates a text field, where a user could enter the URL of their choice. This is less user-friendly then the configuration in the example and also the "External file" option described in the point above, but it does provide maximum flexibility.
- Use the same setup as the example, but obtain the files using a public S3 URL. For this, you would include installation of the AWS CLI in the included script, so you could copy the files from the public S3 bucket to your own bucket.
- Create your own Docker image containing the database(s) of interest. Here, for example, you could take the publicly available Docker image used in the example, and extend it with the contents of your choice and then refer to this new Docker image in the external application command line.
Settings under the Stream handling tab
Under the Stream handling tab, we define how information sent to standard out and standard error should be handled. Depending on the application, information in these streams can be useful for troubleshooting.
- Standard out handling Kraken2 reports only a list of the names of the output files to standard out, which is not of particular interest for users. Thus in this configuration, we chose not to save the information written to standard out.
- Standard error handling Docker reports its progress to standard error. As this information can be useful for troubleshooting. We specified that execution should not be stopped when information is written to this stream and provided the name of a file to write the information to,
Kraken2-docker-log.txt. We also specified that the plain text importer be used to import the file (figure 16.34).The base name of this file appears in an output channel of the corresponding workflow element (figure 16.35).
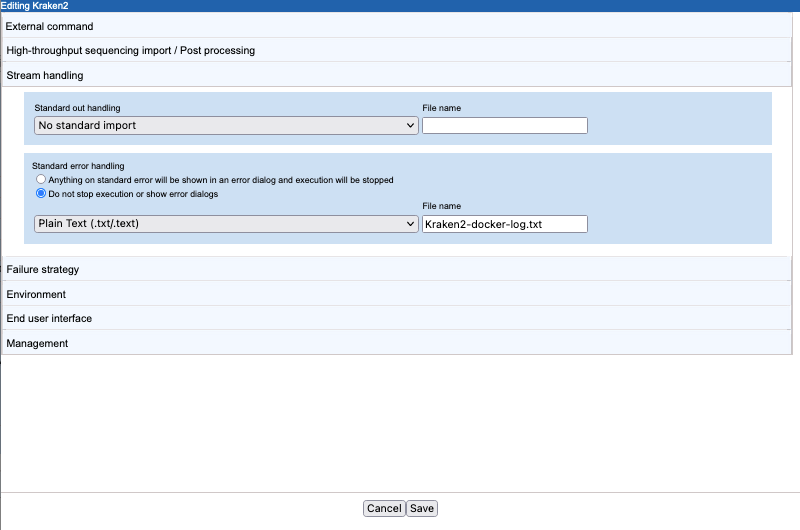
Figure 16.34: The CSV enum parameter type used for the Kraken 2 database parameter results in a drop-down list of options in the Workbench wizard for the application.
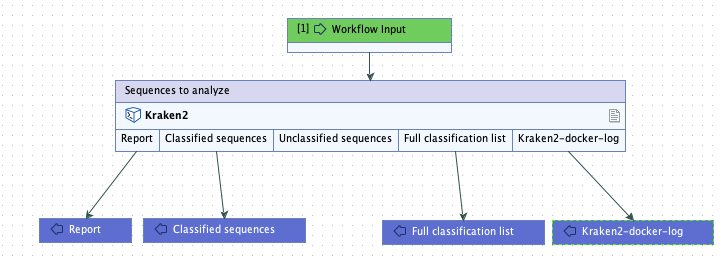
Figure 16.35: A workflow containing the external application. In workflows, the outputs to collect can be specified. Here, all outputs except the unclassified sequences will be returned by the analysis.
Making the external application available for use
When this external application is saved, it becomes available to run on the CLC Server unless its status is set to Disabled.
To submit workflows from a CLC Workbench to run on the cloud via the CLC Server, the CLC Cloud Module must be installed and licensed, and the Cloud Server Plugin must be installed on the CLC Server. Further information about running external applications in a CLC Genomics Cloud setup on AWS is available in the CLC Cloud Module manual at https://resources.qiagenbioinformatics.com/manuals/clccloudmodule/current/index.php?manual=Integrating_third_party_tools_into_CLC_software.html.
Reminder: If you plan to run external applications on the cloud via the CLC Server Command Line Tools, they must be included in a workflow that is installed on the CLC Server.
Of note when creating workflows: options are usually locked by default. To unlock parameters in a workflow element, double click on the central part of the element, or right-click on it, and choose the option Configure.... Then check for the lock/unlock icon beside each setting. See figure 16.36.
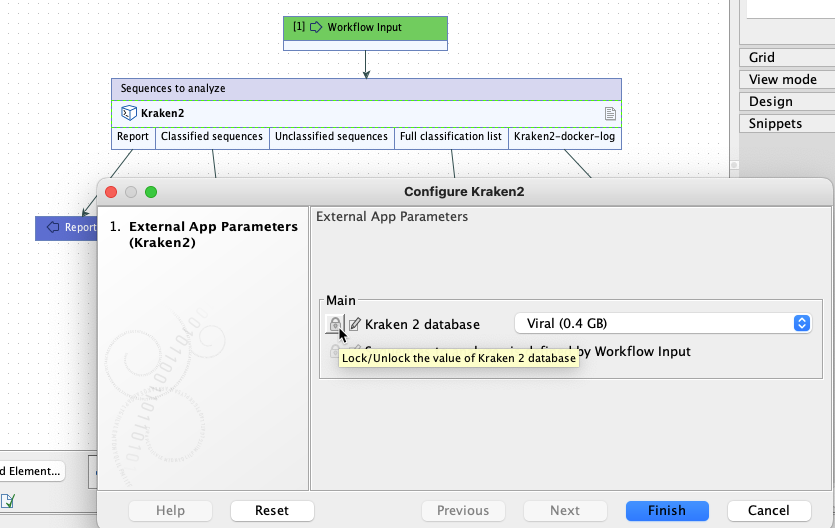
Figure 16.36: By default, the database parameter will be locked in the workflow element. Configure the workflow element to unlock this parameter to allow users to select a database when launching the workflow.
Results from the Kraken2 external application
The outputs from Kraken2 and the standard error information written by Docker are available in CLC format when the application has finished. A log of the job is also available. If the external application was run on the cloud, a file called workflow-result.json will also be present among the results (figure 16.37).
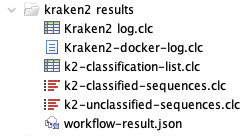
Figure 16.37: Outputs from a Kraken2 containerized external application after running it on AWS using functionality provided by the CLC Cloud module.
These results will be in the location specified by the user when launching the application. If the job was run on a CLC Server, that will be in a CLC Server location. If the job was run on the cloud, the results will be in an AWS S3 location.
Interacting with files on AWS S3 via a CLC Workbench is described at https://resources.qiagenbioinformatics.com/manuals/clccloudmodule/current/index.php?manual=Working_with_AWS_S3_using_Remote_Files_tab.html. Interacting with files on AWS S3 via the CLC Server web interface is described in Browse AWS S3 locations.
Subsections
