Updating workflows
CLC software tools are versioned. The version of a tool in a workflow is the version that was available on the CLC Workbench when the workflow installer was created. The exception to this is external applications available from the CLC Server, where the version present on the server at the time the workflow was created is included.
The version of a tool in a workflow must be the same as the version present in CLC software for that workflow to be executable. Thus, if a new tool version becomes available through upgrading the CLC Server, upgrading plugins, or updating an external application, workflows containing such tools must be updated.
Updating workflows directly in the server web client
Workflows that need to be updated will have a red exclamation mark (![]() ) in the Status column. For workflows that can be updated directly, the option Update... will be available under the Actions menu (figure 10.6). Choosing the Update... action opens a dialog with details about the update (figure 10.7). Please refer to the release notes for details about changes made to individual tools.
) in the Status column. For workflows that can be updated directly, the option Update... will be available under the Actions menu (figure 10.6). Choosing the Update... action opens a dialog with details about the update (figure 10.7). Please refer to the release notes for details about changes made to individual tools.
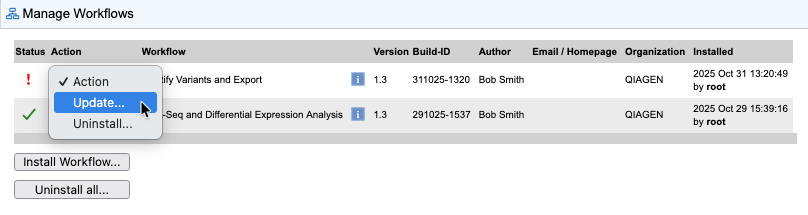
Figure 10.6: The "Update..." action is available for workflows that need to be updated and that can be updated directly in the web client.
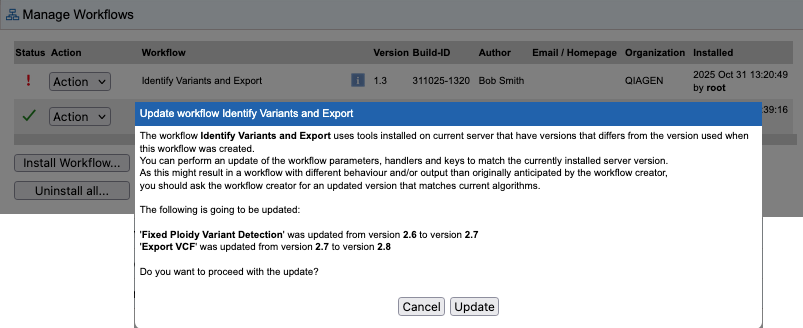
Figure 10.7: Choosing the "Update..." action opens a dialog with further information. Clicking the "Update" button in this dialog triggers the update.
After updating a workflow, the updated copy will be present. Note that the version and build number of the updated workflow remain the same as before the update. A copy of the original workflow is retained. It is disabled and has the original name with "-backup (disabled)" appended. An action to re-enabled the disabled copy is available. Doing that also uninstalls the updated copy. A dialog prompts for confirmation before this action is carried out (figure 10.8).
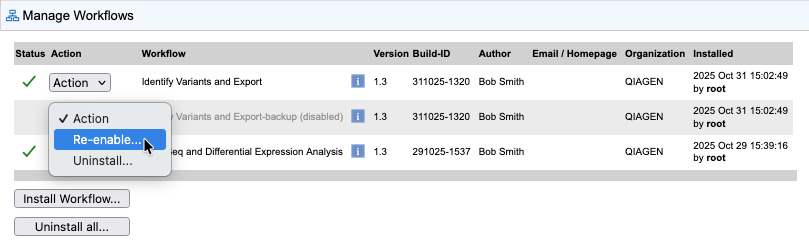
Figure 10.8: After updating a workflow, a copy of the original workflow is present, but disabled. The Re-enable... action is available for that copy.
Workflows that cannot be updated directly
Some installed workflows cannot be updated directly in the web client. Two general circumstances where this can occur are when resources that are missing on the CLC Server that are required by the workflow, and when tools that have been updated in a way where automatic updating is not possible.
Common situations where resources required by a workflow are missing:
- A workflow contains tools delivered by a plugin that is not installed on the CLC Server.
Where possible the source of missing tools is included in the information about the problem. Click the red exclamation mark in the Status column to open the "Workflow status" dialog. Click the link in that dialog labeled "View errors preventing workflow update". This opens a further dialog with details about the missing tools.
- A workflow contains tools delivered by server extensions (commercial plugins) that require a license, but either the license is not present or it does not support the version of the server extension that is installed.
In this case, go to
Extensions ( ) | Manage Plugins (
 )
)
Server extensions with missing licenses are clearly indicated in this area.
After installing the missing resources, restart the CLC Server.
In cases where tools included in the workflow have been updated in a way where automatic updating is not possible, the workflow must be manually updated, as described below10.1.
Updating installed workflows that cannot be updated automatically
Automatic updating of an installed workflow is not always possible. The most common situation where this is experienced is after updating to a new major version line10.2.
When this is the case, the following route can be taken to get an updated version of the workflow:
- Open a version of the CLC Workbench where the workflow can be run.
- Create a copy of the installed workflow. This can be done by:
- Right-clicking on the name of a workflow under the Workflows tab in the Toolbox at the bottom left side of Workbench, and choosing the "Open Copy of Workflow" option in the menu that appears (figure 10.9), or by opening the Workflow Manager, selecting the installed workflow, and clicking on the "Open Copy of Workflow" button.
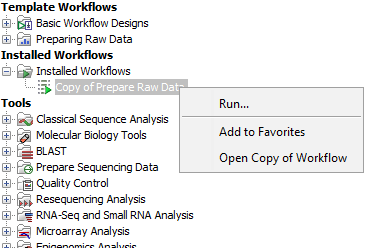
Figure 10.9: Open a copy of an installed workflow by right-clicking on its name under the Workflows tab in the Toolbox and choosing the "Open Copy of Workflow" option from the menu. - Save the workflow copy.
- Close the older Workbench.
- Open the newer Workbench.
- Open the workflow copy that was saved earlier and click on the OK button if you are prompted to update the workflow.
- Checking that the updated workflow has been updated correctly and then save it.
- Install the workflow or make a workflow installer for later installation.
- Right-clicking on the name of a workflow under the Workflows tab in the Toolbox at the bottom left side of Workbench, and choosing the "Open Copy of Workflow" option in the menu that appears (figure 10.9), or by opening the Workflow Manager, selecting the installed workflow, and clicking on the "Open Copy of Workflow" button.
If the above process does not work when upgrading directly from a much older software version, it may be necessary to upgrade step-wise by upgrading the workflow in sequentially higher major versions of the Workbench.
The updated workflow can now be installed on the CLC Server as described in Installing and configuring workflows.
Footnotes
- ... below10.1
- A number of tools commonly used in workflows were substantially updated for version 26.0 of the software. It is thus anticipated that manual updating of workflows will be necessary in many cases when upgrading to the 26 release line from earlier lines.
- ... line10.2
- "Major version line" refers to the first digit in the version number. For example, versions 25.0 and 23.0.2 are part of the same major release line (25). Version 26.0 is part of a different major version line (26).