CLC Server File System Locations
Data imported to or generated using the CLC Server is stored in CLC Server File System Locations. These are configured in the web client under:
Configuration (![]() ) | Main configuration (
) | Main configuration (![]() ) | File system locations
) | File system locations
By default, a Server File System Location is readable and writable by all server users. Enabling permissions, so that access can be controlled, is described below.
Note: Some functionality, including submitting workflows that are configured to use QIAGEN reference data via the CLC Server, require that a File System Location called CLC_References has been configured. Please refer to the section about CLC_References locations for further details.
Search indexes are maintained for each CLC Server File System Location. Indexes are generally expected to be updated automatically, but if problems arise, each location can be re-indexed as needed. See CLC Server File System Location indexes for details, including a list of functionality that relies on these indexes and how to re-use indexes if moving the CLC Server.
Please also refer to that section about additional considerations to take into account when deciding where to configure CLC Server File System Locations.
Adding and configuring CLC Server File System Locations
- Add a new location
- Click on the Add New File Location button and then specify the path to the folder where data imported into or created by the CLC Server will be stored (figure 3.3). The path provided should point to an existing folder on the server machine that the user running the server process has read and write access to.
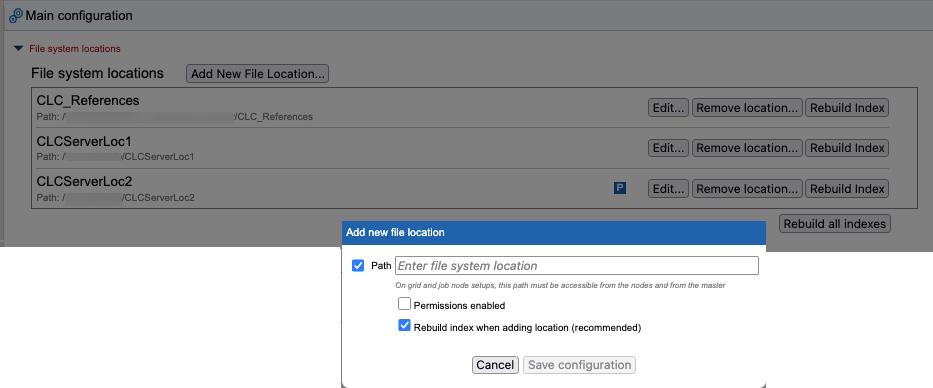
Figure 3.3: The "Add New File Location..." has been clicked, opening a dialog where the file system folder to use can be specfiied, and other settings configured. - Enable or disable access for all users
- The checkbox to the left the Path is used to control whether or not this location should be available to users. Access is enabled by default. Unchecking this box and saving the configuration makes the location unavailable for use via any client software.
Disabled locations are listed in light grey text in the configuration area, as shown for CLCServerLoc1 in figure 3.4.
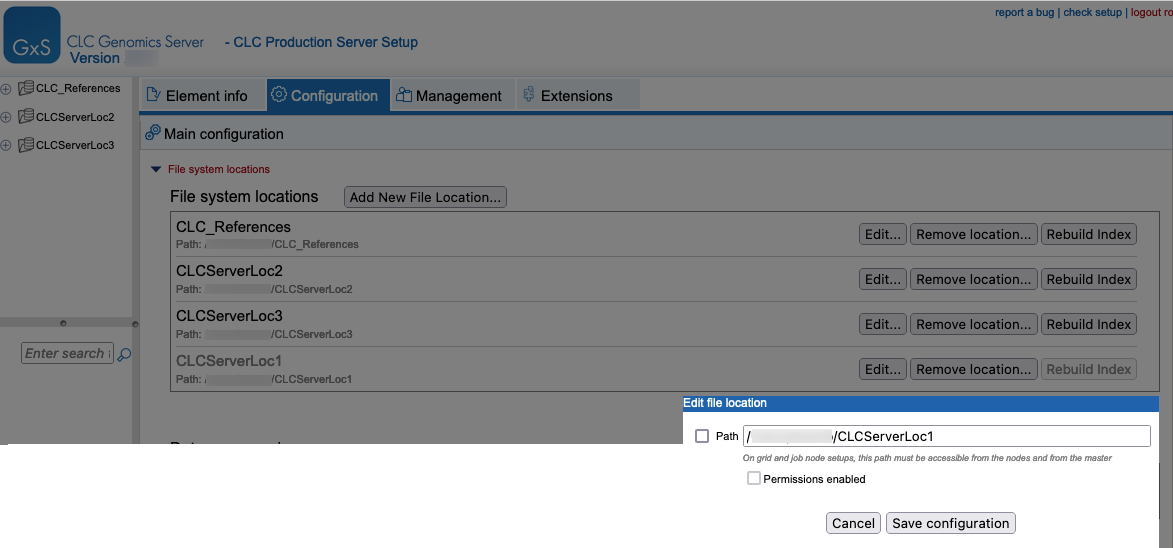
Figure 3.4: When the checkbox to the left of the Path is unchecked, the file system location is disabled. This makes it unavailable to users. Under the Main Configuration tab, disabled locations are listed using light grey text. - Permissions enabled
- When this box is checked, permissions can be configured for that location. A P in a blue box in the File System Locations table indicates that that location has permissions enabled (figure 3.5).
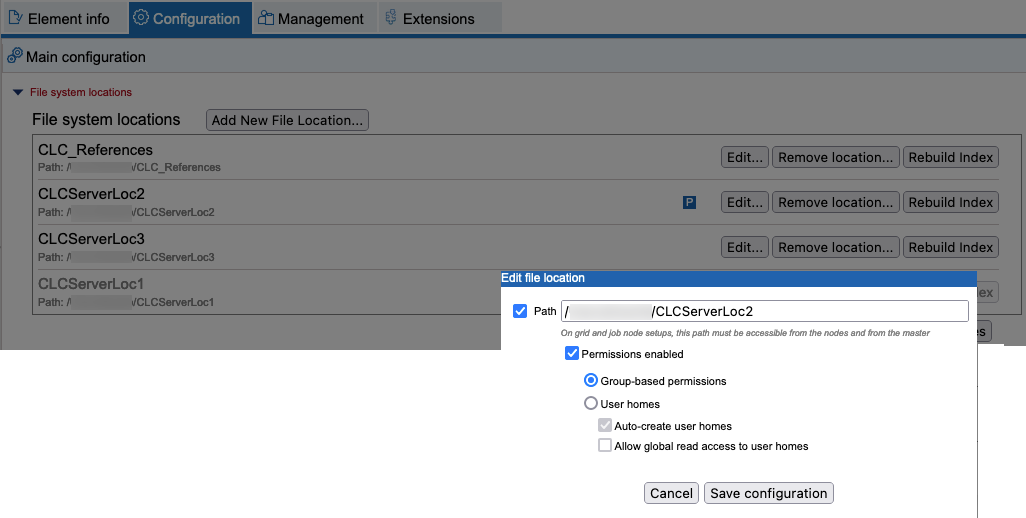
Figure 3.5: The location CLCServerLoc2. has permissions enabled, as signified by the P in a blue box. Permissions were enabled by checking the "Permissions enabled" checkbox in the "Edit file location" dialog.- Group-based permissions
- After selecting this option, group-level read and write permissions can be configured for the file system location using a CLC Workbench client, as described in Controlling access to data. Until such access is granted, the File System Location and its contents will be available only to admin users.
- User homes
- The file system location will be used for user home folders. These are top-level folders with names matching users' usernames. A user is granted write access only to the folder with a name matching their username. Admin users continue to have access to all folders.
- Auto-create user homes When selected, a user folder is created automatically by the CLC Server when a user first logs in.
To create folders only for specific users, deselect this option and use the
mkdircommand of the CLC Server Command Line Tools, specifying the file system location as the target and providing a user's username as the name of the folder to create. - Allow global read access to user homes When selected, all users are granted read access to all user home folders on this file system location. When not selected, users only have access to their own user home area.
When enabling the "User homes" option, please note that:
- Data elements stored directly under the file system location will be readable, but not writable, by all users. While it should only be possible for admin users to place data in this area, if the file system location was in use before the User homes option was selected, then existing data stored at the top level will be accessible to all users.
- Any folder at the top level of a CLC Server file system location with a name matching a user's username will be treated as a user home area, with read and write access granted to that user on that folder and its contents.
- A user logged into the CLC Server from a CLC Workbench will see their user home at the top of the list of user home directories. (Folders a user has access to are listed at the top of a given CLC location.)
- Auto-create user homes When selected, a user folder is created automatically by the CLC Server when a user first logs in.
To create folders only for specific users, deselect this option and use the
- Remove a file system location
- Clicking on the Remove Location button beside a particular file system location removes it from the CLC Server. The underlying folder and its contents are not deleted. To re-enable access via the CLC Server, simply configure the same folder as a File System Location again.
- Rebuild the index
- The CLC Server maintains an index in each File System location of the elements in that location. Further details about this are provided in CLC Server File System Location indexes.
Subsections
- Important points about CLC Server File System Locations
- File locations for job node set-ups
- CLC Server File System Location indexes
- Housekeeping files in CLC Server File System Locations