Master-job node encrypted communication
By default, communication between a master and job nodes takes place over HTTP using port 7777. For HTTPS communication, the following must be in place:
- The Tomcat configuration file,
conf/server.xml, on the master node and on each job node, must include a Connector supporting encrypted communication.Tomcat configuration files can be editing using the HTTPS Configuration tool, available via the master's CLC Server web administrative interface. This is described in more detail later in this section, in the context of configuring a setup to use self-signed certificates.
- The master and each job node must have a certificate in place, with job node certificates trusted by the master and vice versa. Achieving this when working with self-signed certificates is described later in this section.
After updating the Tomcat configuration file or certificates, the CLC Server must be restarted for changes to come into effect.
- The port setting for the master must be updated to one that supports encrypted communication and the "Use HTTPS for node -> master communication" box in the Server settings area must be checked.
- The port configured for each job node must support encrypted communication and the "Use HTTPS for master -> node communication" option much be checked in the job node's settings.
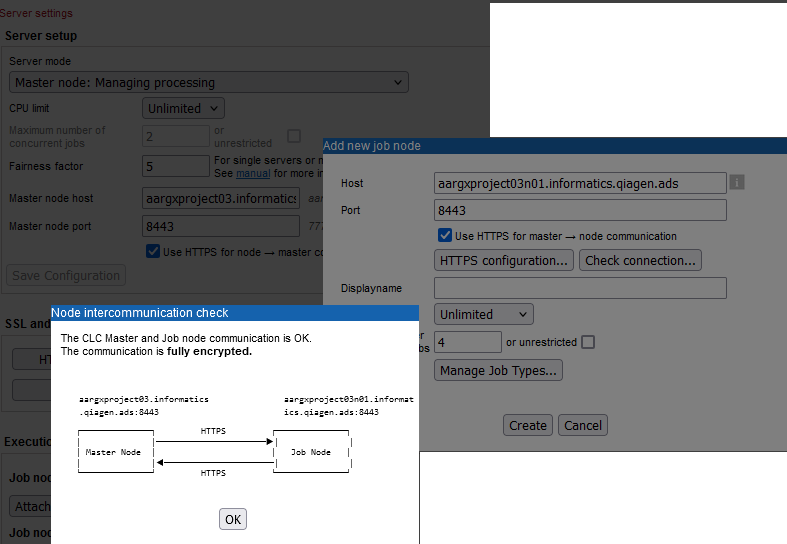
When fully configured, the job and master settings will look something like that in figure 3.9.

Figure 3.9: The master is configured to accept encrypted communication from job nodes (settings in the background) and the job node is configured to accept encrypted communication from the master (settings in the middle). This is indicated in the information returned when checking the connection between the job node and master.
In several places an opportunity to check the status of connections is offered. The check is done using the settings present at that moment, which are not necessarily the saved settings. For example, if the value in a port field were updated from 7777 to 8443 and then the Check Connections button was clicked on, port 8443 would be used for the communication done in carrying out the connection check.
Working with self-signed certificates on master-job node setups
The general list of steps required when working with self-signed certificates is below. There are helper tools available in the CLC Server web administrative interface for easily carrying out these activities.
- Ensure the host name used in the certificate matches the host name configured when attaching the job node.
Self-signed certificates can be easily updated to contain the correct hostname using "Create a self-signed certificate" option in the HTTPS Configuration tool. To use this functionality, a Connector of the expected form must be present in the
conf/server.xmlfile. Such a Connector is present by default in new installations of CLC Server version 25.0 and above. When upgrading from an earlier version, you may need to add the relevant Connector to the file. This can be done using the "Edit Tomcat configuration" functionality in the HTTPS Configuration tool, which includes functionality to copy template text for a Connector of the expected form, so it can be pasted into the configuration file and then adjusted.The hostname for the self-signed certificate at
conf/clc-server-self-signed.p12in each CLC Server installation is, by default, "CLC Server" and thus must be updated before the certificate can be used for encrypted communication between master and nodes. - Add the job nodes' certificates to the master's trust store and add the master's certificate to the job nodes' trust stores.
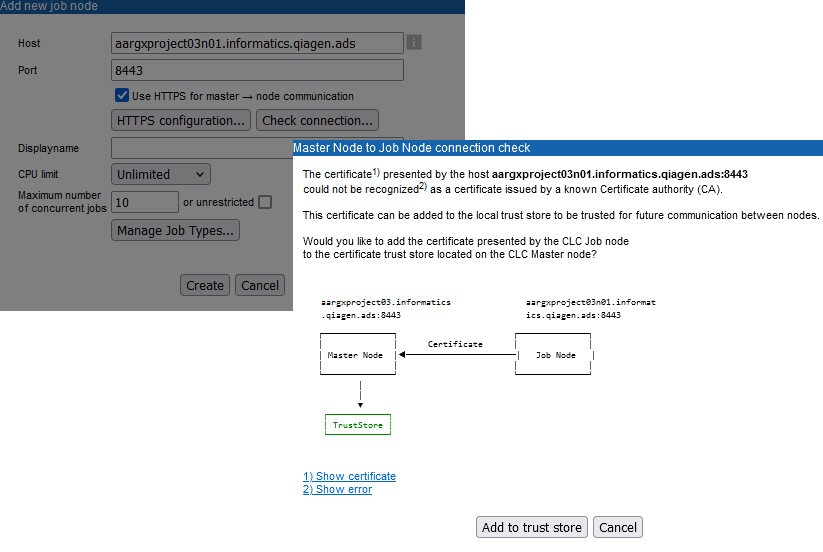
The opportunity to add a certificate to the relevant trust store arises at several points when configuring HTTPS for master-node communication, for example see figure 3.11.
There are various routes one can take to set up encrypted communication between a master and job nodes when using self-signed certificates. One of these, done entirely via the web administrative interface of the master CLC Server is the following:
- Detach any job nodes that are already attached.
- Configure the master as follows:
- If not already present, add a Connector that supports encrypted communication to the Tomcat configuration file,
conf/server.xml.To do this, click on the HTTPS Configuration... button and choose the option "Edit Tomcat configuration".
To easily add a new Connector of the expected form, click on the "Copy default SSL <Connector> configuration to clipboard" link near the top of the dialog and then paste the contents of the clipboard into the
server.xmlconfiguration file.If you are not using the self-signed certificate at
conf/clc-server-self-signed.p12, you can click on the Include keystore file... button to add an X.509 certificate into theconfdirectory of the CLC Server installation. - To use the self-signed certificate at
conf/clc-server-self-signed.p12, update it with the correct hostname for the system. To do this, click on the HTTPS Configuration... button and choose the option "Create self-signed certificate". Ensure the correct hostname is in the "Hostname for certificate (Common Name)" field before clicking on the Create Certificate... button. - Restart the CLC Server when prompted to arrange for a restart.
- Update the port setting for the master to use a port that supports encrypted communication.
- Check the box beside "Use HTTPS for node -> master communication".
- Click on the Save Configuration button.
If there are problems with the setup at this point, an error message with details will be displayed.
- If not already present, add a Connector that supports encrypted communication to the Tomcat configuration file,
- Attach each job node, configuring each to support encrypted communication.
- Click on the Attach Node button in the "Job node settings" area.
- Enter the hostname into the "Host" field.
- Enter a port into the "Port" field that supports non-encrypted communication (usually 7777),
- If not already present, add a Connector that supports encrypted communication to the Tomcat configuration file,
conf/server.xml.To do this, click on the HTTPS Configuration... button and choose the option "Edit Tomcat configuration".
To easily add a new Connector of the expected form, click on the "Copy default SSL <Connector> configuration to clipboard" link near the top of the dialog and then paste the contents of the clipboard into the
server.xmlconfiguration file.If you are not using the self-signed certificate at
conf/clc-server-self-signed.p12, you can click on the Include keystore file... button to add an X.509 certificate into theconfdirectory of the CLC Server installation. - To use the self-signed certificate at
conf/clc-server-self-signed.p12, update it with the correct hostname for the system. To do this, click on the HTTPS Configuration... button and choose the option "Create self-signed certificate". Ensure the correct hostname is in the "Hostname for certificate (Common Name)" field before clicking on the Create Certificate... button.You will be prompted to arrange a restart if you have updated the Tomcat configuration file or updated certificates. You can choose not to restart and continue with attaching the job node, and restart after that point.
- Click on the Check Connection... button in the "Add new job node" dialog.
This checks for any problems, including checking that the master node's certificate is in the job node's trust store. Click on the Add to trust store button if it is present in the dialog.
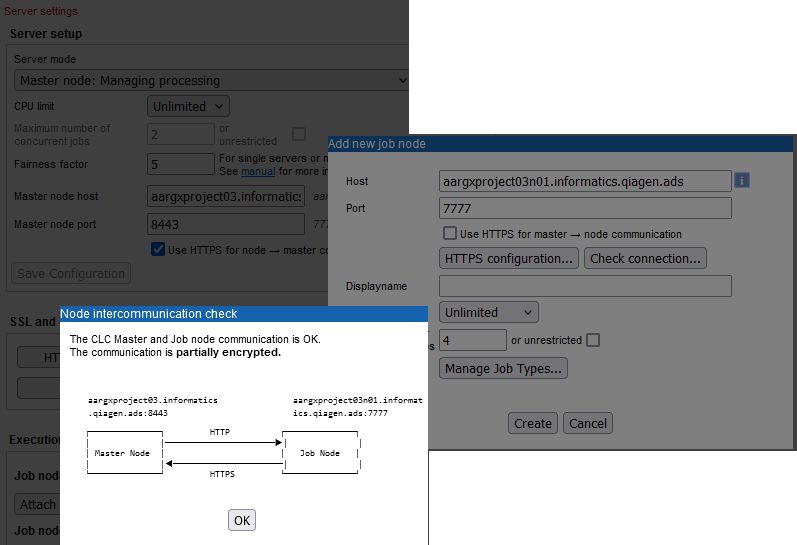
At this point, the communication between the job node and the master will be partly encrypted (figure 3.10).

Figure 3.10: The master is configured to accept encrypted communication from job nodes. A job node is being attached. It current accepts only nonencrypted traffic using port 7777, as indicated in the information returned when checking the connection between the job node and master.If you have multiple job nodes to attach, the steps above can be carried out for each one before proceeding further.
- Restart the master and its job nodes by selecting the Restart option in the Server Maintenance section under the Status and management area on the master server. This restarts the master and all attached job nodes (described in Status and management).
Each attached job node is now ready to be configured to receive communication via HTTPS:
- Click on the Edit... button next to the job node in the "Execution node settings" area.
- Update the port setting to the port that supports encrypted communication (often this is 8443).
- Check the box beside "Use HTTPS for master -> node communication".
As soon as this box is checked, any communication from the master to the node will be encrypted, including any checks on connection status. Thus, check this box only after the items above this are complete, i.e. when encrypted communication can be successfully undertaken.
- Click on the Check Connection... button in the "Add new job node" dialog.
This checks for any problems, including checking that the job node's certificate is in the master's trust store. Click on the Add to trust store button if it is present in the dialog.
The communication between the job node and the master should now be fully encrypted (figure 3.9).
- After dismissing the "Node intercommunication check" dialog, click on the Save button in the "Edit job node" dialog.
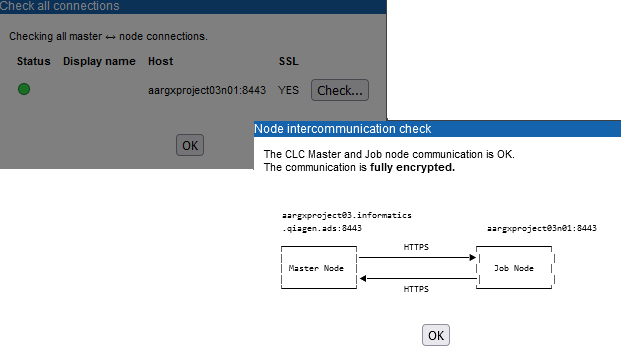
After attaching all the job nodes, click on the Check Connections... button at the bottom of the "Job node settings" area (figure 3.12). The status color, green or red, indicates whether the connection could be established or not, respectively. Hover the mouse cursor over the colored dot to see further information. Information in the SSL column indicates the configuration: "YES" indicates that the setup is configured for encrypted communication in both directions between master and job node. "PARTLY" indicates it is configured to be encrypted in one direction, but not the other. "NO" indicates that the setup is not configured for encrypted communication in either direction. Click on the Check... button in the "Check all connections" dialog to see a diagram showing further details about the communication in each direction.

Figure 3.11: Click on the "Check Connections..." button when attaching a job node to see information on the status of the connection between the master and that job node. If the communication is not trusted, you can click on the "Add to Trust Store" button to add the certificate presented by the job node to the master node's trust store.

Figure 3.12: The connections between master and a single, attached job node has been checked. Communication can be achieved in both directions, as indicated by the status (green dot), and the communication in both directions is encrypted (HTTPS).
