Adapter trimming
Clicking Next will allow you to specify adapter trimming.
In order to trim for adapters, you have to create an adapter list first that must be supplied to the trim tool. A new adapter trim list can be created here:
File | New | Trim Adapter List
This will create a new empty trim adapter list. Add the adapter(s) that you would like to use for trimming by clicking on the button Add Row (![]() ) found at the bottom of the View Area (figure 20.4). Provide the name and sequence of the adapter that should be trimmed away and adjust the parameters if relevant. Click on the button labeled Finish to create the adapter trim list. You must now save the generated adapter trim list in the Navigation Area. You can do this by clicking on the tab and dragging and dropping the adapter trim list to the desired destination, or you can go to File in the menu bar and the choose Save as.
) found at the bottom of the View Area (figure 20.4). Provide the name and sequence of the adapter that should be trimmed away and adjust the parameters if relevant. Click on the button labeled Finish to create the adapter trim list. You must now save the generated adapter trim list in the Navigation Area. You can do this by clicking on the tab and dragging and dropping the adapter trim list to the desired destination, or you can go to File in the menu bar and the choose Save as.

Figure 20.14: Create a new Adapter Trim List by clicking on the button labeled "Add Row" found at the bottom of the New Trim Adapter view.
You can also create an adapter list by importing a comma separated value (.csv) file of your Adapters. This import can be performed with the standard import using either the Automatic Import option or Force Import as Type: Trim Adapter List. To import a csv file, the names of all adapters must be unique - the Workbench is unable to accept files with multiple rows containing the same adapter name. Additionally, the text between each comma that designates a new column should be quoted. The expected import format for Adapter Lists appears as shown in figure 20.5:

Figure 20.15: The expected import format for Adapter Lists.
You can also create an Excel file (.xlsx or .xls) format. In this case, you include the same information per column as indicated above, but do not include the quotes within Excel.
At the bottom of the view, you have the following options:
- Add Rows. Add a new adapter. This will bring up a dialog as shown in figure 20.6.
- Delete Row. Delete the selected adapter.
- Edit Row. Edit the selected adapter. This can also be achieved by double-clicking the row in the table.
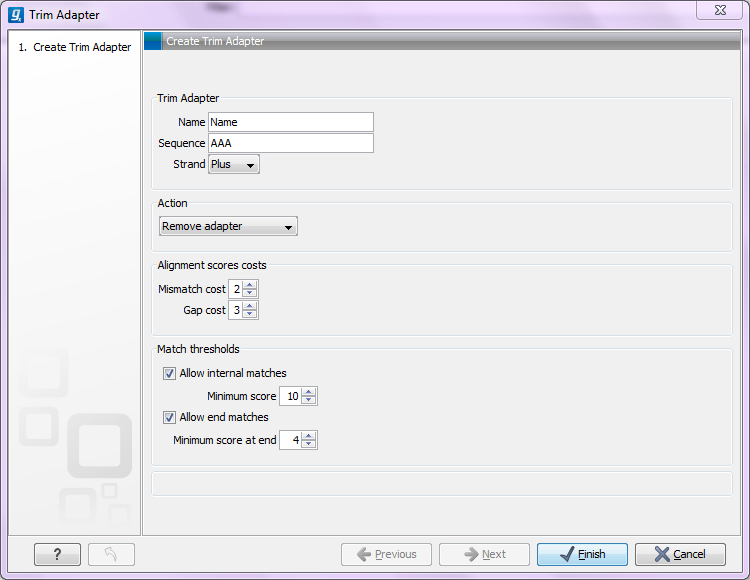
Figure 20.16: Adding a new adapter for adapter trimming.
The information to be added for each adapter is explained in the following sections, going into detail with the adapter trim. Once the adapters have been added to the list, it should be saved (![]() ), and you can select it as shown in figure 20.12.
), and you can select it as shown in figure 20.12.
Action to perform when a match is foundFor each read sequence in the input to trim, the Workbench performs a Smith-Waterman alignment [Smith and Waterman, 1981] with the adapter sequence to see if there is a match (details described below). When a match is found, the user can specify three kinds of actions:
- Remove adapter. This will remove the adapter and all the nucleotides 5' of the match. All the nucleotides 3' of the adapter match will be preserved in the read that will be retained in the trimmed reads list. If there are no nucleotides 3' of the adapter match, the read is added to the List of discarded sequences (see Trim output).
- Discard when not found. If a match is found, the adapter sequence is removed (including all nucleotides 5' of the match as described above) and the rest of the sequence is retained in the list of trimmed reads. If no match is found, the whole sequence is discarded and put in the list of discarded sequences. This kind of adapter trimming is useful for small RNA sequencing where the remnants of the adapter is an indication that this is indeed a small RNA.
- Discard when found. If a match is found, the read is discarded. If no match is found, the read is retained in the list of trimmed reads. This can be used for quality checking the data for linker contaminations etc.
When is there a match?To determine whether there is a match there is a set of scoring thresholds that can be adjusted for each adapter as shown in figure 20.6.
First, you can choose the costs for mismatch and gaps. A match is rewarded one point (this cannot be changed), and per default a mismatch costs 2 and a gap (insertion or deletion) costs 3. A few examples of adapter matches and corresponding scores are shown in figure 20.7.
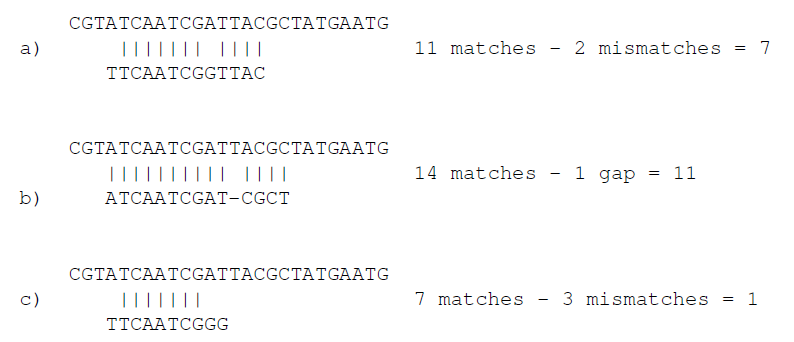
Figure 20.17: Three examples showing a sequencing read (top) and an adapter (bottom). The examples are artificial, using default setting with mismatch costs = 2 and gap cost = 3.
In the panel below, you can set the Minimum score for a match to be accepted. Note that there is a difference between an internal match and an end match. The examples above are all internal matches where the alignment of the adapter falls within the read. Figure 20.7 shows a few examples with an adapter match at the end:
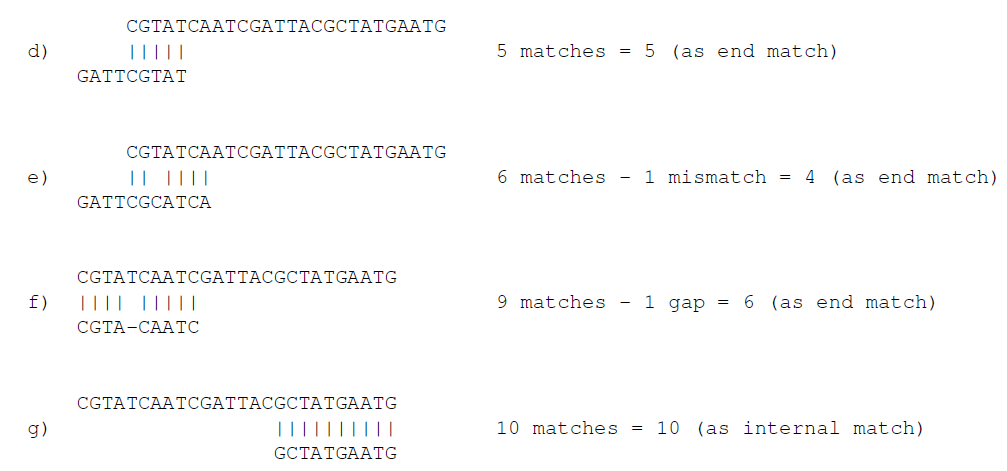
Figure 20.18: Four examples showing a sequencing read (top) and an adapter (bottom). The examples are artificial.
In the first two examples, the adapter sequence extends beyond the end of the read. This is what typically happens when sequencing e.g. small RNAs where you sequence part of the adapter. The third example shows an example which could be interpreted both as an end match and an internal match. However, the Workbench will interpret this as an end match, because it starts at beginning (5' end) of the read. Thus, the definition of an end match is that the alignment of the adapter starts at the read's 5' end. The last example could also be interpreted as an end match, but because it is a the 3' end of the read, it counts as an internal match (this is because you would not typically expect partial adapters at the 3' end of a read). Also note, that if Remove adapter is chosen for the last example, the full read will be discarded because everything 5' of the adapter is removed.
Below, the same examples are re-iterated showing the results when applying different scoring schemes. In the first round, the settings are:
- Allowing internal matches with a minimum score of 6
- Not allowing end matches
- Action: Remove adapter
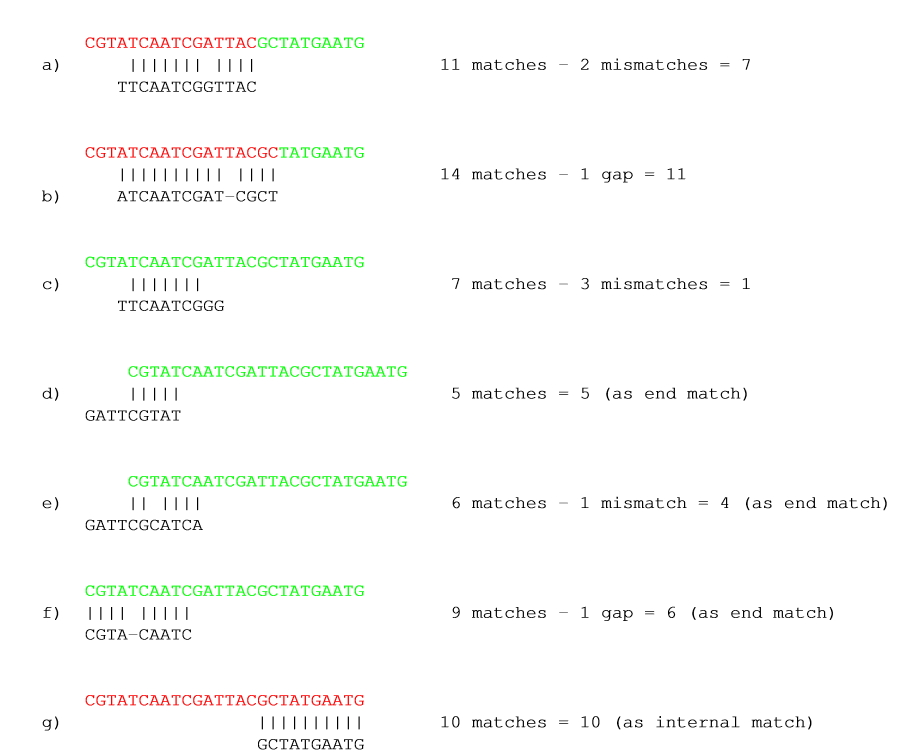
Figure 20.19: The results of trimming with internal matches only. Red is the part that is removed and green is the retained part. Note that the read at the bottom is completely discarded.
A different set of adapter settings could be:
- Allowing internal matches with a minimum score of 11
- Allowing end match with a minimum score of 4
- Action: Remove adapter
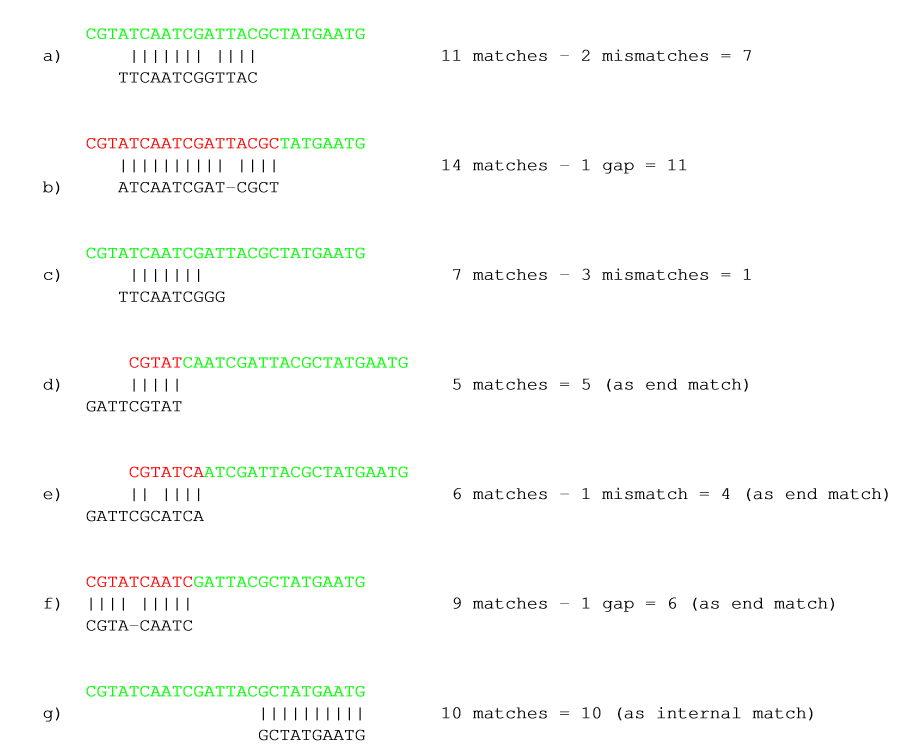
Figure 20.20: The results of trimming with both internal and end matches. Red is the part that is removed and green is the retained part.
Strand settings
Each adapter is defined as either Plus or Minus. Note that all the definitions above regarding 3' end and 5' end also apply to the minus strand (i.e. selecting the Minus strand is equivalent to reverse complementing all the reads). The adapter in this case should be defined as you would see it on the plus strand of the reverse complemented read. The example below (figure 20.11) shows a few examples of an adapter defined on the minus strand.
It shows hits for an adapter sequence defined as CTGCTGTACGGCCAAGGCG, searching on the minus strand.

Figure 20.21: An adapter defined as CTGCTGTACGGCCAAGGCG searching on the minus strand. Red is the part that is removed and green is the retained part. The retained part is 3' of the match on the minus strand, just like matches on the plus strand.
You can see that if you reverse complemented the adapter you would find the hit on the plus strand, but then you would have trimmed the wrong end of the read. So it is important to define the adapter as it is, without reverse complementing.
Trimming of 3' ends of the reads
To trim an adapter and everything to the 3' end of the adapter you will need to search for the reverse complement of the adapter on the negative strand. This is achieved by creating a new Trim Adapter List from the reverse complement of your adapter sequence, choosing the minus strand of your reads and run adapter trimming with the new Trim Adapter List as input.
Other adapter trimming options
When you run the trim, you specify the adapter settings as shown in figure 20.12.
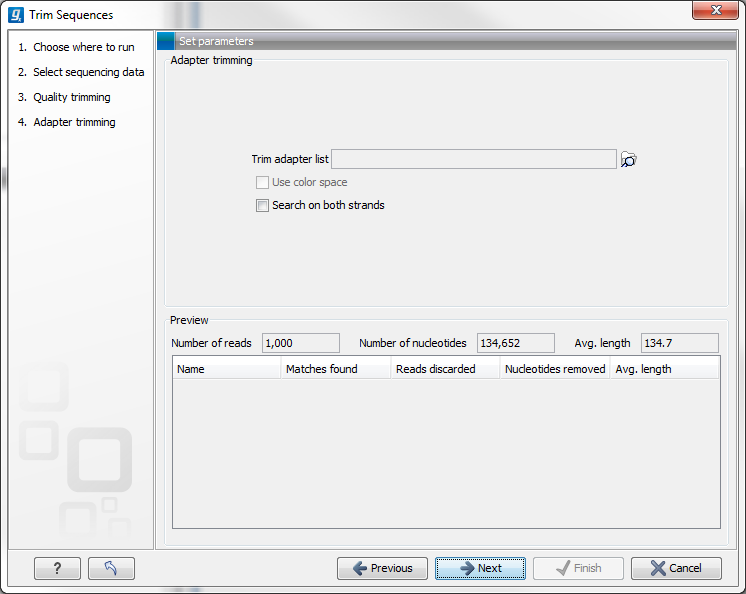
Figure 20.22: Trimming your sequencing data for adapter sequences.
Select an trim adapter list (see Adapter trimming on how to create an adapter list) that defines the adapters to use.
You can specify if the adapter trimming should be performed in Color space. Note that this option is only available for sequencing data imported using the SOLiD import. When doing the trimming in color space, the Smith-Waterman alignment is simply done using colors rather than bases. The adapter sequence is still input in base space, and the Workbench then infers the color codes. Note that the scoring thresholds apply to the color space alignment (this means that a perfect match of 10 bases would get a score of 9 because 10 bases are represented by 9 color residues). Learn more about color space.
Checking the Search on both strands checkbox will search both the minus and plus strand for the adapter sequence. Note! If a match is found on the reverse strand the Trim action will reverse complement the read before trimming and output the trimmed reverse complement. Its intended use is for removal of multiplexing barcodes and primers.
Below you find a preview listing the results of trimming with the current settings on 1000 reads in the input file (reads 1001-2000 when the read file is long enough). This is useful for a quick feedback on how changes in the parameters affect the trimming (rather than having to run the full analysis several times to identify a good parameter set). The following information is shown:
- Name. The name of the adapter.
- Matches found. Number of matches found based on the strand and alignment score settings.
- Reads discarded. This is the number of reads that will be completely discarded. This can either be because they are completely trimmed (when the Action is set to Remove adapter and the match is found at the 3' end of the read), or when the Action is set to Discard when found or Discard when not found.
- Nucleotides removed. The number of nucleotides that are trimmed include both the ones coming from the reads that are discarded and the ones coming from the parts of the reads that are trimmed off.
- Avg. length This is the average length of the reads that are retained (excluding the ones that are discarded).