Configuring your setup
The information in this section assumes that on the machine that will act as the master, the CLC Server software is installed, the license has been downloaded (Downloading a License), and the CLC Server has been restarted.
When logged in as a user in the admin group on the master node, go to:
Configuration (![]() ) | Job processing (
) | Job processing (![]() )
)
Open the Server settings section.
Under Server setup configure the following:
- Server mode - Select
MASTER_NODEfrom the list of server modes. - CPU limit - Enter the maximum number of CPU the CLC Server should use. This is set to unlimited by default, meaning that up to all cores of the system can be used.
Save these configuration changes, and then, under Master and execution node settings configure the following:
- Master node host - Enter the hostname that execution nodes should use to contact the master node. To see a list of host addresses and host names reported by the master node, click on the text "More suggestions".
- Master node port - Enter the port that execution nodes should use to contact the master node. This is usually 7777. The listening port of the master may be changed (see Changing the listening port). Communication between a master and execution nodes uses HTTP.
Save the configuration by clicking on the Save Configuration button under the Fairness factor setting to register the changes made.

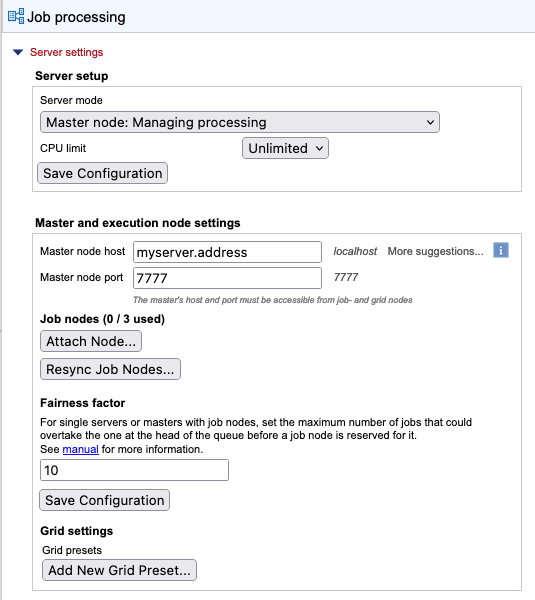
Figure 6.1: When configuring a job node setup, the master node is configured, and then job nodes are attached by clicking on the "Attach Node..." button to attach job nodes.
If the Attach Node button in the Job nodes section is greyed out, please ensure that the server mode selected is MASTER_NODE and that you have clicked on the Save Configuration button below the Fairness factor setting.
Before attaching job nodes to the master, the CLC Server software will need to be installed and running on the machines that will act as job nodes. Note: Do not install license files on the job nodes or configure settings on the job nodes. The licensing information and other settings are taken from the master.
Still on the master node, do the following for each job node:
- Click on the Attach Node button to configure a new job node (figure 6.1).
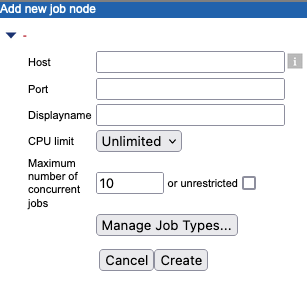
- Enter information about the node in the dialog that is presented (figure 6.2):
- Host The host name of the job node.
- Port The port the node can be contacted on. This is normally 7777.
- Displayname The name to show at the top of the web client for that node.
- CPU limit The maximum number of CPUs the CLC Server should use. This is set to unlimited by default, meaning that up to all cores of the system can be used.
- Maximum number of concurrent jobs Limit the maximum number of jobs that are allowed to run concurrently on the single server. Further information about this setting is provided below.
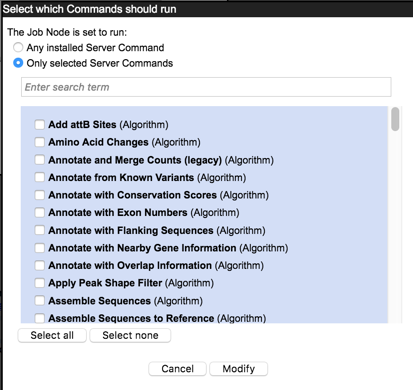
- Manage Job Types... (Optional) Specify the types of jobs that can be run on the node. By default, all tools can run on the node. This equates to selecting the "Any installed Server Command" option in the dialog. When the "Only selected Server Commands" option is selected, a list of tools appears (figure 6.3). Select the tools that can be run on the job node. Enter text in the search field at the top to narrow down the list. Click on the Modify button to save this setting.
- Click on Create to save the job node settings.

Figure 6.3: Select Server Commands to run on the job node.
Repeat this process for each job node and click on the Save Configuration button under the Fairness factor setting when you are done.
A warning dialog is presented if there are types of jobs that are not enabled on any of the nodes.
Once set up, job nodes automatically inherit all configurations on the master node.
To test that access works for both job nodes and the master node, click on the "check setup" link in the upper right corner of the web page (see Check set-up).
Job processing order on job nodes
When a node has finished a job, it takes the first job in the queue of a type the node is configured to process. Depending on how the system is configured, the job that is first in the queue will not necessarily be the next job processed.
The Fairness factor value is the number of times that a job in the CLC Server queue can be overtaken by other jobs before resources are reserved for it to run. With the default value of 10, a job could be overtaken by 10 others before resources are reserved for it that will allow it to run. A fairness factor of 0 means that the job at the head of the queue will not be overtaken by other jobs. See the information below about concurrent job processing, where the connection between job types and the fairness factor setting is described.
Concurrent job processing
There are three general categories of tools: non-exclusive, streaming and exclusive, described below. The Maximum number of concurrent jobs setting applies to tools in the non-exclusive and streaming categories only. Tools in the exclusive category are always run alone.
The maximum allowable value for the number of jobs that can be run concurrently is equal to the number of cores on the system. The default value is 10 or the number of cores on the system, whichever is lowest. If a CPU limit has been set, then the default is 10 or that CPU limit value, whichever is lowest.
The minimum value is 1, which equates to disabling multi-job processing.
Tool categories:
- Non-exclusive algorithms Tools with low demands on system resources. These can be run alongside other jobs in this category, as well with alongside a job in the streaming category. An example is "Convert from Tracks".
- Streaming algorithms Tools with high I/O demands, that is, much reading from and writing to disk is needed. These cannot be run with other jobs in the streaming category but can be run alongside jobs in the non-exclusive category. Examples are the NGS data import tools.
- Exclusive algorithms Tools optimized to utilize the machine they are running on. They have high I/O bandwidth, memory, or CPU requirements and therefore should not be run at the same time as other jobs on the same machine. An example is "Map Reads to Reference".
While non-exclusive algorithms are generally expected to have low demands on system resources, when working with very large genomes, setting a lower limit for the maximum number of concurrent jobs is worth considering.
See Appendix Non-exclusive Algorithms for a list of CLC Genomics Server algorithms that can be be run alongside others on a given machine.
Fairness factor and concurrent job processing In a situation where there are many non-exclusive jobs and some exclusive jobs being submitted, it is desirable to be able to clear the queue at some point to allow the exclusive job to have a system to itself so it can run. The fairness factor setting is used to determine how many jobs can move ahead of an exclusive job in the queue before the exclusive job will get priority and a system will be reserved for it. The same fairness factor applies to streaming jobs being overtaken in the queue by non-exclusive jobs.
Reminder: certain nodes can be reserved for use by only certain tools. See Controlling access to the server, server tasks and external data.
Troubleshooting job node setups
- Disable root squashing Root squashing often needs to be disabled because it prevents the servers from writing and accessing the files as the same user. Read more about this at http://nfs.sourceforge.net/#faq_b11.
- Bringing job nodes back in sync with the master It is expected the job nodes will stay in sync with the master. However, if one of the job nodes gets out of sync, click on the Resync job nodes button, which can be seen in figure 6.1.
Before resyncing, ensure no jobs are running on any nodes. We recommend using Maintenance Mode for this, as this allows current jobs to complete but stops further jobs from being submitted. Once all the running jobs have completed, maintenance tasks can be safely carried out. Maintenance Mode is described further in section Server maintenance.
Resyncing nodes will detach and then reattach all job nodes, and includes a full reinstallation of all installed plugins from the master as well as reapplication of all settings on the master to each job node. When resyncing is complete, restart your setup. This can be done using the Restart option under Server maintenance area, as described in section Server maintenance.

