Upload to QCI Interpret
The Upload to QCI Interpret tool can upload variants as well as TMB and MSI scores, HRD status, and tumor purity to QCI Interpret or QCI Interpret Translational. To facilitate the upload, variant tracks are first exported to VCF and then uploaded using provided login details.
To run the tool, go to:
Tools | Biomedical Genomics Analysis (![]() ) | IPA and QCI Interpret Upload (
) | IPA and QCI Interpret Upload (![]() ) | QCI Interpret Upload (
) | QCI Interpret Upload (![]() ) | Upload to QCI Interpret (
) | Upload to QCI Interpret (![]() )
)
In the first wizard step, select the elements containing the variants that should be uploaded. Supported input elements are:
- Variant track(s) Add variant tracks to include variants in the upload. If multiple variant tracks are selected, all variants in the variant tracks are uploaded except duplicate variants, where only the variant with the highest quality is included.
- CNV track Add a CNV track to include copy number variations.
- Fusion track Add a fusion track to include fusions.
- Inversion track Add an inversion track to include inversions.
In the next step, specify information that should be displayed in QCI Interpret (figure 9.2). Under Names, if a field is left empty, the name of the first selected element is used as the sample name. It is possible to use metadata to define the sample name if the tool is run as part of a workflow, see Configuring Workflow Output and Export elements for details.
- Sample name The name of the uploaded sample that will be shown in QCI Interpret.
- Subject ID Set the subject ID of the uploaded sample, leave empty, or use metadata if running as part of a workflow.
- Project Set the project of the uploaded sample, leave empty or use metadata if running as part of a workflow.
Under Elements, specify the reference sequence, reports containing oncology scores that should be included in the upload, reports containing tumor purity values, and add any reports that should be available as PDFs in QCI Interpret:
- Reference sequence track To generate the VCF, the tool needs a reference track. Hg19 and hg38 references are supported.
- TMB report Include tumor mutation burden value and status by including a report output from Calculate TMB Score. The algo must have been set up to detect a TMB status.
- MSI report Include microsatellite instability score and status by including a report output from Detect MSI Status.
- HRD report Include homologous recombination deficiency score and status by including a report output from Calculate HRD Score.
- Tumor purity report Include tumor purity value by including a report from Detect Regional Ploidy.
- Upload reports Include any report. Specified reports will be shown as PDFs in QCI Interpret.
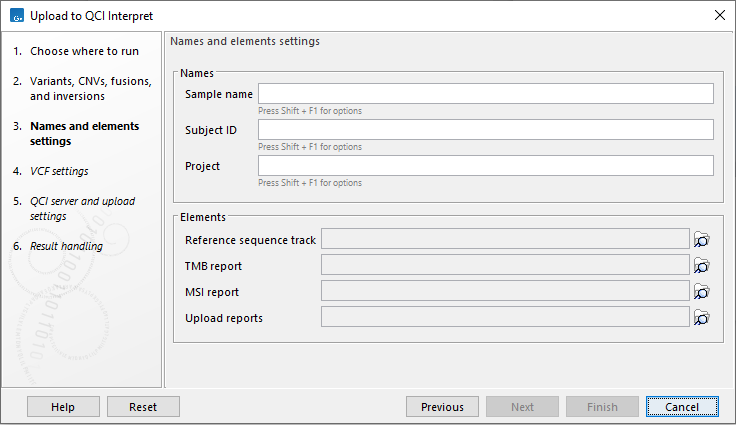
Figure 9.2: Provide information that should be shown in QCI Interpret, the reference sequence for the uploaded variants, oncology scores, tumor purity values, and any reports that should be available as PDFs in QCI Interpret.
The next step defines how the uploaded VCF will be created. The Prefill VCF setting changes the VCF settings to suggested defaults depending on the data. The somatic and germline/hereditary workflows of QCI Interpret focus on different needs, with somatic being primarily focused on therapeutic, prognostic, and diagnostic actionability, while germline/hereditary is better suited for disease diagnosis/risk. For details about VCF export settings, see Export in VCF Format.
In the final step, choose your QCI Region and log in (figure 9.3). Click on the Log in button to open a new browser (or new tab) where you can log in, and give the CLC Workbench permission to upload samples to QCI on your behalf. Note that an API-enabled license is needed to login. If your region is not in the list of QCI regions or for questions about licenses, please send an email to bioinformaticslicense@qiagen.com.
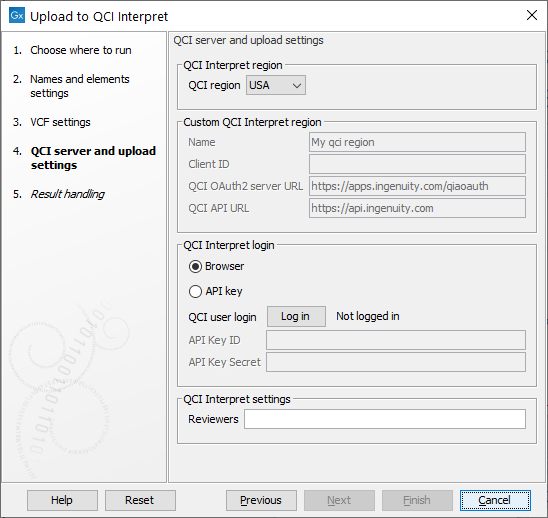
Figure 9.3: Choose QCI region and log in.
Note: Do not share workflows that contain your QCI Interpret login information. A workflow containing this tool contains your login information if you have logged in using a browser.
The uploaded sample can be shared with QCI users by adding a comma-separated list of emails in the Reviewers setting.
Output
The output is a report that shows a summary of the data in the sample, information about the upload, and a link to the sample list in QCI Interpret.