Principal component analysis plot (3D)
The principal component plot may also be displayed in 3D. The 3D view is accessible through the view buttons at the bottom of the panel.
|
Notice that the 3D PCA rendering feature requires a graphics card capable of supporting OpenGL 2.0. Please make sure the latest driver for the graphics card is installed. Indirect rendering (such as x11 forwarding through ssh), remote desktop connection/VNC, and running in virtual machines is not supported. |
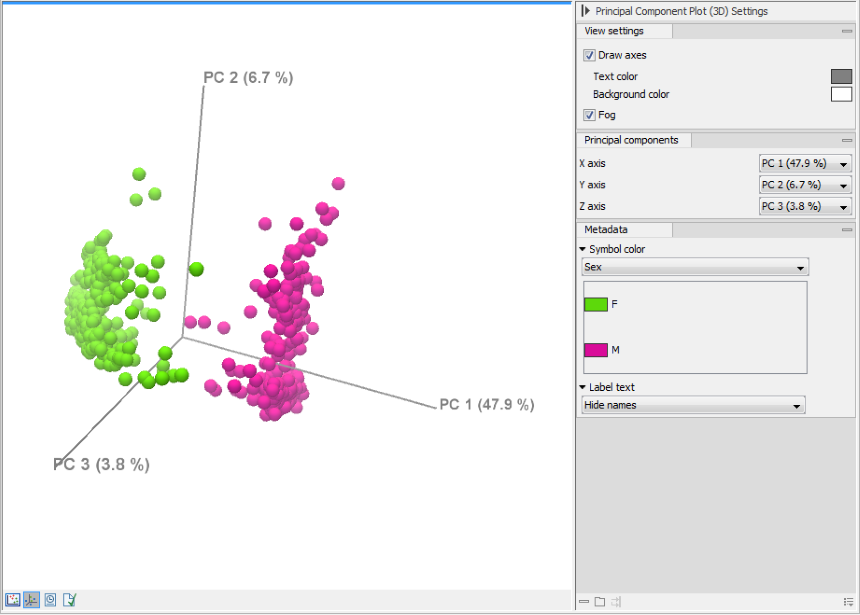
Figure 30.21: A principal component 3D plot.
The 3D view may be rotated by dragging on the view with the left mouse button pressed. It is possible to pan the view by dragging with the right mouse button pressed. Zooming can be done either using the mouse scroll wheel, or by dragging with both left and right mouse button pressed. It is also possible to center and zoom to a sample simply by clicking on it. Clicking outside any sample (or clicking with the right mouse button) restores the zoom and centering.
The Side Panel offers a number of options to change the appearance of the 3D principal component plot:
The View settings group makes it possible to toggle the coordinate system on and off, and adjust the text and background color. It is also possible to enable Fog, which dims distant objects in order to improve the depth perception.
The Principal Components group determines which principal components are used in the 3D plot. The value after the principal component identifier (for example "PC 1 (72.5 %)") displays the amount of variance explained by this particular principal component.
The Metadata group allows metadata associated with the Expression tracks to be visualized using color or as text:
- Symbol color Colors are assigned based on a categorical factor in the metadata table.
- Label text Samples are labeled according to the values in a given metadata column. If 'Show names' is selected, the samples will be labeled according to their name (as shown in the Navigation Area).
To save the current view as an image, press the Graphics button in the Workbench toolbar. Next, select the location where you wish to save the image, select file format (PNG, JPEG, or TIFF), and provide a name, if you wish to use another name than the default name.
It is possible to save the current view settings (including camera settings) using the Side Panel view settings options, see Saving, removing and applying saved settings.