Creating a metadata table directly in the Workbench
Metadata tables can be created from within the CLC Genomics Workbench. Generally, it is much easier to enter the metadata into an Excel file and either import that, as described in Importing metadata, or to use that file when launching a workflow in batch, and use the workflow results metadata file that is output, which is described in Workflow outputs and workflow result metadata tables.
To create a metadata table directly in the CLC Genomics Workbench, go to:
File | New | Metadata Table (![]() )
)
This opens a new metadata table with no columns and no rows. Importing metadata using the Metadata Table Editor requires that the table structure is defined first.
Defining the table structure
Click Setup Table at the bottom of the view (figure 10.6).
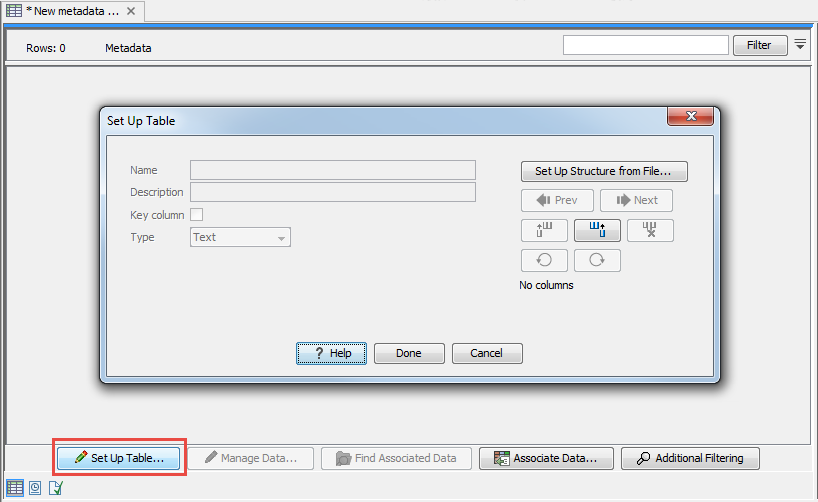
Figure 10.6: Dialog used to add columns to an empty Metadata Table.
To create a metadata table from scratch, use the "Add column right" or "Add column left" buttons (![]() ) to define the table structure with the amount of columns you will need, and edit the fields of each column as needed.
) to define the table structure with the amount of columns you will need, and edit the fields of each column as needed.
To import the table from a file, click on Setup Structure from File. In the dialog that appears (figure 10.7), you need to provide the following information:
- Filename The EXCEL or delimited TEXT file to import. Column names should be in the first row of this file.
- Encoding For text files only: the encoding used to create the file. The default is UTF-8.
- Separator For text files only: The character used to separate the columns. The default is semicolon (;).
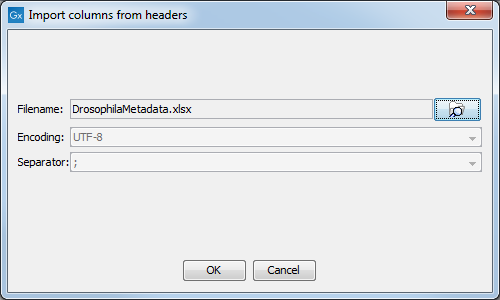
Figure 10.7: Creating a metadata table structure based on an external file.
For each column in the external file, a column will be created in the new metadata table. By default the type of these imported columns is "Text". You will see a reminder to set the column type for each column and to designate one of the columns as the key column.
Populating the table
Click on Manage Data button at the bottom of the view (figure 10.8).
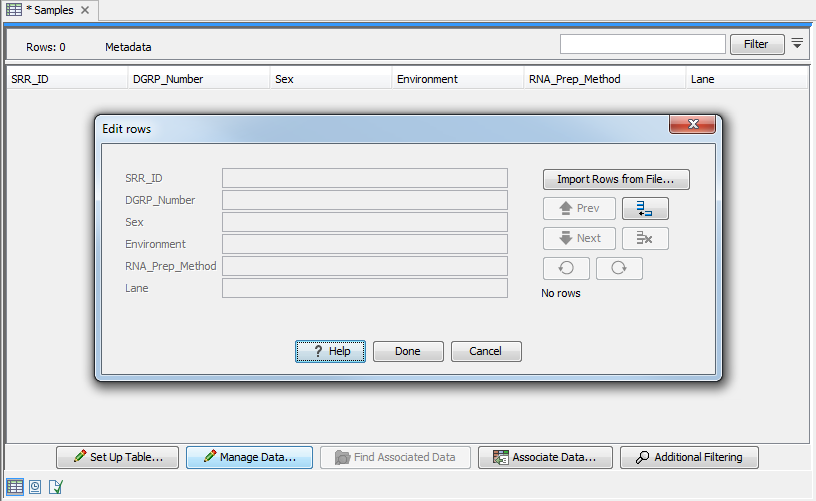
Figure 10.8: Tool for managing the metadata itself. Notice the button labeled Import Rows from File.
The metadata table can then be populated by editing each column manually. Row information is added manually by clicking on the (![]() ) button and typing in the information for each column.
) button and typing in the information for each column.
It is also possible to import information from an external file. In that case, the column names in the metadata table in the workbench will be matched with those in the external file to determine which values go into which cell. Only cell values in columns with an exact name match will be imported. If the file used contains columns not in the metadata table, the values in those columns will be ignored. Conversely, if the metadata table contains columns not present in the file, imported rows will have no values for those columns.
Click on Import Rows from File and select the external file of metadata. This brings up the window shown in figure 10.9.
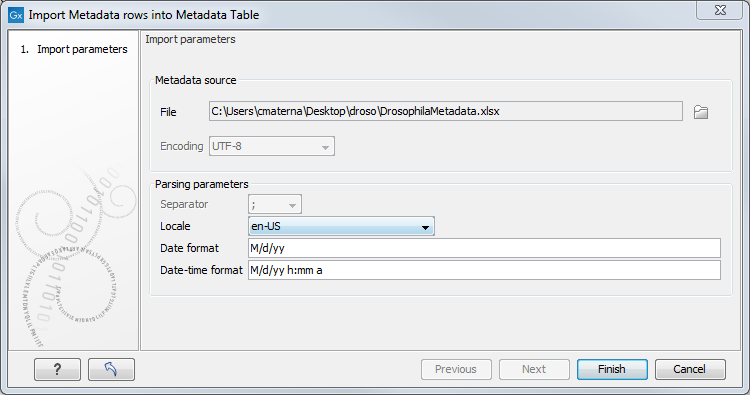
Figure 10.9: Tool to import rows into a Metadata Table.
When working with an existing metadata table and adding extra rows, it is generally recommended that a key column be designated first. If a key column is not present, then all rows in the file will be imported. With no key column designated, if any rows from that file were imported into the same metadata table earlier, a duplicate row will be created. With a key column, rows with a new, unique entry for that column are added to the table and existing rows with a key entry in the file will be updated, incorporating any changes present in the file. Duplicate rows will not be created.
The options presented in the Import Metadata Rows into Metadata Table are:
- File. The file containing the metadata to import. This can be Excel (.xlsx/.xls) format or a delimited text file.
- Encoding. For text files only: The text encoding of the seledcted file. Specifying the correct encoding is important to ensure that the file is correctly interpreted.
- Separator. For text files only: the character used to separate columns in the file.
- Locale. For text files only: the locale used to format numbers and dates within the file.
- Date format. For text files only: the date format used in the imported file.
- Date-time format. For text files only: the date-time format used in the imported file.
The date and date-time templates uses the Java patterns for date and time formatting.
Meaning of some of the symbols:
Symbol Meaning Example y Year 2004; 04 d Day 10 M/L Month 7; 07; Jul; July; J a am-pm PM h Hour (0-12 am pm) 12 H Hour (0-23) 0 m Minute 30 s Second 55 Examples of using this:
Format Meaning Example dd-MM-yy Short date 31-12-15 yyyy-MM-dd HH:mm Date and Time 2015-11-23 23:35 yyyy-MM-dd'T'HH:mm ISO 8601 (standard) format 2015-11-23T23:35 With a short year format (YY), 2000 will be added when imported as, or converted to, Date or Date and time format. Thus, when working with dates before the year 2000 or after 2099, please use a four digit format for the year (YYYY).
Click the button labeled Finish button when the necessary fields have been filled in.
The progress and status of the row import can be seen in the Processes tab of the Toolbox. Any errors resulting from an import that failed can be reviewed here. The most frequent errors are associated with selecting the wrong separator or encoding, or wrong date/time formats when importing rows from delimited text files.
Once the rows are imported, The metadata table can be saved.