Batch Rename
With the Batch Rename tool it is possible to rename your data in a batch fashion.
To run the batch rename tool:
Toolbox | Utility Tools (![]() ) | Batch Rename (
) | Batch Rename (![]() )
)
This will open the dialog shown in figure 34.1 where you can select the input data.
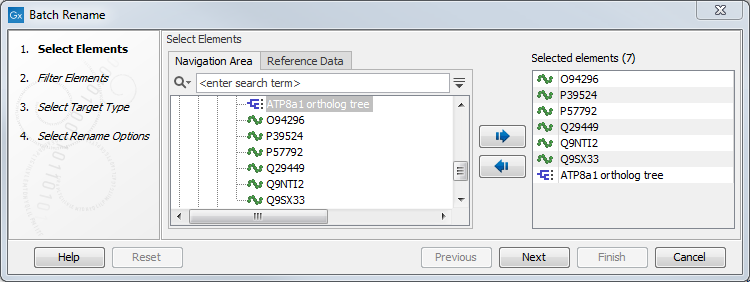
Figure 34.1: Selecting the data you want to rename.
Click Next to go to the next dialog (see figure 34.2).
Here, one can choose to include or exclude only some of the datat previously selected to work on. For small numbers of data elements, this would not usually be necessary. However, if many data objects were selected at the previous step (to save time when choosing many data elements) you could use the include or exclude functionality at this point so that only certain data elements will be be acted on by the batch rename tool.
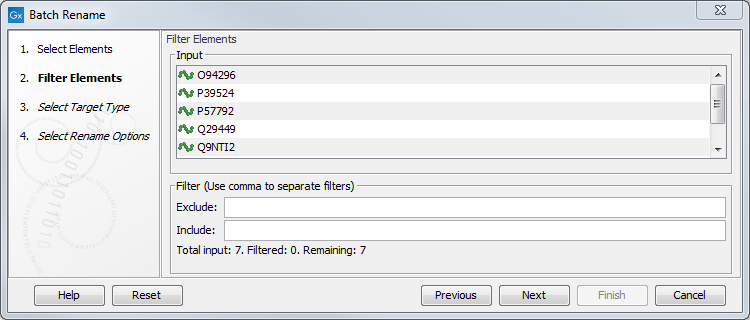
Figure 34.2: Select how to filter the input data.
The Include and Exclude filters take the text entered into the respective fields and search for matches in the names of the data elements selected in the first wizard step. Thus, you could enter the full names of particular data elements, or just partial names. Any elements where a match is found to the term or terms in the Include field will have the batch renaming applied to them. Any elements where a match is found to the term or terms in the Exclude field will not have the batch renaming applied to them.
For both filters, if you wish to filter on more than one term at the time, the individual terms must be separated with a comma - and without using a space after the comma. An example is shown in figure 34.3.
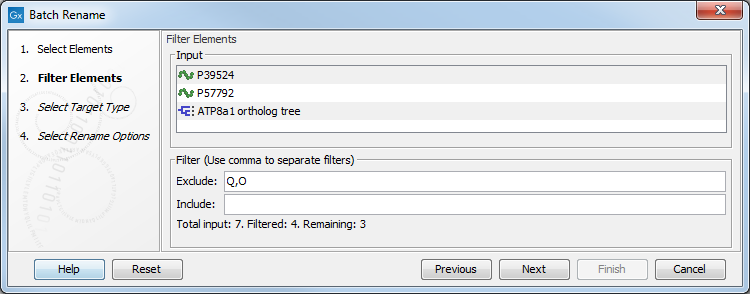
Figure 34.3: Items remaining after filtering away items with a Q or an O in their name.
In the "Select Target type" step, you can specify at which level you wish to perform the renaming. For a single sequence this is straightforward because it has just one name, and you would use the Rename elements option. But if you have a sequence list - as in the example shown in figure 34.4 - you could choose either to rename the list (using Rename elements) or the sequences in the list (using Rename sequences in sequence lists). The same goes for alignments (using Rename sequences in alignments) and read mappings (using Rename reads in mappings). For read mappings, there is also an option to Rename reference sequence in mappings.

Figure 34.4: In this example, as we only have one category represented, the other target type options are disabled.
Click Next to open the last dialog (see figure 34.5). For each text field, you can press Shift+F1 (Shift + Fn + F1 on Mac) to get a drop-down list of advanced placeholder options.
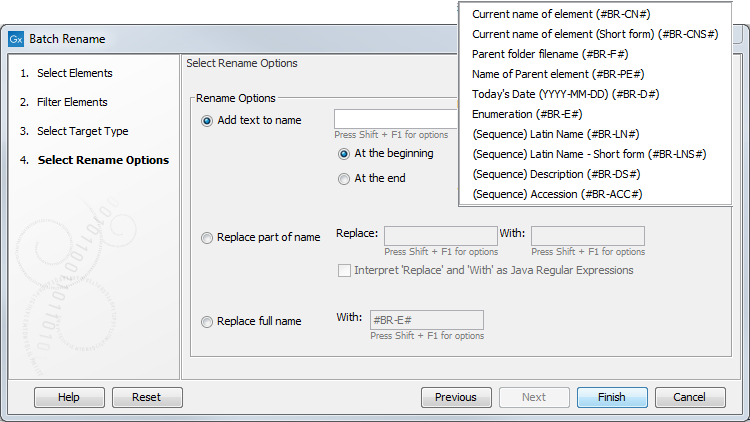
Figure 34.5: Rename options. At this step you can choose whether you wish to add text to the existing name, replace some of the name, or replace the entire name.
At this step you can select between three different renaming options.
- Add text to name This option will add text at the beginning or the end of the existing name, depending on which you choose. Pressing Shift + F1 (Shift + Fn + F1 on Mac) will enable a list of different renaming options as shown in figure 34.5. The different options are presented as e.g. #BR-E#, which means "Batch Rename - Enumeration" = the current name is kept, and if "At the end" was selected, consecutive numbers will be added directly after the existing name (without introducing a space between the existing name and the new addition). Please note, that the numbering will follow the order of which the data were selected in the first dialog under "Select Elements".
- Replace part of name This is an advanced function that allows to replace e.g. data with completely different names in one go with a new name. This is shown in figure 34.6.
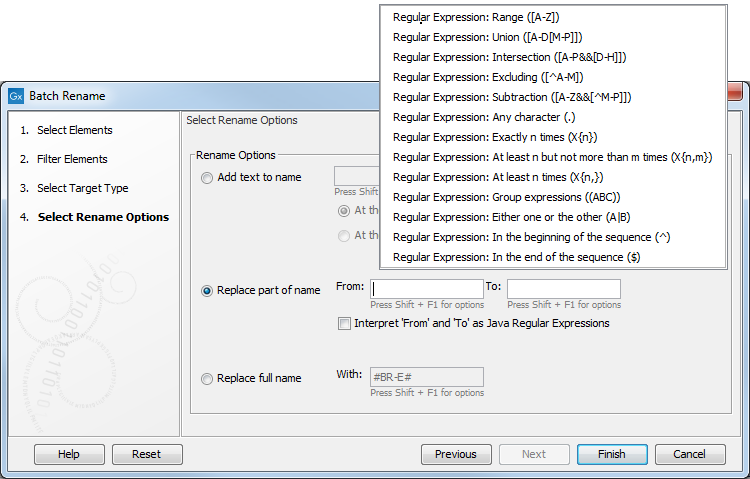
Figure 34.6: Advanced options for rename of only part of a name.The option to replace part of a name is based on regular expressions. Regular expressions allows you to describe text in a flexible manner. For more details, please see: http://docs.oracle.com/javase/tutorial/essential/regex/.
By clicking in either the From: or To: box and pressing the Shift and F1 keys at the same time (Shift + Fn + F1 on Mac), you will see a drop down list of renaming possibilities. The options listed for the From: field are some of the most commonly used regular expressions. Other standard regular expressions are also admissible in this field. Note! Please ensure that if you choose any of these options, or other regular expressions, that you check in the box labeled "Interpret From as Java Regular Expressions". If you do not check this box, then the characters you enter in the From box will be interpreted literally. For example, a full stop or period (.) is interpreted as that character (.) when this box is not checked, but is interpreted as meaning any single character when the box is checked.
An example: if you enter "From:" "Regular Expression: Range ([A-Z]) "To:" "Enumeration (#BR-E#)", titles containing any (capital) letters will be renamed to consecutive numbers. A more advanced example where the sequences shown in the images earlier in this manual are used is shown in figure 34.7. The sequence names contain both a capital letter, small letters and a number. In the first, the number is kept and a date is added in front of the number.
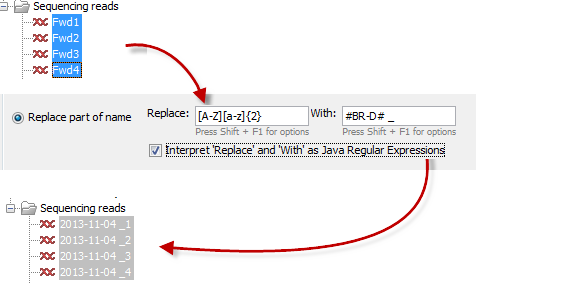
Figure 34.7: The letters "Fwd" are removed from the primer name and replaced with "Today's date". In this case we have also inserted a space and a "_" between the date and the number, which was the only thing that was left from the original primer name. Please note that in order to be able to remove both of the small letters in the primer name, you have to add 2, which indicates that [a-z] should be performed twice.As this can be a bit difficult to grasp, we will look at three more examples. We will use the name 1N R1_0001 in the two first examples:
- First we want to keep only the first 4 none-whitespace characters of the name(s). To do this write the following in the "From" and "To" fields shown in figure 34.7:
From:
(^\S{4}).*Nomenclature:
^: start of the line,\S: none-whitespace characters,{4}: 4 characters,.*: everything after the patternTo:
$1Nomenclature:
$1: the first group in the "From" fieldThe result of this is that 1NR1 is kept, whereas the space between "N" and "R1" and _0001 have been discarded.
- If we would like to keep only the last 4 characters of the name(s):
From:
(.*)(.{4}$)Nomenclature:
(.*): the first group, (.{4}$): any 4 character atthe end of the line as the second groupTo:
$2Nomenclature:
$2: the second group in the "From" fieldThe result of this is that 0001 is kept, whereas 1N R1_ has been discarded.
- Now we would like to replace the first letter followed by 9 numbers in the name "p140101034_1R_AMR" with the parent folder name, which in this case is "AmericanSamples".
From:
([A-Z]\d{9})(.*)Nomenclature:
[A-Z]: any character(as long as they are part of [A-Z][a-z], the CLC software do not differentiate between upper/lower case),
\d{9}: any 9 digit numbers, (.*): the second group of the name(anything after the "([A-Z]\d{9})" pattern ).To:
#BR-F#$2Nomenclature:
$2: the second group in the "From" field.The result of this is that we have replaced "p140101034" with "AmericanSamples" and as a result have changed the name from p140101034_1R_AMR to AmericanSamples_1R_AMR.
- If we want to extract and use the text "sample-code" for the new name from the following "1234_sample-code_5678" with Java Regular Expressions:
From:
(^[^_]+)_([^_]+)_(.*)Nomenclature:
^[^_]+: Starting from the beginning and match anything before the first underscore,[^_]+: will match anything and stop before the second underscore.After the second underscore, the match will include the rest of the name.
To:
$2Nomenclature:
$2: includes the match from the second group, which is flanked between the first and the second underscore symbols of the name.
- First we want to keep only the first 4 none-whitespace characters of the name(s). To do this write the following in the "From" and "To" fields shown in figure 34.7:
- Replace full name Allows replacement of the entire name with the name that is either typed directly into the text field, or with options that can be selected when pressing Shift + F1 (Shift + Fn + F1 on Mac). Figure 34.8 shows an example where a combination of "Shift +F1" (Shift + Fn + F1 on Mac) options (#BR-D# and#BR-E#) are used together with user-defined text (RNA-Seq).
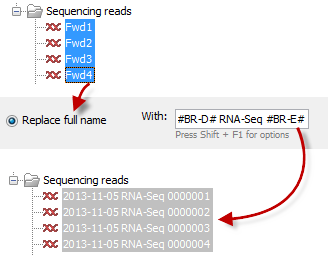
Figure 34.8: The entire name is removed from the primer names and is replaced with "Today's date" (#BR-D#), the userdefined text: RNA-Seq, and the addition of consecutive numbers (#BR-E#). In this case we have inserted a space between the date, the user-defined text and the added number. If commas were inserted instead, the commas would be part of the new name as everything that is typed into the text field will be used in the new name when renaming the entire name.
Click Finish to start renaming. Please note that the rename cannot be undone and that it does not show up in the History (![]() ).
).