Batch launching workflows with multiple inputs
This section describes legacy functionality for launching workflows with multiple inputs, where the contents of more than one input should change in each batch. This functionality is now supported through standard launch mechanisms. Please see Batching entire workflows for information about the new functionality.
Previously, the requirements for launching workflows with multiple inputs in batch mode were:
- The workflow must be installed on the Workbench, meaning that the workflow is accessible from the Toolbox (as opposed to workflows accessible from the Navigation Area).
- The workflow is characterized by more than one input file, and all input elements are unique per batch. You cannot reuse a common input element (such as control reads for example), unless it has been saved under different names in the Navigation Area.
- An Excel format file (.xlsx/.xls) must be provided, with at least 3 different columns:
- Unique ID The first column must contain either the exact name of the data elements to be used as inputs, or partial name information such that data elements being entered into the analysis can be uniquely identified and matched with the information contained in the spreadsheet.
- Grouping A second column must specify which data elements should be analyzed together in a given batch unit: this would be the ID of a single individual when comparing different tissues from the same individual (one individual per batch); or a family name when identifying variants existing within one family (one family per batch).
- Type The third column must specify the type for each data element: the values in this column distinguish tissue samples from controls, or inform about the disease status of a family member (affected/non-affected/proband) when identifying disease causing variants.
(Figure 35.31) shows an example of a spreadsheet used in the case of tissue comparison. Note that the "grouping" and "type" are context specific, and will depend on the analysis performed, i.e., on the tools that constitute the workflow.
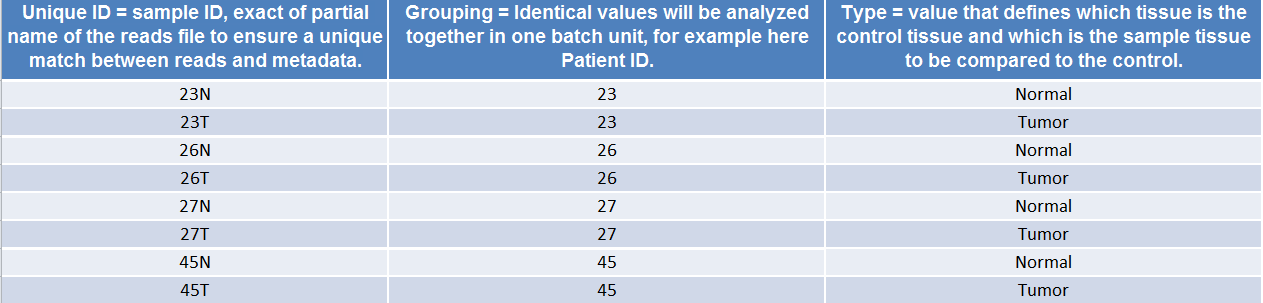
Figure 35.31: Example of a spreadhseet necessary to run a workflow in batch, where the workflow intend to compare two tissue samples.
To launch a workflow with multiple input elements in batch mode, right click on the name of the workflow in the Toolbox and select the option "Run in Batch Mode..." (figure 35.32).
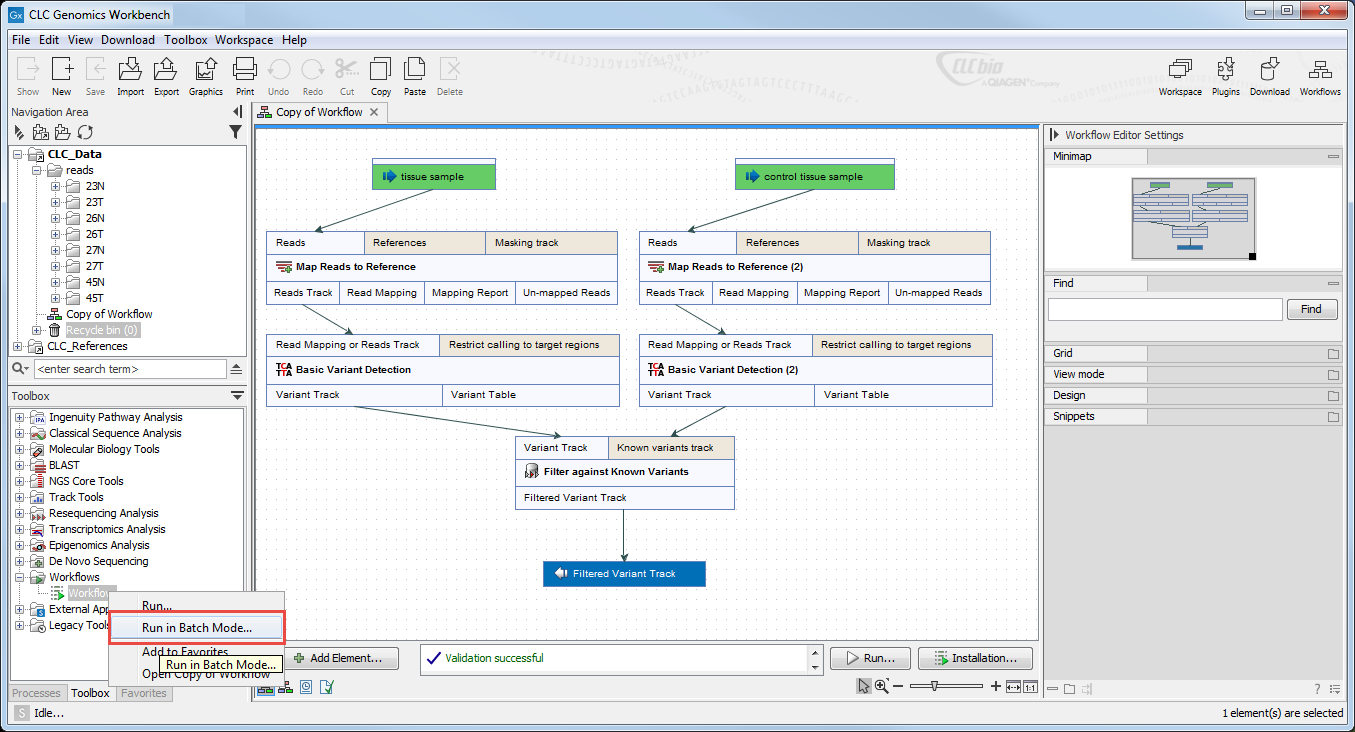
Figure 35.32: The option to "Run in Batch Mode..." appears in the context menu when you right click on the name of an installed workflow that has multiple input elements in the Toolbox panel.
A wizard opens and in the first window, you need to specify:
- An Excel file containing the information about the data to be analyzed (figure 35.33). Note that this file dos not need to be saved in your Navigation Area. When it has been selected, the table found in the lower part of the wizard will show recapitulate the content of the Excel sheet. The location of the data for this analysis is not yet specified, so a red, no-entry sign is visible in the header of the first column.
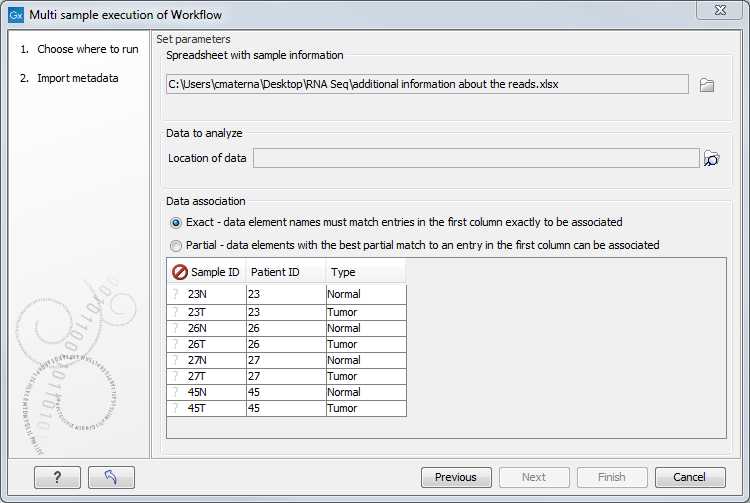
Figure 35.33: Select the information about the data to be analyzed and the folder holding the data to analyze. An example of an Excel sheet with the relevant information is shown. - The location of the reads: click on the Navigation button next to the "Location of data" field and specify the folder(s) that contain(s) the data, as shown in figure 35.34.
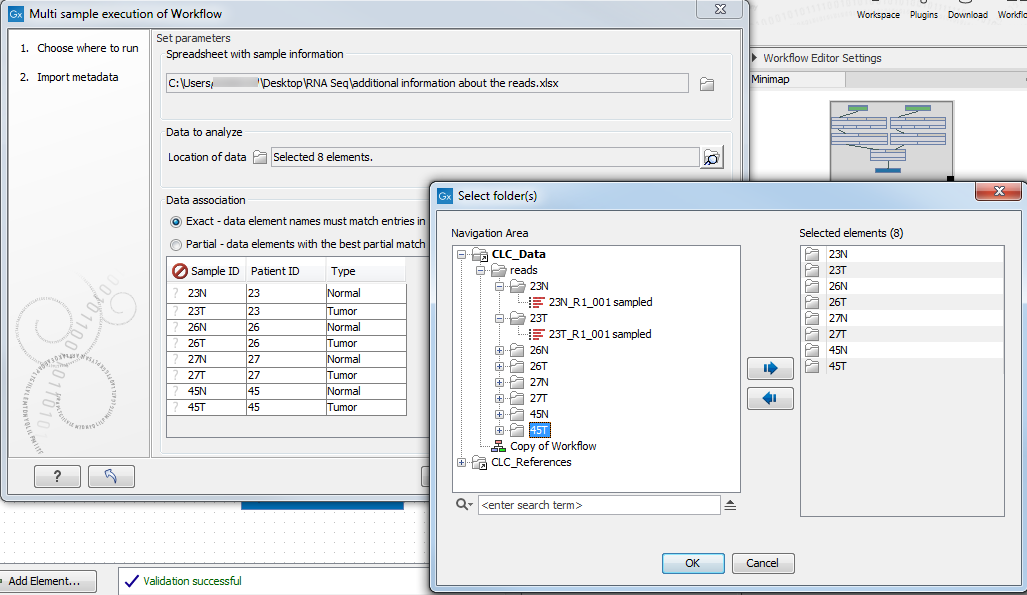
Figure 35.34: Select the folder(s) that contain(s) the data to be analyzed.Data elements within the selected folders are considered for the analysis. Subfolders and their contents are not considered unless the subfolder is also selected. Individual data elements cannot be selected.
- Select the appropriate matching scheme - exact or partial. The matching rules applied are the same as those used for metadata association: "Exact" means that data element names must exactly match an entry in the first column of the Excel file; "Partial" matching allows for data elements names partially matching an entry in the first column. "Exact" is selected by default.
An icon with a green check mark (![]() ) appears in the table preview next to rows where a data element corresponding to a row of the Excel sheet was uniquely identified. If no match can be made to a given row of the Excel sheet, a question mark (
) appears in the table preview next to rows where a data element corresponding to a row of the Excel sheet was uniquely identified. If no match can be made to a given row of the Excel sheet, a question mark (![]() ) is displayed.
) is displayed.
Graphical symbols are also presented in the header of the first column of the preview pane to give information about the overall status of the matching of rows in the Excel sheet with data elements in the Workbench:
- When no data elements match information in the Excel sheet, a red, no entry symbol (
 ) is displayed. In this situation, the button labeled Next is not enabled. This is the expected state before any data elements have been selected.
- A yellow exclamation mark (
 ) indicates that some, but not all rows in the Excel sheet have been matched to a data element in the selected folder(s).
- A green checkmark (
 ) indicates that all rows in the Excel sheet have been matched to a data element in the selected folder(s).
In figure 35.35, the green check mark symbol in the header of the first column in the preview pane indicates that data elements were identified for each of the rows in the Excel sheet. You can click on the button labeled "Next".
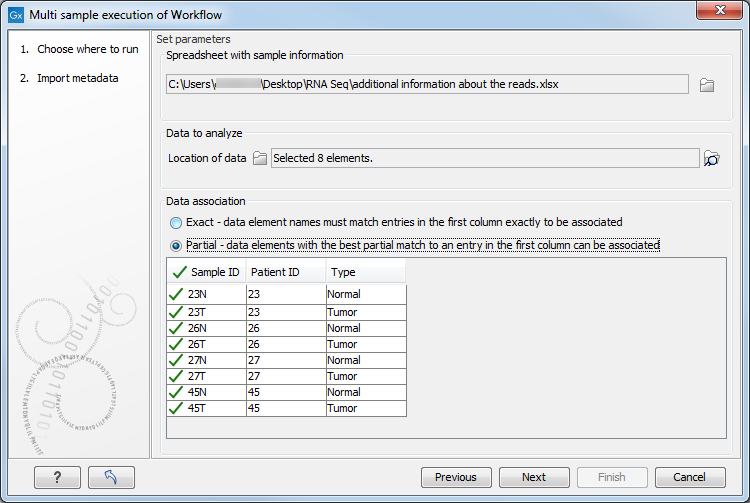
Figure 35.35: View of the Data Association table after all samples were successfully associated.
The next wizard window is called "Select grouping parameters and analysis inputs".
- In the Group by drop down menu, select the name of the column containing information that specifies which samples should be analyzed together.
- In the Type drop down menu, select the name of the column containing information that can be mapped to the workflow input type of each data element.
In the same window you will need to further specify the inputs of the workflow. What needs to be specified here is dependant on the workflow itself.
An example is shown in figure 35.36. Group by is set to a column specifying "Patient ID", because each workflow run will analyze a sample pair. Type is set to the "Type" column, because the workflow inputs are either tumor or normal tissues. The sample columns section maps data elements to the different workflow inputs, in this case "Tissue sample" is set to "Tumor", and "Control tissue sample" to "Normal".

Figure 35.36: Grouping samples.
The rest of the wizard is dependant of the tools included in the workflow. Fill in the appropriate information and save the results of your workflow in a folder you can create in the Navigation Area.
As in a regular batching mode, you can use the progress bar to see how the job is progressing (figure 35.37): a process called "Batch Process" indicates how many batches have been completed, while the ones situated above show the analysis progress of a particular batch unit.
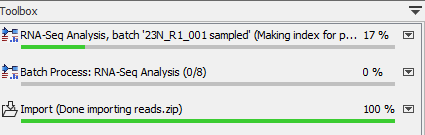
Figure 35.37: Check on the progress of your workflow being run in batch mode using the Processes tab below the Toolbox.