
Sequence List view
The graphical Sequence List view ( ) is the primary view for working directly with sequences in the list. In this view, all the residues of a sequence can be seen when zoomed in, or for long sequences, the view can be zoomed out to get an overview (figure 15.8).
This section focuses on functionality available in the graphical view of Sequence Lists that is not already described in the section about working with individual sequences.
Topics covered:
- Sequence layout options in the Side Panel
- Marking sequences and working with marked sequences
- Changing the sequence order
- Adding more sequences to a list
- Deleting sequences from a list
- Selecting one or more regions across multiple sequences
- Other functionality (rename a sequence, find sequences based on names, delete annotations, create restriction maps, extract sequences)
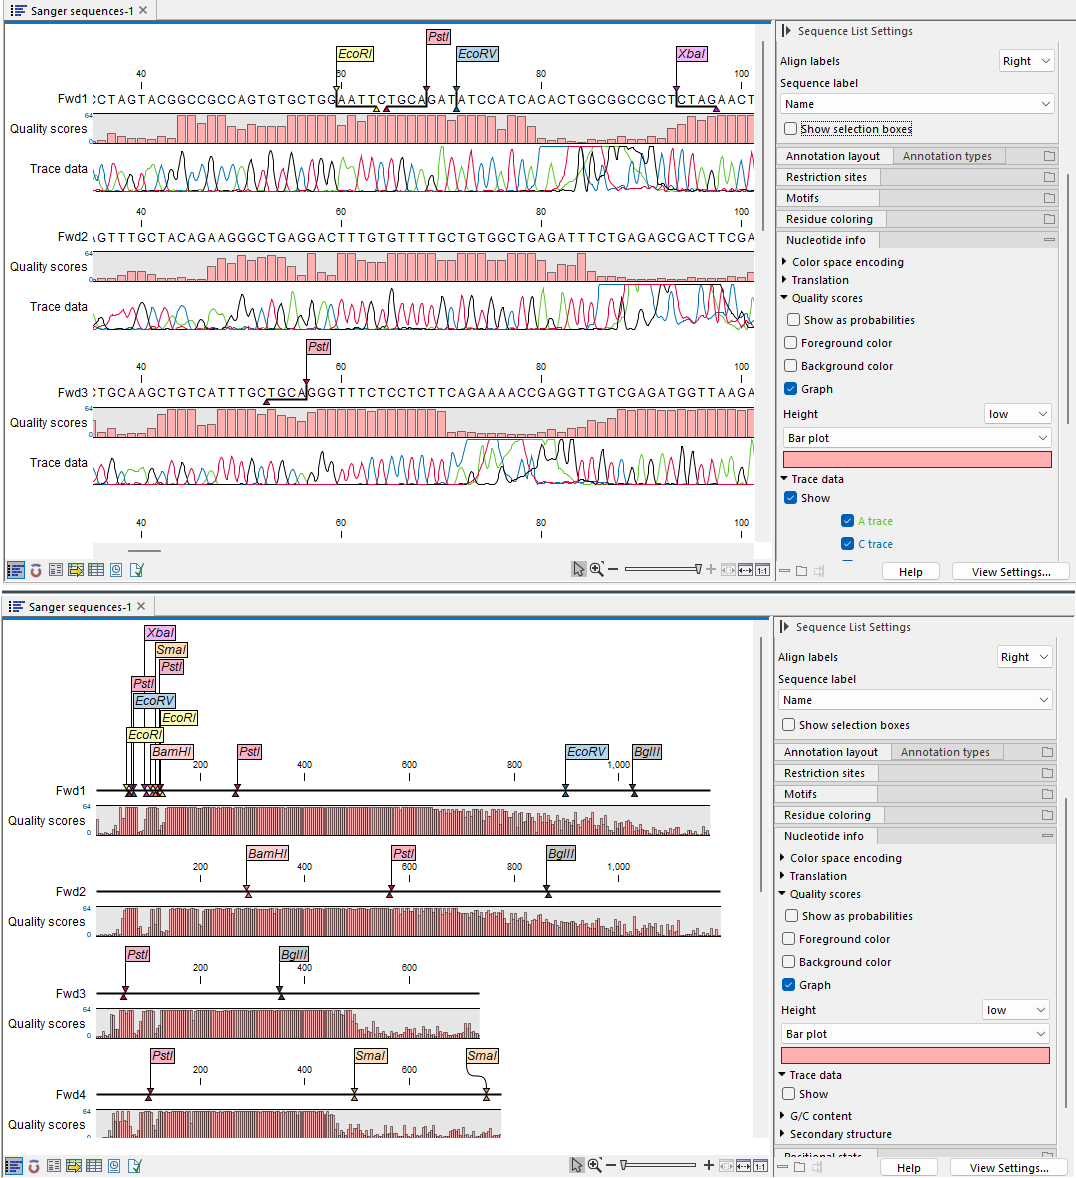
Figure 15.8: The graphical Sequence List view supports viewing sequence content in detail when zoomed in (top) or a general overview when zoomed out (bottom). What is displayed in the view, and how it is displayed, is controlled using the Side Panel settings. Here, the option to view traces was turned on when zoomed in, but was turned off when zoomed out.
Sequence layout options in the Side Panel
The information in this section is focused on functionality in the Sequence layout Side Panel palette that are specific for Sequence Lists.
For general information about working with Side Panel settings, see Side Panel. For information about Side Panel settings shared by data types containing sequence data, see Sequence view.
The Sequence layout Side Panel palette in the Sequence List view includes the following options (figure 15.9):
- Align labels. Left or right justify the sequence labels. Usually, the label is the sequence name.
- Sequence label The label used for the sequences in the view can be adjusted here. In addition to the options provided for inidividual sequence elements, the following options are available when working with a Sequence List:
- Name (number). The sequence name followed by a sequential number representing the position of each sequence in the list. The numbers are updated each time the order of the sequences is changed.
- (number) Name. The sequence name prepended by a sequential number representing the position of each sequence in the list. The numbers are updated each time the order of the sequences is changed.
- Show selection boxes. Display boxes to the right of sequence labels. These are used for marking sequences. Working with sequences based on marked status is described later in this section. By default, these checkboxes are not displayed.
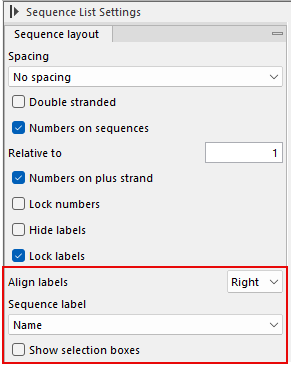
Figure 15.9: Sequence layout settings in the Side Panel include those applicable to individual sequences, as well as options relevant for Sequence Lists, shown here in the red box.
Marking sequences and working with marked sequences
Sequences in a list can be marked (figure 15.10), and those marked sequences can then be deleted, or manually moved to another position in the list in a single action. The order of the sequences in the list can also be sorted based on marked status.
Marking sequences is intended for interactive use. The marked status of a sequence is not saved when the alignment is closed.
Marking sequences To mark a sequence, click once on its label or check the selection checkbox to the right of the sequence label. The labels of marked sequences are highlighted.
Checkboxes for marking sequences are not displayed by default. To show these, check the Show selection boxes option in the Sequence layout Side Panel palette.
Clicking once on an additional sequence name, or in an additional checkbox, marks an additional sequence.
To simultaneously mark multiple sequences:
- After marking one sequence, keep the Shift key depressed and click on another sequence name, or in another selection checkbox. The sequence clicked on, along with all sequences between it and the first sequence marked, will be marked.
- Right-click a selection checkbox, and choose the Mark All option.
- Right-click a selection checkbox, and choose the Invert All Marks option.
Mark All and Invert All Marks can be useful when most sequences should be marked.
Clearing marks Clearing marked status can be done in a number of ways:
- Unmark a single sequence:
- Click the name of a marked sequence once.
- Click a checked selection checkbox once.
- Unmark all marked sequences:
- With selection checkboxes displayed (described above), right-click any checkbox and choose the menu option Clear All Marks.
- Close the Sequence List (saving changes if desired) and re-open it. Mark status is not stored when closing an element.
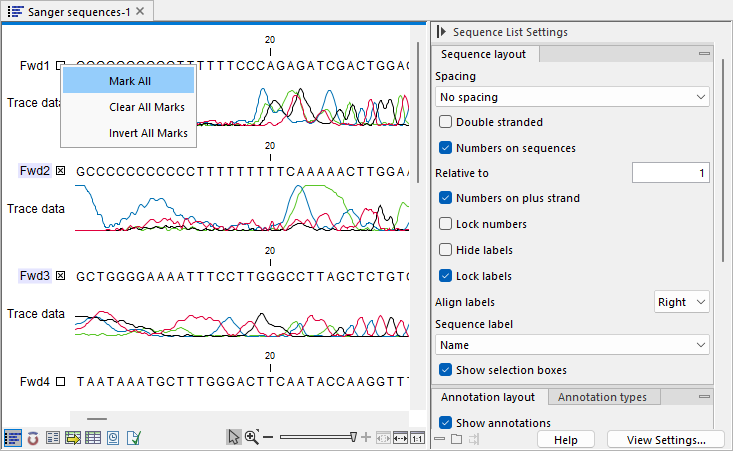
Figure 15.10: Selection boxes are being displayed, and sequences Fwd2 and Fwd3 have been marked. The selection box next for sequence Fwd 1 has been right-clicked, opening a menu with options for marking, unmarking or inverting the marked status for all sequences in the list.
Changing the sequence order
To change the order of sequences in the list:
- Drag marked sequences Click the label of a marked sequence and drag the cursor up or down to change the position of that sequence and all other marked sequences.
- Drag an individual sequence Click the label of a single sequence and drag the cursor up or down to change the position of that sequence.
Note: The position of a single sequence cannot be changed if other sequences in the list are marked. To move a single sequence, either clear all marks (see above), mark just this one sequence, or use the Table view instead and drag the individual row, or the two rows for paired sequences, to the desired location in the list.
When changing the sequence order:
- Changes must be saved for the updated order to be used when the Sequence List is later re-opened.
- Undo and Redo functionality is available when re-ordering actions are carried out.
- For paired end data, both members of a pair are moved, even when the action is taken on just one member of the pair.
- Sort the sequences The menu opened when right-clicking on a sequence name or on a residue within a sequence includes three options for sorting the list (figure 15.11):
- Sort Alphabetically on Name
- Sort by Ascending Length
- Sort by Marked Status
These options are available only for lists containing 1000 or fewer sequences. Tips for working with larger sequence lists are given in working with large sequence lists.
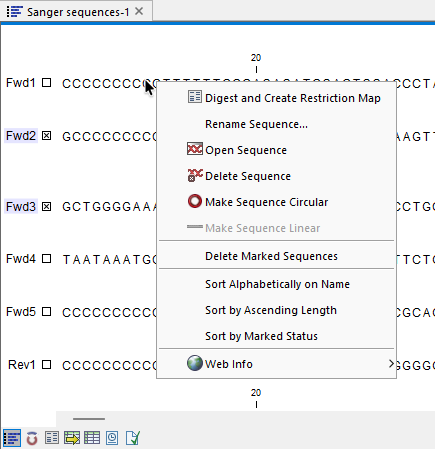
Figure 15.11: The context menu opened by right-clicking on residues in a sequence or by right-clicking on a label in a Sequence List view.
Adding more sequences to a list
Right-click in a blank area in the view and choose the option Add Sequences... ( ) from the menu (figure 15.12). A wizard will open allowing existing sequence elements or sequence lists to be added.
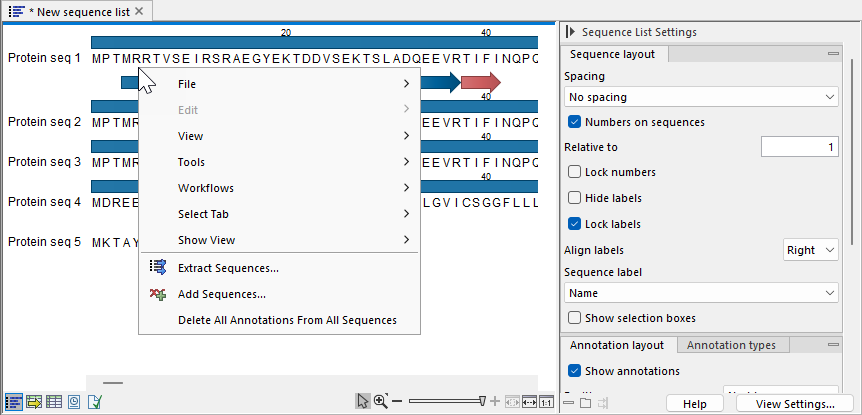
Figure 15.12: The context menu opened when clicking on a blank area of Sequence List view.
Deleting sequences from a list
To delete a single sequence from the list, right-click the sequence label or any of its residues and choose the option Delete Sequence from the menu (figure 15.11).
To delete multiple sequences, mark those to be removed, right-click any sequence label or sequence residue, and choose the option Delete Marked Sequences from the menu.
Selecting one or more regions across multiple sequences
Beyond selecting regions in individual sequences, selections in regions of multiple sequences in a list can be made (figure 15.13) by keeping the Ctrl key depressed, ( on Mac) while dragging the mouse cursor horizontally across the residues of the relevant coordinate range, and vertically, if desired, to also select that region in adjacent sequences.
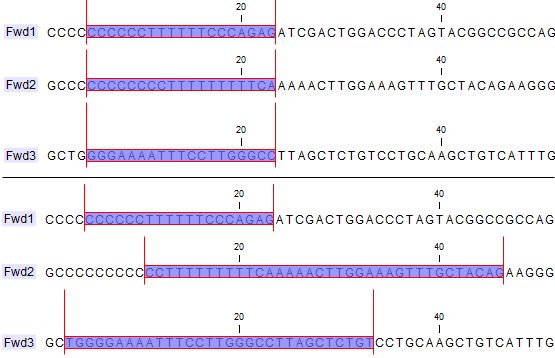
Figure 15.13: Selecting parts of multiple different sequences in a list simultaneously. Top: Using the Shift key to make selections with the same start and end positions. Bottom: Using the Ctrl key to make selections with different start and end positions.
The selected residues in a sequence can be copied and pasted into external text editing programs, or similar, if desired.
Other available functionality
Finding sequences based on their names In addition to the Find functionality for sequences, sequences lists can be searched using a sequence name by selecting the Name radio button in the Find palette in the Side Panel.
Various other functionality is available via right-click menus in the Sequence List view, including:
- Rename Sequence Available in context menu opened by right-clicking a sequence label or a sequence residue. If the sequence label has been changed so that something other than the name is being used, then the new name will not be visible in the Sequence List view, but the update will still be visible in other views, for example, the Table view (
 ).
).
- Delete All Annotations from All Sequences (Nucleotide sequence list only) Available in the context menu opened by right-clicking any blank area in the view. This option can only be used in lists with 1000 or fewer sequences. Deleting annotations from the Annotation Table view (
 ) is a more flexible view for working with annotations.
- Digest and Create Restriction Map (Nucleotide sequence list only) Available in the context menu opened by right-clicking a sequence name or sequence residue. Select this option to run a restriction site analysis on that sequence using the Restriction sites shown in the Restriction sites Side Panel palette. The output is the same as that generated using the Restriction Site Analysis tool.
A similar option is available in the context menu opened by right-clicking any blank area in the Sequence List view, Digest All and Create Restriction Map. This produces one set of results for all the sequences in the list. This option is only enabled for Sequences Lists with 1000 or fewer sequences.
- Extract Sequences Extracts all sequences from the list to a new list or to individual sequence elements. (Note: There is rarely a benefit to extracting to individual sequence elements.) To extract a subset of sequences to a new list, use functionality available in the Table view () or use the Split Sequence List (
 ) tool.
Subsections