Inspecting and completing a workflow
A workflow must be valid before it can be run or saved. To be valid, a workflow must, at minimum, have at least one route for data to flow into it, one result saved from it, and must not contain any unconnected elements. In more detail:
- There must be at least one Input element connected to the main input channel of the element where data starts its flow through the workflow. Where there are multiple independent arms in the workflow, this requirement pertains to each of those arms.
- There must be at least one result saved from the end of each branch within a workflow. In practice this means that at least one Output or Export element must be connected to each terminal element with an output channel.
- All elements must have at least one connection to another element in the workflow.
Valid workflows can be run, whether or not they have been saved.
When an unsaved workflow meets the minimum requirements and there are no other problems, the message The workflow must be saved will be shown in a field at the bottom of the editor. The unsaved state is also represented by the asterisk in the name of the tab.
The message Validation successful is shown in the field at the bottom of the editor when the workflow is valid and has been saved. In this state, the workflow can be run, and a workflow installer can be made.
The same field at the bottom of the editor is used for reporting problems with the workflow, as described below.
Tracking down and addressing issues in the workflow
The status of a workflow in the editor is continuously monitored, with messages relating to problems listed in the field at the bottom. To view multiple messages, expand the field by clicking the small arrow on the right hand side. It can be collapsed by clicking the arrow again.
Clicking an error message brings the relevant area of the workflow into focus in the editor and the corresponding element is selected (figure 14.18). If the problem pertains to an element within a collapsed Group, the Group will be expanded so the element is visible.
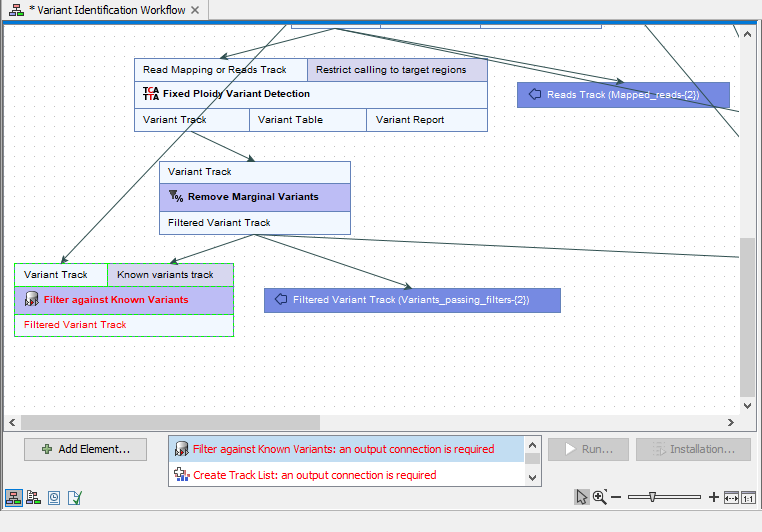
Figure 14.18: The list of error messages has been expanded, and a message about the Trim Sequences element selected. The Trim Sequences element in the workflow is in view and has been selected.
Viewing the flow of elements in a workflow
Following the potential data path through a workflow downstream or upstream from a particular element can be useful when authoring complex workflows.
Right-click an element name or a collapsed Group and choose Highlight Preceding Path or Highlight Subsequent Path, as relevant (figure 14.19). Elements and input/output channels not in that path will be faded, making it easier to follow the path data can take.
If multiple elements are selected when this action is taken, the highlighting is applied upstream/downstream of all the selected elements. Highlighting from a collapsed Group applies the action to all the elements in that Group.
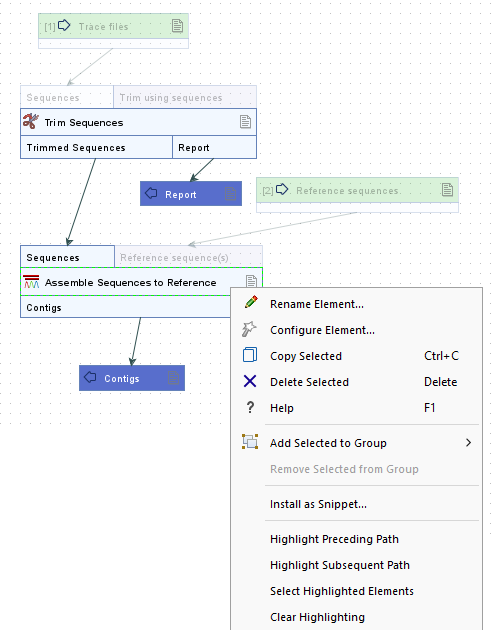
Figure 14.19: The right-click menu over an element's name includes options for highlighting the preceding or subsequent path. Here, Highlight Subsequent Path had already been applied from the Trim Sequences element.
Highlighting can be applied multiple times, with each action being applied sequentially. Use the Clear Highlighting option, available in the right-click menu over the editor canvas, Group areas or over element names whenever highlighting has been applied.
To take action on the highlighted elements, like dragging them or deleting them, use the Selected Highlighted Elements option, available from the same context menu, and then take the desired action.