Customized attributes on data locations
Custom attributes can be defined for a CLC Data Location or CLC Server File System Location. A set of custom attributes is specific to a given location. Examples of custom attributes could be LIMS id, freezer position, etc. Attributes are defined, and attribute values set, using a CLC Workbench.
Defining custom attributes for a CLC Location is described on this page. Assigning values to custom attributes for a data element is described in Setting custom attribute values.
Defining custom attributes
Custom attributes are defined for a CLC location using the Attribute Manager (figure 3.11). To open it, right-click on the CLC location folder in the Navigation Area of a Workbench and in the menu that appears, select:
Location | Attribute Manager
Attributes can only be added for CLC Server File System Locations by members of the administration group.
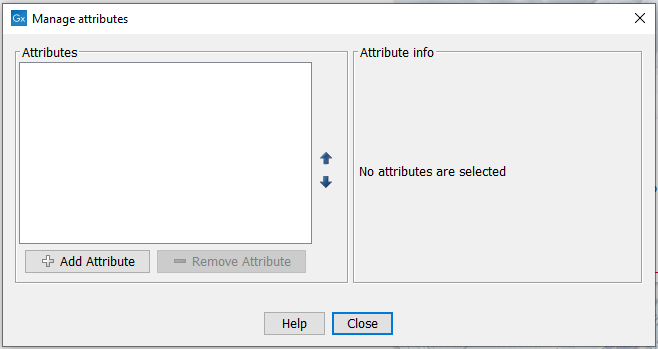
Figure 3.11: The Attribute Manager is used to add custom attributes to a CLC Data Location or CLC Server File System Location.
Click on the Add Attribute (![]() ) button to create a new attribute. The following types are available in the Create Attribute dialog (figure 3.12):
) button to create a new attribute. The following types are available in the Create Attribute dialog (figure 3.12):
- Checkbox Presented as a checkbox in the Element info view. When checked, the value shown in the table view of a folder listing is "Yes". When unchecked, it is "No". When not set, the field remains blank in the folder table view. For search purposes, the term "True" is a synonym for "Yes" and "False" is a synonym for "No".
- Text Any text can be provided as the value.
- Hyper Link A single URL should be provided as text. Text entered is presented as a clickable hyperlink in the Element Info view and in the folder table view.
- List A list of terms is configured in the Attribute Manager by clicking on the Add Value (
 ) button (figure 3.13). Those terms are presented in a drop-down list in the Element Info view and in the dialog presented when updating a List attribute value in the folder table view.
- Number Any positive or negative integer can be provided.
- Bounded number Same as number, but minimum and maximum values can be specified in the Attribute Manager.
- Decimal number Any positive or negative decimal value number can be provided.
- Bounded decimal number Same as decimal number, but minimum and maximum values can be specified in the Attribute Manager.
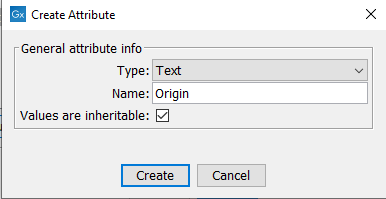
Figure 3.12: The attribute type is selected from a drop-down list, and a name is then assigned to the attribute. Values are inheritable by default.
When a data element is copied, attribute values are transferred to the copy of the element by default. This can be changed by unchecking the Values are inheritable checkbox.
When you click on the Create button in the Create Attributes dialog, the attribute will appear in the list on the left side of the Attribute Manager. When an attribute in that list is selected, information about it is shown in the right hand panel. For List attributes, values to include in the drop-down list can also be added or removed (figure 3.13).
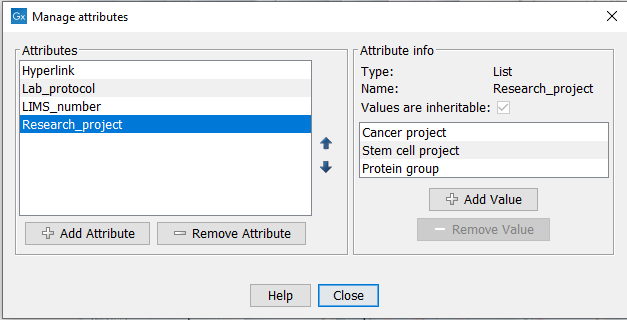
Figure 3.13: Information about a custom attribute is shown on the right-hand side of the Attribute Manager. Values for List attributes are added and removed using buttons provided in this area.
Note: Renaming an attribute or changing its type after creation is not possible.
Changing the order of custom attributes
The position of the attribute in the list in the Attribute Manager is the same relative position the attributes are presented in the Element Info view for that data element (figure 3.14), and in the folder table view.
Change the order of the attributes by selecting an attribute and clicking on the up arrow or down arrow in the Attribute Manager.
Removing custom attributes
To remove an attribute, select it in the Attribute Manager and click on the Remove Attribute (![]() ) button.
) button.
When a custom attribute is removed:
- That attribute is no longer present for data elements created after the attribute removal or for data elements created earlier, but where no value had yet been set for that attribute.
- The attribute and its value will remain present for data elements where a value had previously been set, but that value will no longer be editable.
- It can be restored by creating a new attribute for that CLC location using the identical name and type of the removed attribute. Data elements that had values set for the original attribute will still have the attribute and value, with the value once again being editable.
Subsections
- Setting custom attribute values
- Custom attributes on elements copied to other data locations
- Searching custom attributes