Workflow groups
Workflow elements can be placed in a Group. Groups can be assigned a name and description, and can be expanded or collapsed in the Workflow Editor, making it easier to author and explain large workflows. When collapsed, a Group is represented by a colored box, both in the editor and in the Side Panel (figure 14.12). When expanded, the elements within the Group are visible in both those locations (figure 14.13).
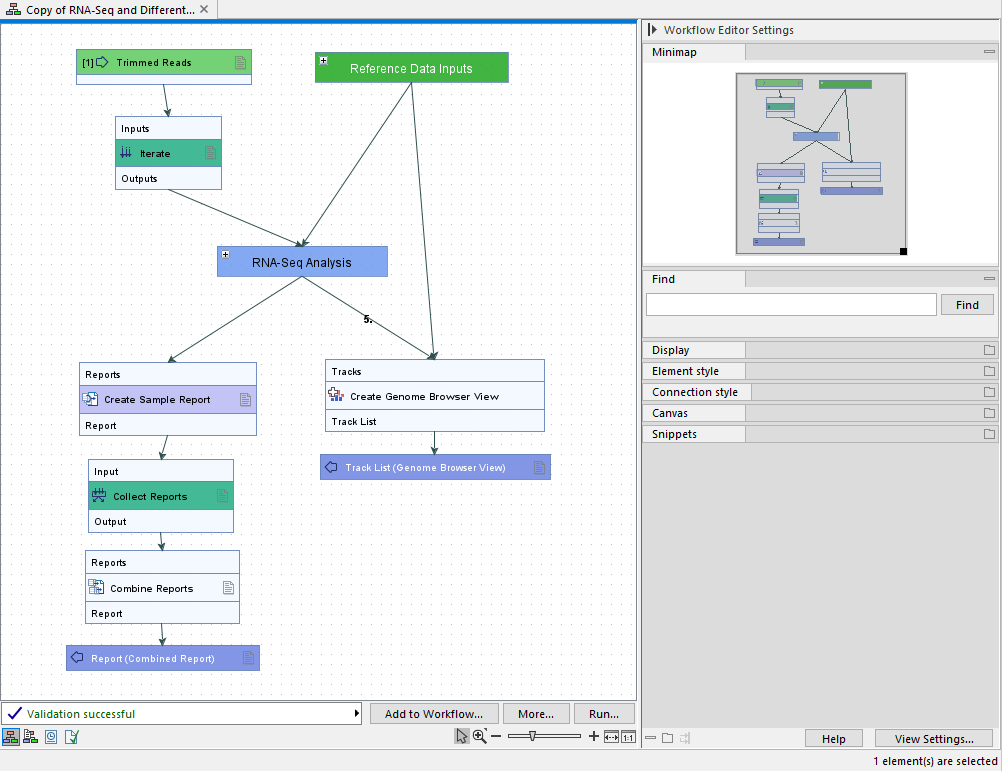
Figure 14.12: A copy of a CLC Genomics Workbench template workflow containing two groups, Reference Data Inputs and RNA-Seq Analysis that are both collapsed. They are visible as colored boxes both in the editor and in the minimap in the Side Panel.
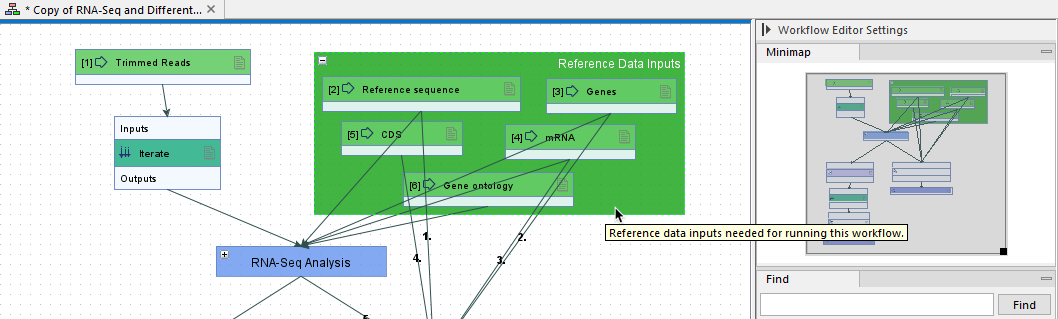
Figure 14.13: The Reference Data Inputs Group in its expanded form. Elements within the Group are visible in the editor and in the minimap in the Side Panel. Hovering the mouse cursor over the Group has revealed a tooltip containing its description.
Creating a new Group
To create a Group, select one or more elements, right-click one of them, and choose Add Selected to Group... from the context menu. Choose the option New Group from the submenu that appears (figure 14.14).
Adding elements to an existing Group
There are several ways to add elements to an existing Group:
- Select one or more elements, right-click one of them, and choose Add Selected to Group... from the context menu. From the submenu that appears, select the name of the Group the elements should be added to (figure 14.14).
- Drag elements onto an existing Group.
- Right-click a Group and choose the option Add to Group... from the context menu. This opens a dialog allowing one or more elements to be selected for addition.
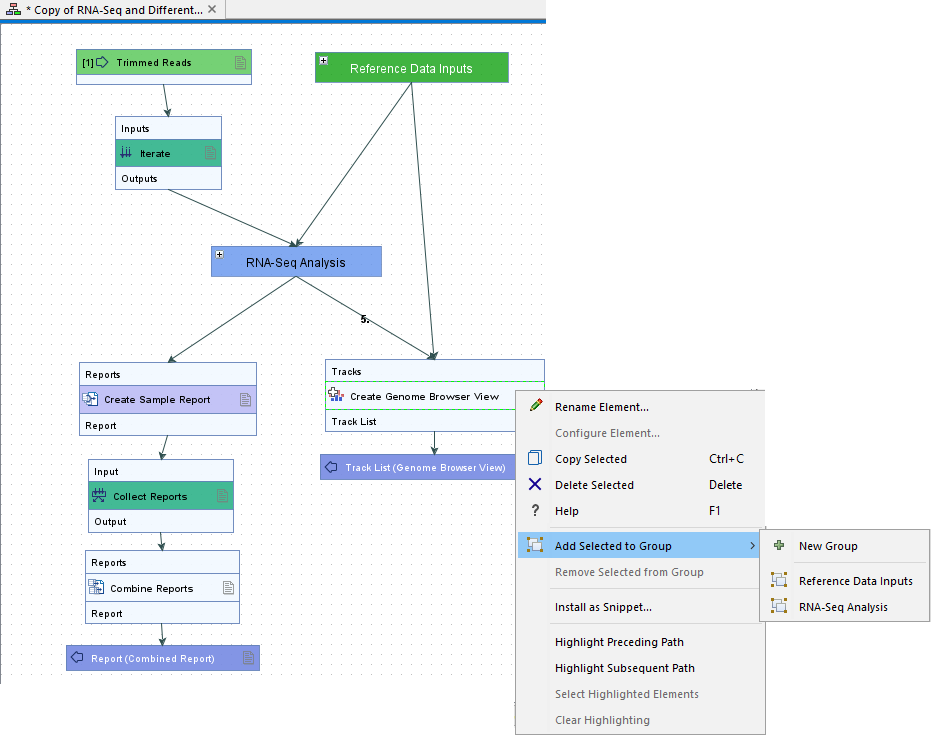
Figure 14.14: The right-click context menu for the Create Genome Browser View element includes Add Selected to Group, under which are options to create a new Group containing this element, or to add it to one of the two existing Groups.
Configuring a Group
When a new Group is created, the Edit Group dialog is presented, prompting for a name, description and color (figure 14.15). This dialog can be opened later to update these settings by double clicking the Group or by right-clicking the Group and choosing the option Configure Group... from the context menu.
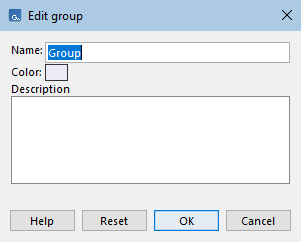
Figure 14.15: The Edit Group dialog is used to add a name, color and description for a Group.
Note:
- Groups in a single workflow must have unique names.
- Group descriptions are visible only in the Workflow Editor. To include descriptive information accessible when a workflow is installed, edit the workflow description. This can be done in the Element Info view of the Workflow Editor, or when creating a workflow installer.
Collapsing and expanding Groups
When a Group is collapsed, only its name is visible in the editor. When it is expanded, all the contained elements are visible. The collapsed and expanded state is also reflected in the minimap in the Side Panel and is maintained when the workflow is saved and later re-opened.
A newly created Group will be in the expanded state.
To collapse one or more expanded Groups:
- Click on the "-" icon in the top left of an expanded Group. All selected Groups are expanded when this action is taken.
- Right-click on a blank area of the editor canvas and choose the Collapse All Groups option from the context menu. Alternatively, press the C key. This collapses all expanded Groups, whether or not they are selected.
To expand one or more collapsed Groups:
- Click on the "+" icon in the top left of an expanded Group. All selected Groups are expanded when this action is taken.
- Right-click on a blank area of the editor canvas and choose the Expand All Groups option from the context menu. Alternatively, press the E key. This expands all collapsed Groups, whether or not they are selected.
A Group will automatically be expanded if an element in a Group is found using the Find functionality in the Side Panel.
Element layout within Groups
Elements can be dragged within Groups to place them where desired.
The layout of elements within a Group can also be adjusted by:
- Selecting the Group and hitting the L key.
- Right-clicking an expanded Group and selecting Apply Auto Layout to Group option from the context menu.
If you wish to undo the layout changes, click on the Undo (![]() ) button in the top toolbar, or use the Ctrl + Z (
) button in the top toolbar, or use the Ctrl + Z (![]() + Z on mac) keyboard shortcut.
+ Z on mac) keyboard shortcut.
For further details about layout, see Adjusting the workflow layout.
Removing a Group
A Group can be removed, without removing the elements within it by:
- Selecting the Group, and without selecting any of the contained elements, use the Delete/Backspace key. Alternatively, right-click and select the Delete Selected option from the context menu.
- With the Group expanded, right-click on it and select the Select All in Group option from the context menu. Then click one of the selected elements and drag it outside the Group area. This will drag all the selected elements out of the Group. An empty Group is immediately deleted.
A Group and all the elements it contains can be deleted by selecting the Group and all its elements, and then using the Delete/Backspace key or right-clicking and selecting the Delete Selected option from the context menu.
If you wish to undo deletions, click on the Undo (![]() ) button in the top toolbar, or use the Ctrl + Z (
) button in the top toolbar, or use the Ctrl + Z (![]() + Z on mac) keyboard shortcut.
+ Z on mac) keyboard shortcut.
Copying Groups
Selecting a Group and using the keyboard shortcut Ctrl + C (![]() + C on macs) copies the Group and its elements. The Ctrl + V (
+ C on macs) copies the Group and its elements. The Ctrl + V (![]() + V on mac) keyboard shortcut pastes a copy of the original Group in the workflow.
+ V on mac) keyboard shortcut pastes a copy of the original Group in the workflow.
Copies of the contained elements are included in the new Group, and connections between these elements are maintained. Connections to elements outside the new Group will need to be added.
The original Group description is copied and the original Group color is applied. Two items in the same workflow cannot have the same name. Thus, if pasting into the same workflow as the original Group, the name of the new Group will be made unique by appending a digit to it, e.g. "-1", "-2", etc. and the names of elements within the copy will also have digits appended.