Setting up an experiment
To set up an experiment:
Toolbox | Transcriptomics Analysis (![]() )| Set Up Experiment (
)| Set Up Experiment (![]() )
)
Select the samples that you wish to use by double-clicking or selecting and pressing the Add (![]() ) button (see figure 27.46).
) button (see figure 27.46).
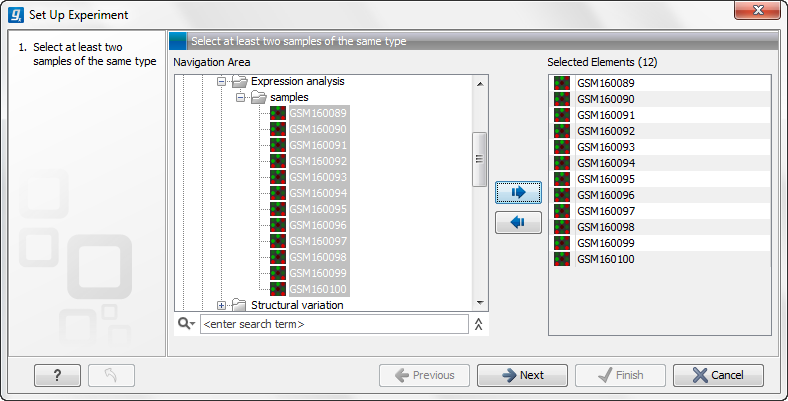
Figure 27.46: Select the samples to use for setting up the experiment.
Note that we use "samples" as the general term for both microarray-based sets of expression values and sequencing-based sets of expression values.
Clicking Next shows the dialog in figure 27.47.
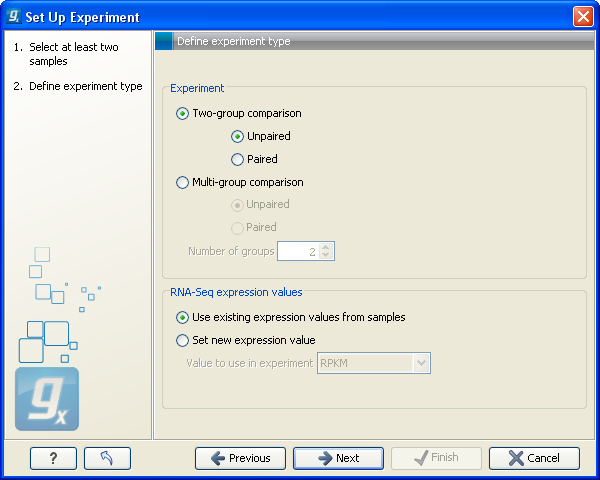
Figure 27.47: Defining the number of groups.
Here you define the number of groups in the experiment. At the top you can select a two-group experiment, and below you can select a multi-group experiment and define the number of groups.
Note that you can also specify if the samples are paired. Pairing is relevant if you have samples from the same individual under different conditions, e.g. before and after treatment, or at times 0, 2 and 4 hours after treatment. In this case statistical analysis becomes more efficient if effects of the individuals are taken into account, and comparisons are carried out not simply by considering raw group means but by considering these corrected for effects of the individual. If the Paired is selected, a paired rather than a standard t-test will be carried out for two group comparisons. For multiple group comparisons a repeated measures rather than a standard ANOVA will be used.
For RNA-Seq experiments, you can also choose which expression value to be used when setting up the experiment. This value will then be used for all subsequence analyses.
Clicking Next shows the dialog in figure 27.48.
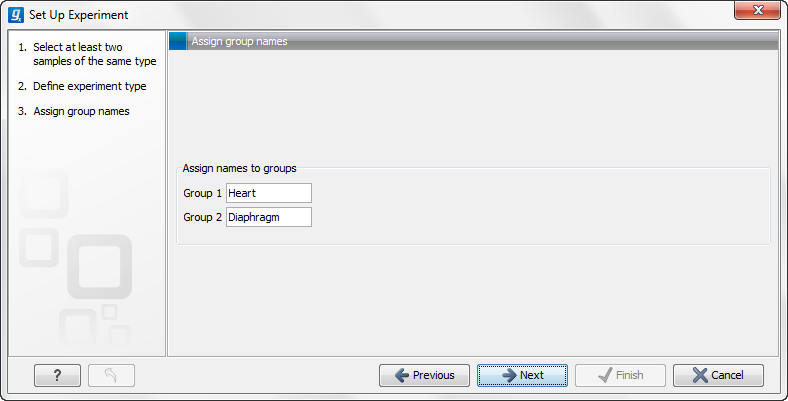
Figure 27.48: Naming the groups.
Depending on the number of groups selected in figure 27.47, you will see a list of groups with text fields where you can enter an appropriate name for that group.
For multi-group experiments, if you find out that you have too many groups, click the Delete (![]() ) button. If you need more groups, simply click Add New Group.
) button. If you need more groups, simply click Add New Group.
Click Next when you have named the groups, and you will see figure 27.49.
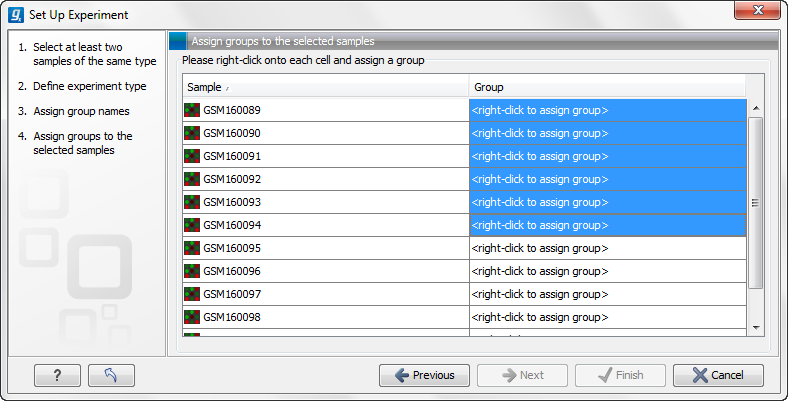
Figure 27.49: Putting the samples into groups.
This is where you define which group the individual sample belongs to. Simply select one or more samples (by clicking and dragging the mouse), right-click (Ctrl-click on Mac) and select the appropriate group.
Note that the samples are sorted alphabetically based on their names.
If you have chosen Paired in figure 27.47, there will be an extra column where you define which samples belong together. Just as when defining the group membership, you select one or more samples, right-click in the pairing column and select a pair.
Click Next if you wish to adjust how to handle the results. If not, click Finish.