Navigation Area
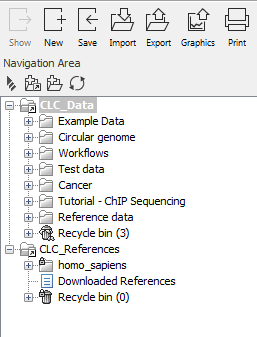
The Navigation Area (figure 3.1) is used for organizing and navigating data. Its behavior is similar to the way files and folders are usually displayed on your computer.

Figure 3.1: The Navigation Area.
Each data element has a name and an icon. The icon represents the type of data in the element. A list of many of the icons and the type of data they represent can be found in our FAQ at https://qiagen.my.salesforce-sites.com/KnowledgeBase/KnowledgeNavigatorPage?id=kA41i000000L5uFCAS.
Just above the area with the listing of data are 4 icons that can be clicked upon. From left to right, these are:
- Collapse all (
 ). Close all the open folders in the Navigation Area.
- Add File Location (
 ). Add a new top level location for storing CLC data. See Adding locations for further details.
- Create Folder (
 ) Create new folders within a data location.
- Update All (
 ) Refresh the view of the Navigation Area.
Between the area listing the data and the icons mentioned above is the Quick Search field, which can be used to find data elements in your CLC Locations. This is described in Quick search.
To provide more space for viewing data, you can hide Navigation Area and the Toolbox by clicking on the hide icon (![]() ) in the top right hand side of the Navigation Area.
) in the top right hand side of the Navigation Area.
Elements placed in a folder (e.g. by copy/pasting or dragging) will be put at the bottom of the folder listing. If the element is placed on another element, it will be placed just below that element in the folder listing.
If an element of the same name already exists in that folder, a copy will be created with the name extension "-1", "-2" etc.
Opening and viewing data elements is described in View Area.
Subsections
- Data structure
- Adding locations
- Create new folders
- Sorting folders
- Multiselecting elements
- Moving and copying elements
- Change element names
- Delete, restore and remove elements
- Show folder elements in a table
