Adding annotations to an experiment
Annotation files provide additional information about each feature. This information could be which GO categories the protein belongs to, which pathways, various transcript and protein identifiers etc. See Expression data format for information about the different annotation file formats that are supported CLC Genomics Workbench.
The annotation file can be imported into the Workbench and will get a special icon (![]() ). See an overview of annotation formats supported by CLC Genomics Workbench. In order to associate an annotation file with an experiment, either select the annotation file when you set up the experiment, or click:
). See an overview of annotation formats supported by CLC Genomics Workbench. In order to associate an annotation file with an experiment, either select the annotation file when you set up the experiment, or click:
Toolbox | Microarray Analysis (![]() )| Annotation Test (
)| Annotation Test (![]() ) | Add Annotations (
) | Add Annotations (![]() )
)
Select the experiment (![]() ) and the annotation file (
) and the annotation file (![]() ) and click Finish. You will now be able to see the annotations in the experiment as described in Annotation level. You can also add annotations by pressing the Add Annotations (
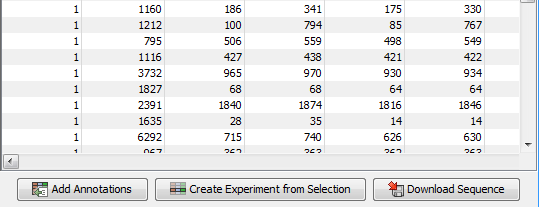
) and click Finish. You will now be able to see the annotations in the experiment as described in Annotation level. You can also add annotations by pressing the Add Annotations (![]() ) button at the bottom of the table (see figure 32.13).
) button at the bottom of the table (see figure 32.13).

Figure 32.13: Adding annotations by clicking the button at the bottom of the experiment table.
This will bring up a dialog where you can select the annotation file that you have imported together with the experiment you wish to annotate. Click Next to specify settings as shown in figure 32.14).

Figure 32.14: Choosing how to match annotations with samples.
In this dialog, you can specify how to match the annotations to the features in the sample. The Workbench looks at the columns in the annotation file and lets you choose which column that should be used for matching to the feature IDs in the experimental data (experiment or sample) as well as for the annotations. Usually the default is right, but for some annotation files, you need to select another column.
Some annotation files have leading zeros in the identifier which you can remove by checking the Remove leading zeros box.
Note! Existing annotations on the experiment will be overwritten.
