Import with Metadata
The Import with Metadata template workflow imports sequence data into sequence lists and creates a CLC Metadata Table containing descriptive information for each sample. Each sequence list has an association with the CLC Metadata Table created, so that the CLC Metadata Table can be used as input to downstream analyses requiring metadata, such as Differential Expression.
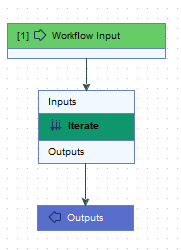
Importing sequences, importing metadata and associating sequence lists to a CLC Metadata Table can be done easily using import tools, without a workflow. This workflow, with just an Input, Output and Iterate element (figure 12.60), is just a shortcut to the same end.

Figure 12.60: By using an Iterate element connected to Input and Output elements, sequence data can be imported, and associated with a CLC Metadata Table containing information about the samples.
Launching the workflow
The Import with Metadata workflow is at:
Toolbox | Template Workflows | Preparing Raw Data| Import with Metadata (![]() )
)
In the first step of the workflow, select the format of the sequence data to import and check the options are configured as needed.
In the next step, batch units are defined using metadata. Select an Excel, CSV or TSV format file containing sample information. The first row must contain column headers. The first column must contain either the full names of the samples being input or a unique prefix of the sample names, such that the sequence inputs can be matched to the relevant row. The matching of input files with the contents of the first column is done according to the Prefix matching scheme, described in Matching schemes.
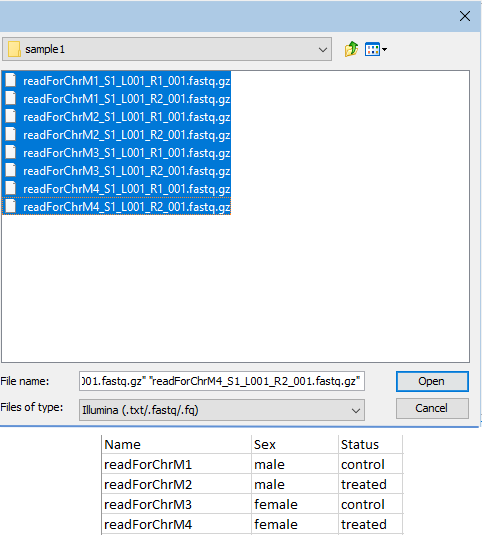
Note: There should be one row per sample in the metadata file. For paired sequence reads, this means half the number of rows as sequence files selected, with the first column containing enough of the sample name to uniquely identify the sample, but shared between the two files of a pair (figure 12.61).

Figure 12.61: Paired fastq files were selected for import (top). The file with metadata contains a header row and 4 rows of information, one row per sample. The contents of the first column contain enough of each file name to uniquely identify the sample the sequence data is associated with.
The first column in the metadata file should be selected as the one defining the batch units. That column is selected by default in the wizard.
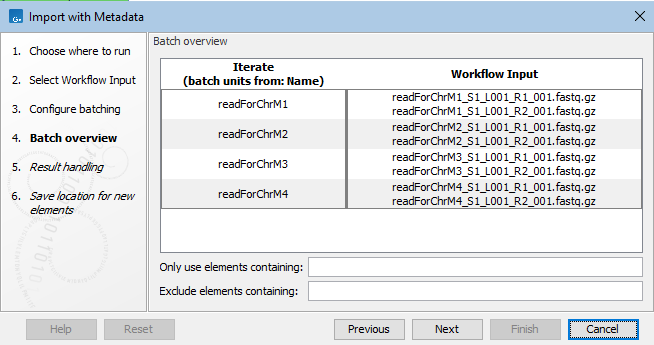
In the next wizard step, you can see how the rows of the metadata provided will be matched with the sequence files (figure 12.62).

Figure 12.62: In the batch overview step, you can check that the rows of the metadata and the sequence files have been matched as expected.
In the result handling step, ensure the option Create workflow result metadata is checked. This is a key output from this workflow.
Workflow outputs
There are two types of output from this workflow:
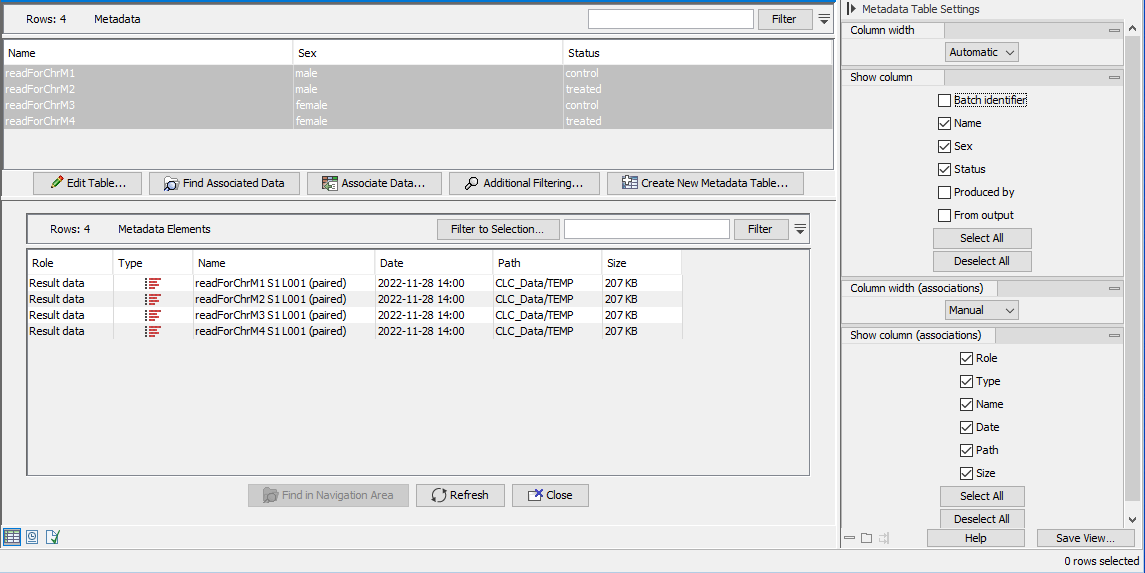
- A CLC Metadata Table This contains one row per sample, and all the columns provided in the original metadata file (figure 12.63). Additional columns are also present, containing general information relating to how the workflow was run.
The CLC Metadata table is named "Workflow Result Metadata". We recommend the name is updated to something more specific if the file will be kept for later use.
- Sequence lists Each sequence list contains an association to the row in the CLC Metadata Table with information describing that sample. The sequence lists can be found by selecting rows in the table, and then clicking on the Find Associated Data button (figure 12.63).

Figure 12.63: A CLC Metadata Table created using the Import with Metadata template workflow. There is a row per sample, and an association between each sequence list imported (bottom) and the relevant sample information (top). In this view, some column names in the side panel have been unchecked so that only the sample-specific information is shown.
