Insert one sequence into another
Sequences can be inserted into each other in various ways as described in in Manipulate the whole sequence and Manipulate part of the sequence. When you choose to insert one sequence into another, you will be presented with a dialog where all sequences in the sequence list are present (see figure 21.25).

Figure 21.25: Select a sequence for insertion.
The sequence that you have chosen to insert into will be marked with bold and the text [vector] is appended to the sequence name. Note that this is completely unrelated to the vector concept in the cloning workflow.
Furthermore, the list includes the length of the fragment, an indication of the overhangs, and a list of enzymes that are compatible with this overhang (for the left and right ends, respectively). If not all the enzymes can be shown, place your mouse cursor on the enzymes, and a full list will be shown in the tool tip.
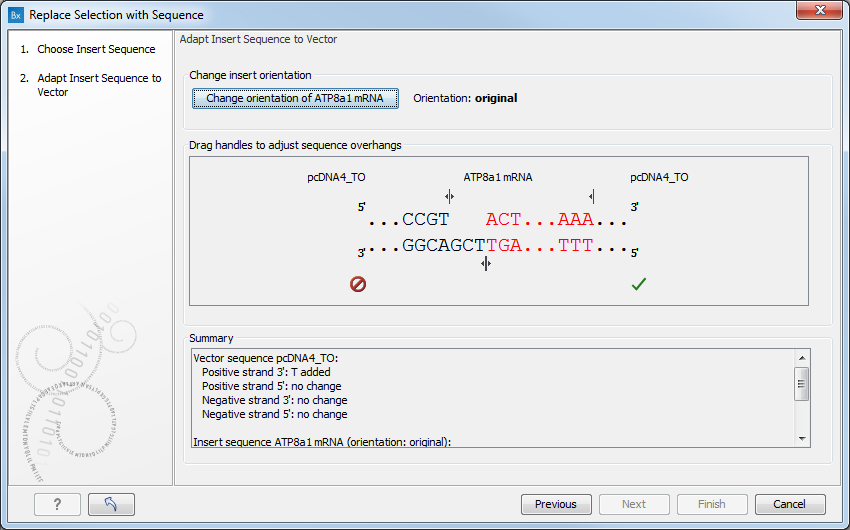
Select the sequence you wish to insert and click Next to adapt insert sequence to vector dialog (figure 21.26).

Figure 21.26: Drag the handles to adjust overhangs.
At the top is a button to reverse complement the inserted sequence.
Below is a visualization of the insertion details. The inserted sequence is at the middle shown in red, and the vector has been split at the insertion point and the ends are shown at each side of the inserted sequence.
If the overhangs of the sequence and the vector do not match (![]() ), you
can blunt end or fill in the overhangs using the drag handles
(
), you
can blunt end or fill in the overhangs using the drag handles
(![]() ) until it does (
) until it does (![]() ).
).
At the bottom of the dialog is a summary field which records all the
changes made to the overhangs. This contents of the summary will
also be written in the history (![]() ) of the cloning experiment.
) of the cloning experiment.
When you click Finish, the sequence is inserted and highlighted by being selected.

Figure 21.27: One sequence is now inserted into the cloning vector.
The sequence inserted is automatically selected.
