Demultiplex Parse Bio Samples
When using a Parse Biosciences kit, the first step is to distribute the samples into wells, such that each well contains material from only one sample. A well-specific barcode is added. The Demultiplex Parse Bio Samples tool assigns the correct sample to the cells, according to the well of origin. The tool is available from::
Tools | Single Cell Analysis (![]() ) | Gene Expression (
) | Gene Expression (![]() ) | Cell Preparation (
) | Cell Preparation (![]() ) | Demultiplex Parse Bio Samples (
) | Demultiplex Parse Bio Samples (![]() )
)
It takes an Expression Matrix (![]() ) / (
) / (![]() ) as input and outputs a copy of the input with updated sample names.
) as input and outputs a copy of the input with updated sample names.
|
Batches and samples: QC for Single Cell runs separately for each sample detected in the input Expression Matrix. This might not be appropriate for Parse Biosciences data, where samples are sequenced together in one batch. For such data, we recommend running QC for Single Cell before updating the sample name. |
Defining the samples
The sequenced samples are defined by filling in the sample table at the top of the dialog (figure 7.22).
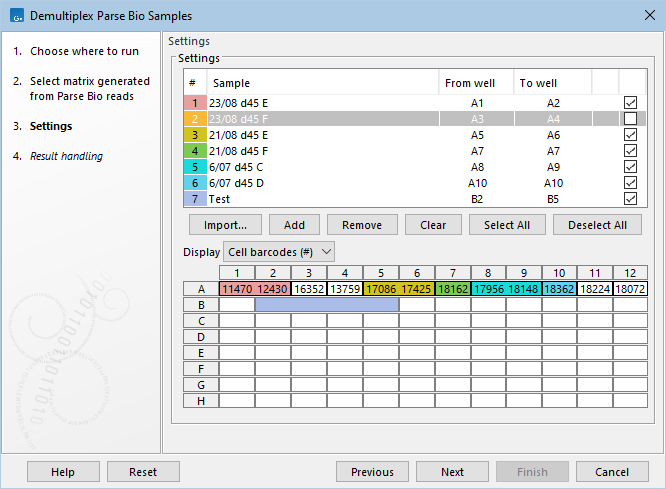
Figure 7.22: Demultiplexing the GSM7730635 Parse Biosciences expression matrix from the Gene Expression Omnibus repository. The provided sample loading table was used to populate the dialog. The original sample 7, corresponding to wells A11-A12, was removed, and another sample, named "Test", was added for wells B2-B5. The wells in the plate configuration at the bottom are colored according to the sample they belong to, if the sample is checked in the sample table at the top. The plate configuration quickly reveals that the "Test" sample does not contain any cells, while several cells present in the input matrix will not be part of the output. The well right-click menu from the plate configuration provides options to fill in 'From well' and 'To well' for the selected row of the sample table.
Each row contains information for one sample, and the following is needed:
- The name of the sample, set in the Sample column.
- The wells the sample was distributed to. The wells have to be consecutive and are defined by the first and last well, set in the From well and To well columns, respectively.
The sample table can be filled in from a Parse Biosciences sample loading table by using the Import... button.
Alternatively, the table can be filled in manually. More rows can be added by using the Add button. The selected row can be deleted by using the Remove button. The Clear button removes all rows.
Choosing output samples
The check boxes in the sample table's right column can be used to select and deselect samples. Only the selected samples will be added to the output. This can be useful when the input contains unrelated samples that should not be analyzed jointly.
The Select All and Deselect All can be used to select or deselect all samples, respectively.
Plate configuration
At the bottom of the dialog, the plate with wells A1-H12 is shown. The wells can show different information as selected in Display:
- Cell barcodes #. The number of cells, if any, from this well that are found in the input matrix.
- Sample. The sample number, if any, that this well belongs to.
- Well. The number of this well, ranging from 1 to 96. This corresponds to the barcode from the first barcoding round.
The wells are colored based on their sample, if the sample is checked in the sample table. Their border is black if they are not empty, i.e. the input matrix has cells for the well.
If the input matrix is not available, for example in workflows, information about the number of cells will not be displayed.
The well right-click menu provides the following options (figure 7.22):
- Set in 'From well'. Sets 'From well' in the selected row of the sample table to the current well.
- Set in 'To well'. Sets 'To well' in the selected row of the sample table to the current well.