Specifying reads and reference
To start the RNA-Seq analysis, go to:
Toolbox | RNA-Seq Analysis (![]() ) | RNA-Seq Analysis (
) | RNA-Seq Analysis (![]() )
)
This opens a dialog where you select the sequencing reads. Note that you need to import the sequencing data into the Workbench before it can be used for analysis. Importing read data is described in Import Sequencing Data.
If you have several samples that you wish to analyze independently and compare afterwards, you can run the analysis in batch mode.
Click Next when the sequencing data are listed in the right-hand side of the dialog.
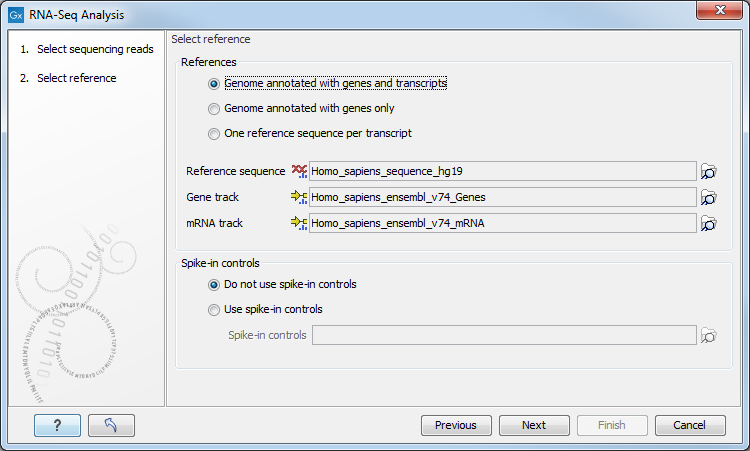
You are now presented with the dialog shown in figure 28.4.

Figure 28.4: Defining a reference genome for RNA-Seq.
At the top, there are three options concerning how the reference sequences are annotated.
- Genome annotated with genes and transcripts. This option should be used when both gene and mRNA annotations are available. When this option is enabled, the EM will distribute the reads over the transcripts. Gene counts are then obtained by summing over the (EM-distributed) transcript counts. The mRNA annotations are used to define how the transcripts are spliced (as shown in figure 28.2). This option should be used for Eukaryotes since it is the only option where splicing is taken into account. Note that genes and transcripts are linked by name only (not by position, ID etc).
When this option is selected, both a Gene and an mRNA track should be provided in the boxes below. Annotated reference genomes be can obtained in various ways:
- Directly downloaded as tracks using the Reference Data Manager (see Download Genomes).
- Imported as tracks from fasta and gff/gtf files (see Import tracks)
- Imported from Genbank or EMBL files and converted to tracks (see Converting data to tracks and back).
- Downloaded from Genbank (see GenBank search) and converted to tracks (see Converting data to tracks and back).
When using this option, Expression values, RPKM and TPM are calculated based on the lengths of the transcripts provided by the mRNA track. If a gene's transcript annotation is absent from the mRNA track, all values will be set to 0 unless the option "Calculate expression for genes without transcript" is checked in a later dialog.
- Genome annotated with genes only. This option should be used for Prokaryotes where transcripts are not spliced. When this option is selected, a Gene track should be provided in the box below. The data can be obtained in the same ways as described above.
When using this option, Expression values, RPKM and TPM are calculated based on the lengths of the genes provided by the Genes track.
- One reference sequence per transcript. This option is suitable for situations where the reference is a list of sequences. Each sequence in the list will be treated as a "transcript" and expression values are calculated for each sequence. This option is most often used if the reference is a product of a de novo assembly of RNA-Seq data. It is also a suitable option for references where genes are particularly close to each other or clustered in operon structures (see Tightly packed genes and genes in operons ). When this option is selected, only the reference sequence should be provided, either as a sequence track or a sequence list. Expression values, RPKM and TPM are calculated based on the lengths of sequences from the sequence track or sequence list.
|
For annotated references containing genes located very close to each other (including operon structures) only reads mapping completely within a gene's boundaries will be counted towards the expression value for that gene. If any part of a read maps outside a given gene's boundaries, then it will be considered intergenic and will not be counted towards the expression value. For tightly packed genes, especially in cases where non-coding 5' regions are not included in the gene annotation, this can be too conservative: if there are short genes, where the read length exceeds the gene length in some cases, then some granularity may be lost. That is, reads mapping to short genes might not be counted at all.
|
At the bottom of the dialog you can choose between these two options:
- Do not use spike-in controls.
- Use spike-in controls. In this case, you can provide a spike-in control file in the field situated at the bottom of the dialog window. Make sure you remember to check the option to output a report in the last wizard step, as the report is the only place where the spike-in controls results will be available. During analysis, the spike-in data is added to the references. However, all traces of having used spike-ins are removed from the output tracks.
If spike-ins have been used, the quality control results are shown in the output report. So when using spike-in, make sure that the option to output a report is checked.
To learn how to import spike-in control files, see Import RNA Spike-in.
