Create MLST Schemes
There a several ways to create a new MLST scheme: it is possible to create one using the Create MLST Schemes tool as explained in this section; it is also possible to add an NGS MLST report (generated using the Identify MLST tool) to a Scheme (see Add NGS MLST Report to Scheme). Finally, it is possible to use the CLC MLST module to run an assembly and create an isolate that can later be added to a scheme (see http://resources.qiagenbioinformatics.com/manuals/clcmlst/current/CLC_MLST_Module_User_Manual.pdf).
A scheme can be created from scratch by defining a number of loci and accumulating sequence information about each loci. The schemes should have the same format as the schemes that are downloaded from PubMLST.
To create a new scheme, go to:
Legacy Tools (![]() ) | Create MLST Scheme (
) | Create MLST Scheme (![]() )
)
This will bring up a dialog as shown in figure 24.10.
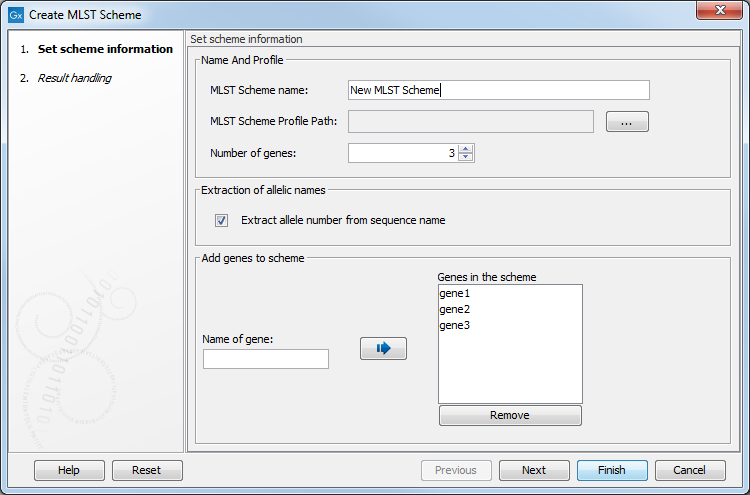
Figure 24.10: Entering basic information for the scheme.
In the top field you can enter a name for the scheme - typically the name of the species in question.
Below, you can specify the location for a text file where all the loci included in the scheme are listed. The file must contain a row with the column names 'ST', 'gene_1', 'gene_2', etc. Each subsequent row must contain exactly one loci/sequence type. Note that the file must be in plain text format and the columns must be tab-separated. It is important to update the parameter "Number of genes" to match the number of genes in the selected text file. If such a file does not exist, you can just type, in the "Add genes to scheme" section of the dialog, the name of the locus in the Name of gene field, and click the Add (![]() ) button. If you accidentally add a wrong name to the list, select it and click the Remove button.
) button. If you accidentally add a wrong name to the list, select it and click the Remove button.
When you are done adding loci for your scheme, click Next to start assigning sequences to the loci. Note that the option "Extract allele number from sequence name" assumes that the allele number is part of the allele name (e.g. 'atpA_2'). If this is not the case, disable the option.
The wizard will open successively one window for each locus in the scheme (figure 24.11). In each of these windows, you can assign allelic sequences to each locus. Clicking Next will display a similar dialog for the next gene, and so on for all the loci that were entered in the first dialog.
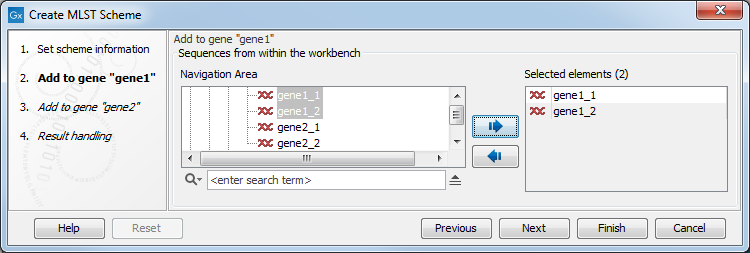
Figure 24.11: Selecting sequences for "gene1".
It is not mandatory to add sequences to the loci. You can also choose to proceed and create the scheme before you add sequences. If you just add individual sequences as shown in figure 24.11, they will not be combined in an allelic profile and the scheme will not yet contain any sequence types.