Saving, removing and applying saved settings
To save and apply the saved settings, click (![]() )
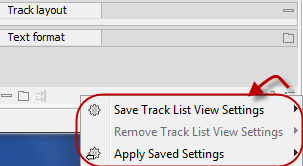
seen in figure 4.10. This opens a menu where the following options are available (figure 4.11):
)
seen in figure 4.10. This opens a menu where the following options are available (figure 4.11):

Figure 4.11: When you have adjusted the side panel settings and would like to save these, this can be done with the "Save ... Settings" function, where "..." is the element you are working on - e.g. "Track List View", "Sequence View", "Table View", "Alignment View" etc. Saved settings can be deleted again with "Remove ... Settings" and can be applied to other elements with "Apply Saved Settings".
- Save ... Settings. (
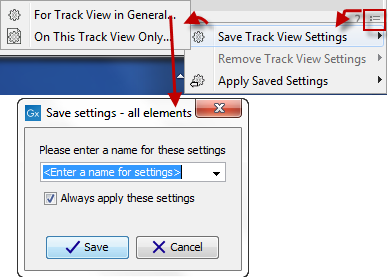
 ) The settings can be saved in two different ways. When you select either way of saving settings a dialog will open (see figure 4.12) where you can enter a name for your settings.
- For ... View in General (
 ) Will save the currently used settings with all elements of the same type as the one used for adjusting the settings. E.g. if you have selected to save settings "For Track View in General" the settings will be applied each time you open an element of the same type, which in this case means each time one of the saved tracks are opened from the Navigation Area. These "general" settings are user specific and will not be saved with or exported with the element.
- On This Only (
 ) Settings can be saved with the specific element that you are working on in the View area and will not affect any other elements (neither in the View Area or in the Navigation Area). E.g. for a track you would get the option to save settings "On This Track Only". The settings are saved with only this element (and will be exported with the element if you later select to export the element to another destination).

Figure 4.12: The save settings dialog.Two options exist for saving settings. Click on the relevant option to open the dialog shown at the bottom of the figure. - For ... View in General (
- Remove ... Settings. (
 ) Gives you the option to remove settings specifically for the element that you are working on in the View Area, or on all elements of the same type. When you have selected the relevant option, the dialog shown in figure 4.13 opens and allows you to select which of the saved settings to remove.
- From ... View in General (
 ) Will remove the currently used settings on all elements of the same type as the one used for adjusting the settings. E.g. if you have selected to remove settings from all alignments using "From Alignment View in General", all alignments in your Navigation Area will be opened with the standard settings instead.
- From This ... Only (
 ) When you select this option, the selected settings will only be removed from the particular element that you are working on in the View area and will not affect any other elements (neither in the View Area or in the Navigation Area). The settings for this particular element will be replaced with the CLC standard settings (
 ).
).

Figure 4.13: The remove settings dialog for a track. - From ... View in General (
- Apply Saved Settings. (
 ) This is a submenu containing the
settings that you have previously saved (figure 4.14). By clicking one of the
settings, they will be applied to the current view. You will also
see a number of pre-defined view settings in this submenu. They are
meant to be examples of how to use the Side Panel and provide
quick ways of adjusting the view to common usages. At the bottom of
the list of settings you will see CLC Standard Settings which
represent the way the program was set up, when you first launched
it. (
 )
)

Figure 4.14: Applying saved settings.
The settings are specific to the type of view. Hence, when you save settings of a circular view, they will not be available if you open the sequence in a linear view.
If you wish to export the settings that you have saved, this can be done in the Preferences dialog under the View tab (see Import and export Side Panel settings).
