Detailed description of the Homology Based Cloning wizard
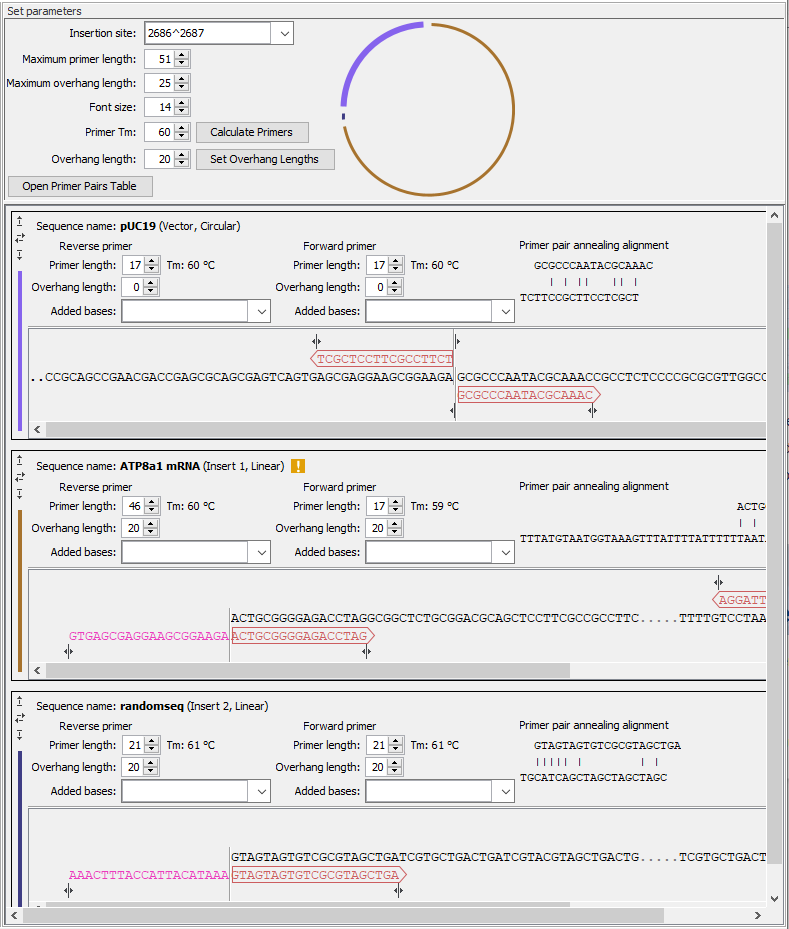
This section contains a detailed description of the Homology Based Cloning options (figure 23.32).

Figure 23.32: General options for the cloning experiment are provided at the top of the wizard, followed by sections for the vector and insert sequences, where many options relevant to the cloning experiment can be adjusted.
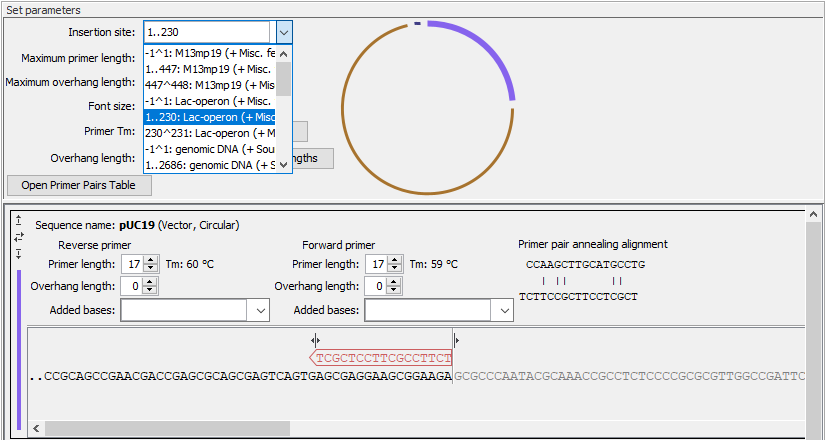
- Insertion site The position where fragments will be inserted in the vector. You can type in a specific position or a range of positions. You can also choose the start, the end, or the entire span of an annotation on the vector using the drop down menu (figure 23.33).
The primers designed to amplify the vector will be placed so that their 5' ends are adjacent to the insertion site. If a range of positions are selected, the primers will be placed so that the selected positions are not included in the PCR product. When the insertion site is changed, the vector primers in the view below are updated accordingly.
Insertion site examples:
- 0 or 0^1 Assembles inserts into the vector between the last and the first base.
- 1 or 1^2 Assembles inserts into the vector between the first and second base.
- 1..10 Inserts replace bases 1-10 in the vector.
- Start of an annotation Assembles inserts into the vector before the first base in the annotated region.
- Span of an annotation Inserts replace all bases in the annotated region.
- End of an annotation Assembles inserts into the vector after the last base in the annotated region.

Figure 23.33: Specify the insertion site in the vector. Here the entire Lac-operon has been selected from the drop down menu. Notice that when a span of bases are chosen as insertion site, the vector sequence between the primers is grey and not included in the PCR product. - Maximum primer length The maximum length that primers for vectors and inserts can be. This is reflected in the number of nucleotides visible for each sequence in the views below.
- Maximum overhang length The maximum length that overhangs for vectors and inserts can be.
- Font size The font size to use for vector and insert sequences, and for primers and overhangs.
- Primer Tm The primer melting temperature. This value does not take into account any added bases or overhangs. Click on Calculate primers to update all primers after changing this value.
- Overhang length The length of the overhang added to primers not including added bases. Click on Set Overhang Lengths to update overhangs after changing this value.
- Open Primer Pairs Table Opens a table listing each of the primer pairs shown on the sequences below. The primer pairs table contains primer pairs, both with and without overhangs and added bases. It also provides information about melting temperatures, secondary structure, etc. For a description of each of the columns in the Primer Pairs table, see Standard PCR output table.
- Vector map A vector map showing the assembled vector. Each original fragment has its own color that matches the side bars of the sequences in the views below. If you hover over the sequence of the vector or an insert, it will become bold in the vector map. If you hover over a primer, it will appear on the vector map. The fragments, but not the primers are drawn to scale.
- Sequence Name: n (vector, circular) and Sequence Name: n (insert y, linear). The sequences identified as the vector and inserts.
- Arrows to the left of Sequence Name Change the order of the sequences in the list using the up and down arrows. Reverse complement the sequence using the horizontal arrows.
- Primer length and Overhang length The primer and overhang lengths for the forward and reverse primer, respectively. These lengths can be adjusted by typing new values into the dialogs, or by using the up and down arrows to the right of the dialogs. Changes to the lengths are immediately updated in the sequence view below. The Tm and primer pair annealing alignment are also updated.
- Tm The primer melting temperature. This value does not include overhangs or any added bases.
- Primer pair annealing alignment Predicted primer-primer annealing of the forward and reverse primers. Overhangs and added bases are not included. The same plot is also available in the primer pairs table.
- Added bases Insert additional bases between the primer and overhang. You can either type the bases directly into the dialog, or you can choose the sequence of a specific restriction enzyme from the drop down menu.
- Sequence and primer views For each sequence included in the homology cloning reaction, you can see the part of the sequence that primers are designed to, as well as the primers and their overhangs. For the vector, the fragment is considered circular and the primers are placed pointing in opposite directions from the insertion site (figure 23.34). Inserts are considered linear and primers are placed at the ends (figure 23.35).
Vector, inserts, primers and overhangs are color coded (figure 23.30):
- Black Vector or insert sequence
- Grey Vector or insert sequence not included in the PCR product
- Brown Primer sequence
- Pink Overhang sequence
- Blue Added bases that are inserted between primer and overhang
The overhang of a primer for a given sequence is identical to the sequence that it will be adjacent to in the assembled vector. Figures 23.34 and 23.35 show an example where the linear sequence can be inserted into the circular sequence. Pink overhang bases on the primers for the circular fragment are either the same sequence or complementary to the black sequence of the linear DNA fragment. Overhangs are designed to assemble the fragments in the order they appear in the wizard. In this example, two sequences are assembled, but more than two can be used for homology based cloning.

Figure 23.34: Vector sequence and corresponding primers.
Figure 23.35: Insert sequence and corresponding primers. - Warnings in sequence views A yellow or red exclamation mark next to the sequence name warns of any problems 23.36. Hover over the primer to get more information from the tooltip or click on the warning to open a dialog showing the warning message. Examples of when warnings appear include:
- A primer does not have G/C content between 40 and 60 %.
- Only one primer is designed for a given fragment.
- An insert with a length that is not a multiple of 3 is placed inside a vector region annotated as a CDS and so may disrupt the reading frame.

Figure 23.36: Hover over the yellow exclamation mark to see the warnings in the tooltip.
