Create entry clones (BP)
The next step in the Gateway cloning work flow is to recombine the attB-flanked sequence of interest into a donor vector to create an entry clone. Before proceeding to this step, make sure that the sequence of the destination vector was saved in the Navigation Area: find the relevant vector sequence on the Thermo Fisher Scientific's website, copy it, and paste it in in the field that opens when you choose New | Sequence in the workbench. Fill in additional information appropriately (enter a "Name", check the "Circular" option) and save the sequence in the Navigation Area.
Toolbox | Cloning (![]() )| Gateway Cloning (
)| Gateway Cloning (![]() ) | Create Entry Clone (
) | Create Entry Clone (![]() )
)
In the first wizard window, select one or more sequences to be recombined into your donor vector. Note that the sequences you select should be flanked with attB sites (see Add attB sites). You can select more than one sequence as input, and the corresponding number of entry clones will be created.
In the following dialog (figure 23.43), you can specify a donor vector.

Figure 23.43: Selecting one or more donor vectors.
Once the vector is selected, a preview of the fragments selected and the attB sites that they contain is shown. This can be used to get an overview of which entry clones should be used and check that the right attB sites have been added to the fragments. Also note that the workbench looks for the attP sites (see how to change the definition of sites in Technical information about modifying Gateway cloning sites), but it does not check that they correspond to the attB sites of the selected fragments at this step. If the right combination of attB and attP sites is not found, no entry clones will be produced.
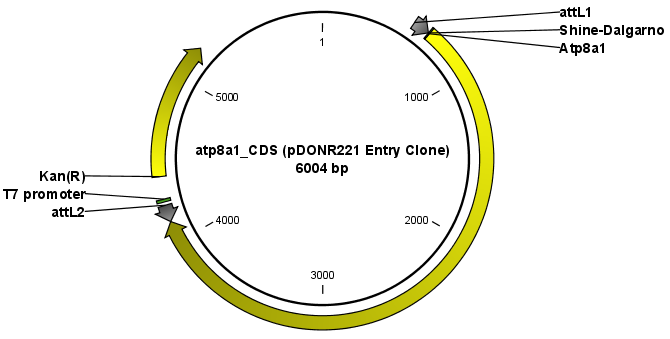
The output is one entry clone per sequence selected. The attB and attP sites have been used for the recombination, and the entry clone is now equipped with attL sites as shown in figure 23.44.

Figure 23.44: The resulting entry vector opened in a circular view.
Note that the bi-product of the recombination is not part of the output.
