Demultiplexing single reads
To demultiplex your data, please go to:
Toolbox | Prepare Sequencing Data (![]() ) | Demultiplex Reads (
) | Demultiplex Reads (![]() )
)
This opens a dialog where you can specify the sequences to process (figure 26.17).

Figure 26.17: Specify the sequences to demultiplex.
When you click on the button labeled Next, you can then specify the details of how the demultiplexing should be performed. At the bottom of the dialog, there are three buttons, which are used to Add, Edit, and Delete the elements that describe how the barcode is embedded in the sequences.
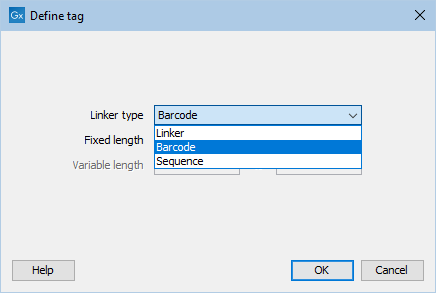
First, click Add to define the first element. This will bring up the dialog shown in 26.18.

Figure 26.18: Defining an element of the barcode system.
At the top of the dialog, you can choose the type of element you wish to define:
- Linker. The linker (also known as adapter) is a sequence which should just be ignored - it is neither the barcode nor the sequence of interest. In the example in figure 26.16, the linker is two nucleotides long. For this element, you simply define its length - nothing else.
- Barcode. The barcode (also known as index) is the stretch of nucleotides used to group the sequences. In this dialog, you simply need to specify the length of the barcode. The valid sequences for your barcodes must be provided at a later wizard step.
- Sequence. This element defines the sequence of interest. You can define a length interval for how long you expect this sequence to be. The sequence part is the only part of the read that is retained in the output. Both barcodes and linkers are removed.

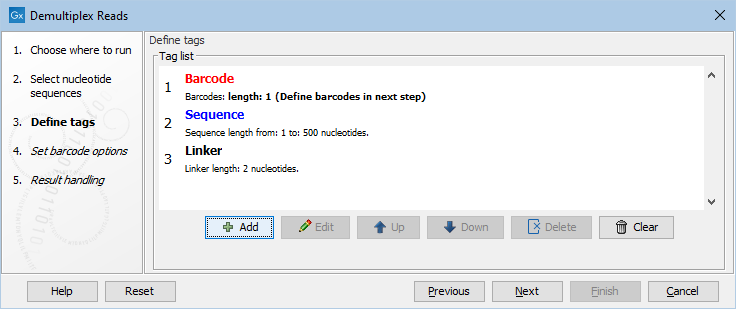
Figure 26.19: Processing the tags as shown in the example of figure 26.16.
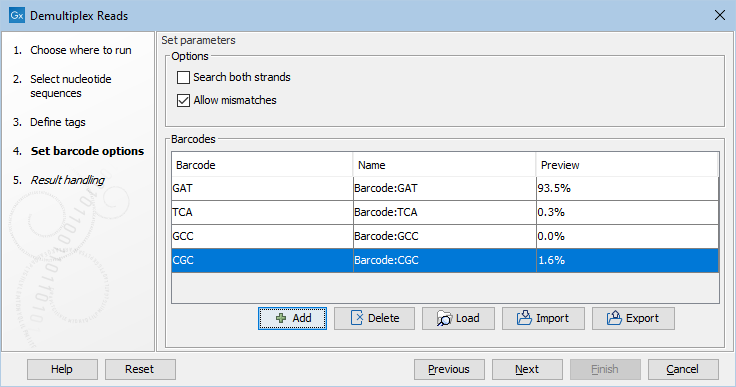
Click Next to set the barcode options (figure 26.20). At the top, you can choose to search on both strands for the barcodes; this is needed for some 454 protocols where the MID is located at either end of the read. You can also choose to allow mismatches: only one per barcode will be allowed, regardless of whether the barcodes are on the same read, or distributed on both R1 and R2.
Note: If a sequence is one mismatch away from two barcodes, it will not be assigned to any of them.
In the table below, the Preview column will show a preview of the results by running through the first 10,000 reads.

Figure 26.20: A preview of the results.
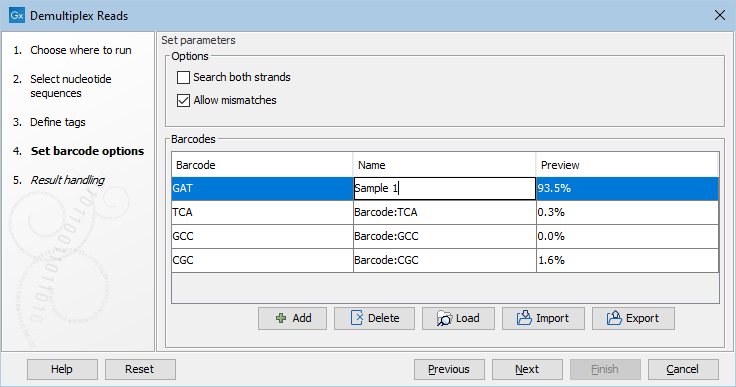
If you would like to change the name of the sequence(s), this can be done at this step by double-clicking on the specific name that you would like to change. This is shown in figure 26.21.

Figure 26.21: The name of the sequence can be renamed by double-clicking on the existing name.
