Creating a new Trim adapter list
It is possible to generate a Trim adapter list directly in the workbench. Go to:
File | New | Trim Adapter List
This will create a new empty Trim adapter list. At the bottom of the view, you have the following options that allow you to edit the Trim adapter list:
- Add Rows. Add a new adapter.
- Edit Row. Edit the selected adapter. This can also be achieved by double-clicking the relevant row in the table.
- Delete Row. Delete the selected adapter.
Add the adapter(s) that you would like to use for trimming by clicking on the button Add Row (![]() ) found at the bottom of the View Area. Adding an adapter is done in two steps. In the first wizard step (figure 25.4), you enter the basic information about the adapter, and how the trimming should be done relative to the adapter found.
) found at the bottom of the View Area. Adding an adapter is done in two steps. In the first wizard step (figure 25.4), you enter the basic information about the adapter, and how the trimming should be done relative to the adapter found.
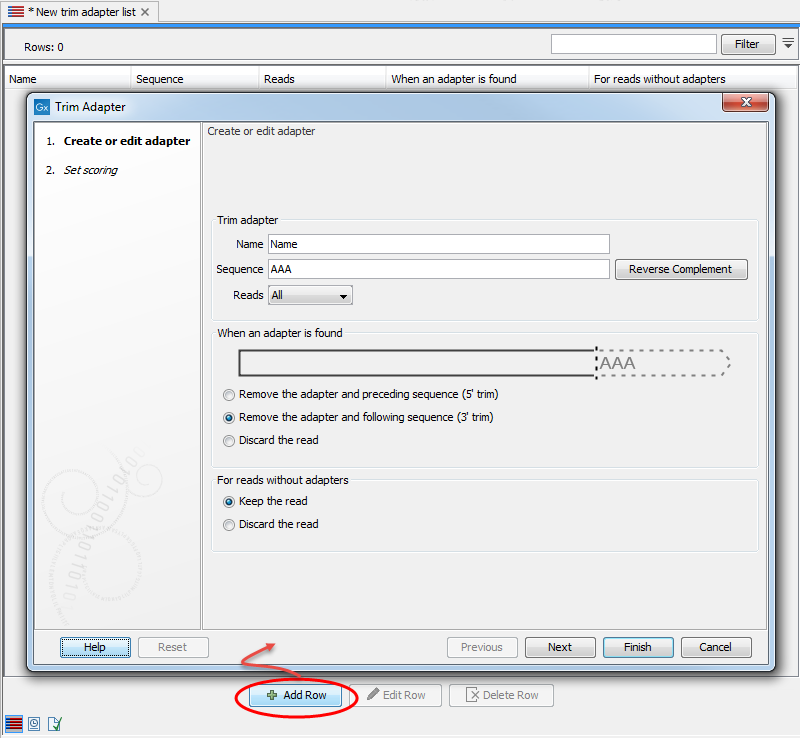
Figure 25.4: Add an adapter to the Trim Adapter List by clicking on the button labeled "Add Row" found at the bottom of the New Trim Adapter view.
In the second dialog (figure 25.5), you define the scores that will be used to recognize adapters. For each read sequence in the input, a Smith-Waterman alignment [Smith and Waterman, 1981] is carried out with each adapter sequence. Alignment scores are computed and compared to the minimum scores provided for each adapter when setting up the Trim adapter List. If the alignment score is higher or equal to the minimum score, the adapter is recognized and the trimming can happen as specified in the first wizard. If however the alignment score is lower than the minimum score, the adapter is not recognized and trimmed.
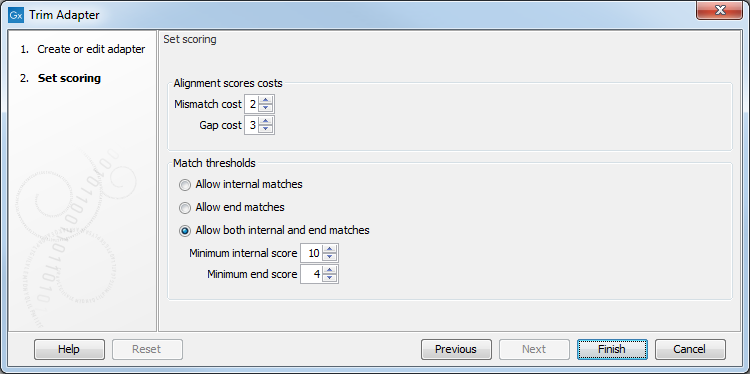
Figure 25.5: Set the scoring used to define what will be considered as adapter.
Trim adapter
Start by providing the name and sequence of the adapter that should be trimmed away. Use the Reverse Complement button to reverse complement the sequence you typed in if it is found in reverse complement in the reads. You can then specify whether you want the adapter to be trimmed on all reads, or more specifically on the first or second read of a pair.
When an adapter is found
Once you have entered the sequence of the adapter, a visual shows how the adapter will be trimmed, allowing you to decide which option suits your needs best:
- Remove the adapter and preceding sequence (5' trim)
- Remove the adapter and following sequence (3' trim)
- Discard the read. The read will be placed in the list of discarded sequences. This can be used for quality checking the data for linker contamination for example.
For reads without adapters
You can decide here what to do with reads where no adapter was found. This kind of adapter trimming is particularly useful for small RNA sequencing where the remnants of the adapter is an indication that this is indeed a small RNA. Beware of lists where multiple adapters have been set to "Discard the read" when the adapters are not found: only sequences containing all the adapters will remain in the list of trimmed reads.
Alignment scores costs
An A,C,G or T in the adapter that matches an A,C,G or T respectively - or a corresponding ambiguity code letter - in a sequence is considered a match and will be awarded 1 point. However, you can decide how much penalty should be awarded to mismatches and gaps:
- Mismatches The penalty for mismatches between bases is set as 2 by default.
- Gap The penalty for gaps introduced into the alignment is set as 3 by default.
Here are the few examples of adapter matches and corresponding scores (figure 25.6). These examples are all internal matches where the alignment of the adapter falls within the read.
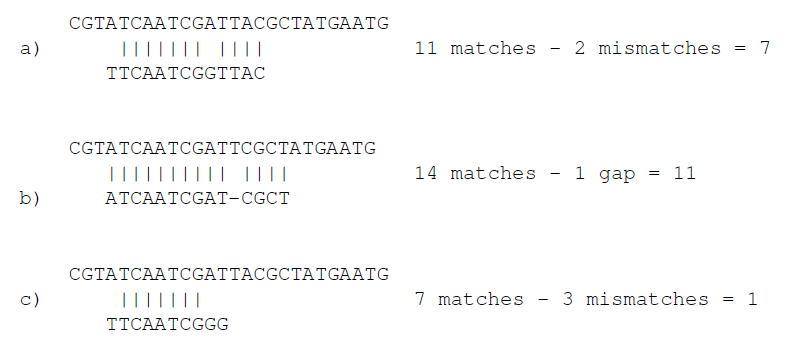
Figure 25.6: Three examples showing a sequencing read (top) and an adapter (bottom). The examples are artificial, using default setting with mismatch costs = 2 and gap cost = 3.
Match thresholds
Note that there is a difference between an internal match and an end match. An end match happens when the alignment of the adapter starts at the end of the sequence that is being trimmed. This can be 5' or 3' depending on the option chosen in the first dialog. Note that for 3' trim, we internally reverse-complement the read and look for a match at the 5' end of the reverse complemented sequence. So in case of 3' trim, if a match is found at the 5' end, it will be treated as an internal match, because it is on the end of the sequence that is not being trimmed.
If a match can be treated as either an end match or an internal match, the workbench will treat it as an end match.
This section allows you to decide whether to
- Allow internal matches
- Allow end matches
- Allow both internal and end matches
You can also change the minimum scores for both internal and end score
- Minimum internal score is set to 10 by default
- Minimum end score is set to 4 by default
For example, if your adapter is 8 nucleotides long, it will never be found in an internal position with the settings set as they are by default (the minimum internal score being at 10).
Figure 25.7 shows a few examples with an adapter match at the end.
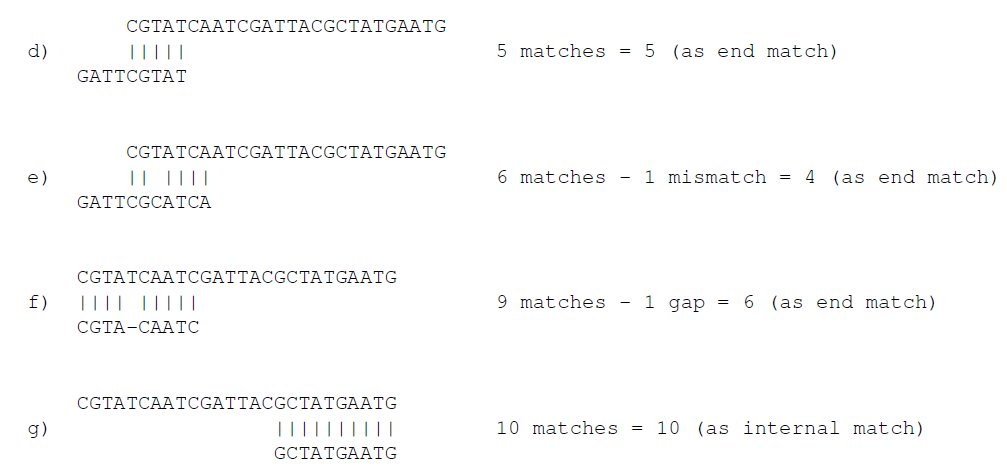
Figure 25.7: Four examples showing a sequencing read (top) and an adapter (bottom). The examples are artificial.
In the first two examples (d and e), the adapter sequence extends beyond the end of the read. This is what typically happens when sequencing small RNAs where you sequence part of the adapter. The third example (f) shows a case that could be interpreted both as an end match and an internal match. However, the workbench will interpret this as an end match, because it starts at beginning (5' end) of the read. Thus, the definition of an end match is that the alignment of the adapter starts at the read's 5' end. The last example (g) could also be interpreted as an end match, but because it is a the 3' end of the read, it counts as an internal match (this is because you would not typically expect partial adapters at the 3' end of a read).
Below (figure 25.8), the same examples are re-iterated showing the results when applying different scoring schemes. In the first round, the settings are:
- When an adapter is found: Remove adapter and the preceding sequence (5' trim)
- Allowing internal matches with a minimum score of 6
- Not allowing end matches
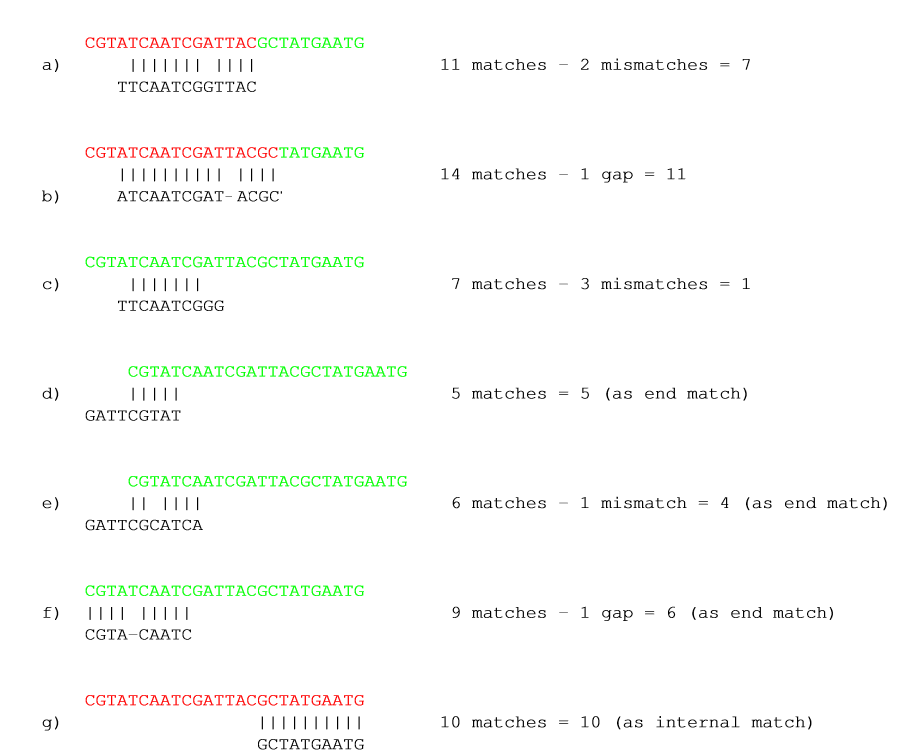
Figure 25.8: The results of trimming with internal matches only. Red is the part that is removed and green is the retained part. Note that the read at the bottom is completely discarded.
A different set of adapter settings could be:
- When an adapter is found: Remove adapter and the preceding sequence (5' trim)
- Allowing internal matches with a minimum score of 11
- Allowing end match with a minimum score of 4
The results of such settings is shown in figure 25.9.
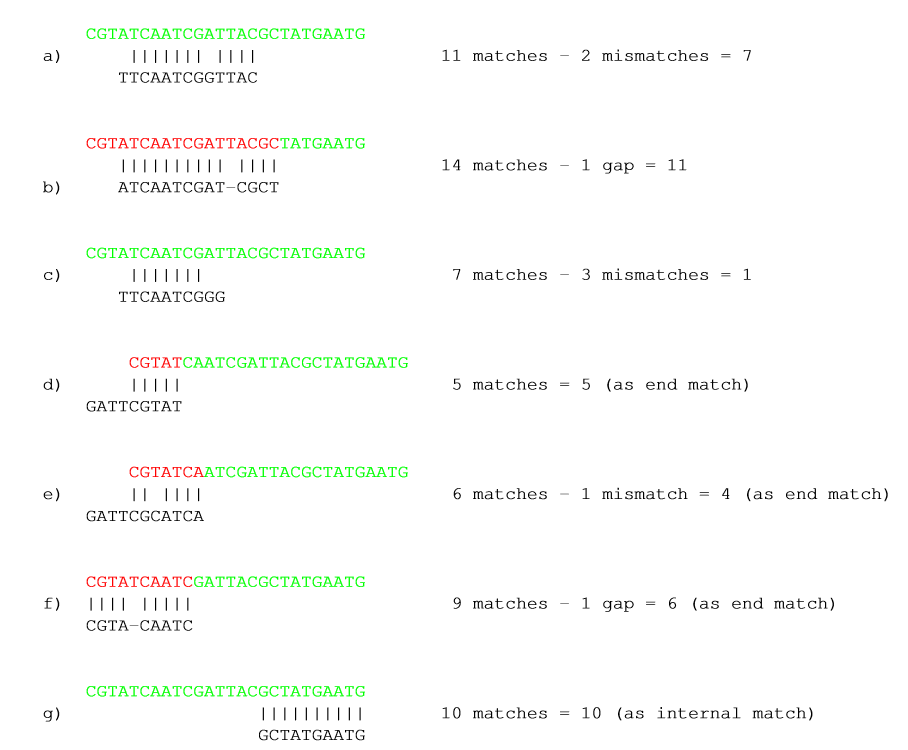
Figure 25.9: The results of trimming with both internal and end matches. Red is the part that is removed and green is the retained part.
Click Finish to create the trim adapter list. You must now save the generated trim adapter list in the Navigation Area. You can do this by clicking on the tab and dragging and dropping the trim adapter list to the desired destination, or you can go to File in the menu bar and the choose Save as.