Creating a workflow installation file
Installing workflows allows you to provide and use a controlled version of the workflow. Only parameters left unlocked in such workflows can be configured when launching. Installed workflows are available for use from within the Workbench Toolbox.
To create a workflow installer, or to directly install the workflow into the Toolbox, click on the Installation... button at the bottom of the workflow editor (keyboard shortcut Shift + Alt + I).
At the end of this process, you will have the option to install the workflow directly to your Workbench or to create an installer file, which can be used to install the workflow on any compatible CLC Workbench or CLC Server. If you are logged into a CLC Server as a user with appropriate permissions, you will also have the option to install the workflow directly on the CLC Server.
Information about the workflow
In the Create Installer dialog, you are prompted for information about the workflow (figure 13.78). After the workflow is installed, this information will be visible in the Workflow Manager, as described in Managing workflows.
The information requested when creating a workflow installer is described below. The workflow name and organization information are required- Other fields are optional.
- Author name
- The name of the workflow author.
- Author email
- The email address of workflow author.
- Author homepage
- A URL.
- Organization
- (Required) The organization name. This is used as part of the workflow id (Managing workflows).
- Workflow name
- (Required) The name of the workflow, as it should appear in the Toolbox after installation. Changing this does not affect the name of the original workflow (as appears in your Navigation Area). This name is also used as part of the workflow id (Managing workflows).
- ID
- The workflow id. This is created using information provided in other fields. It cannot be directly edited.
- Workflow icon
- An icon to use for this workflow in the Toolbox once the workflow is installed. Icons use a 16 x 16 pixel gif or png file. If your icon file is larger, it will automatically be resized to fit 16 x 16 pixels.
- Workflow version
- A major and minor version for this workflow. This version will be visible via the Workflow Manager after the workflow is installed, and will be included in the history of elements generated using this workflow. The version of the workflow open in the Workflow Editor, from which this installer is being created, will also be updated to the version specified here.
- Workflow description
- A textual description of the workflow. After installation, this is shown in the Description tab of the Workflow Manager (Managing workflows) and is also shown in a tooltip when the cursor is hovered over the installed workflow in the Workbench Toolbox.
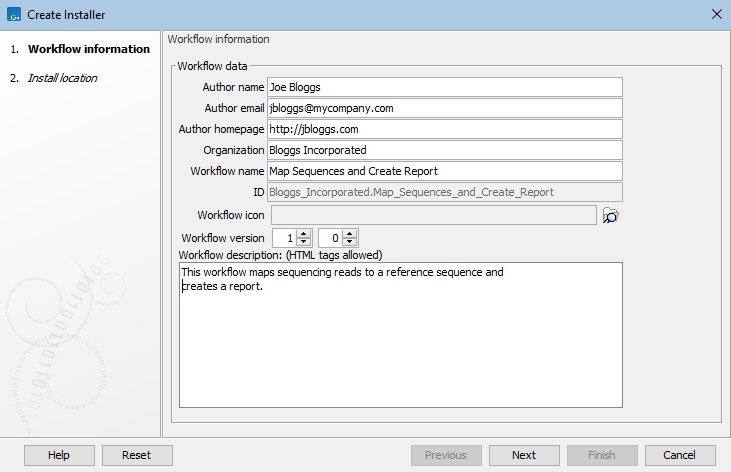
Figure 13.78: Provide information about the workflow that you are creating an installer for.
Choosing how reference data inputs should be handled
If data elements were preconfigured as inputs to any workflow element, then the next step when creating the workflow installer is to specify how those elements and associated data should be handled (figure 13.79).
In workflows where no data elements were preconfigured as inputs, this step is not shown.
The data handling options are:
- Ignore
- The data elements selected as inputs in the original workflow are not included in the workflow installer.
Input options where Ignore is selected should generally be kept unlocked. If locked, the data element referred to must present in the exact relative location used on your system when creating the installer. If the option is locked, and the selected data element is not present in the expected location, an error message is shown in the Workflow Manager when the workflow is installed. It will not be possible to run that workflow until the relevant data element is present in the expected location.
Locking and unlocking parameters is described at https://resources.qiagenbioinformatics.com/manuals/clcgenomicsworkbench/current/index.php?manual=Basic_configuration_workflow_elements.html
- Bundle
- The data elements selected as inputs in the original workflow are included in the workflow installer. This is a good choice when sharing the workflow with others who may not have the relevant reference data on their system.
When installing a workflow with bundled data on a CLC Workbench, you are prompted where to save the bundled data elements. If the workflow is on a CLC Server, the data elements are saved automatically, as described in the CLC Server manual at:
Bundling is intended for use with small reference data elements. With larger elements, the workflow installer can quickly become very big. In addition, each time such a workflow is installed, a copy of the bundled data is included, even if the relevant data element is already present on the system elsewhere.
When working with large data elements, leaving the input option unlocked and choosing the Ignore option is recommended. In this case, the relevant data elements should be shared using other means. For example, export the data and share this separately. The benefit with this, over bundling, is that the data can be shared once, rather than with every workflow installer that refers to it.
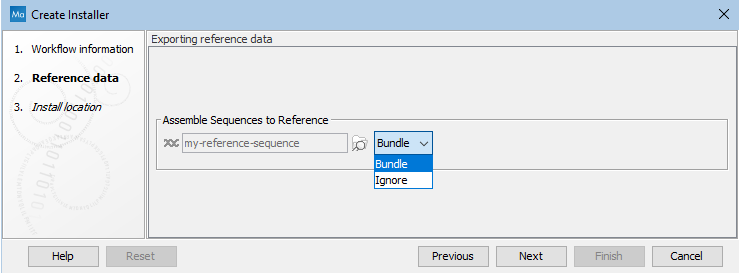
Figure 13.79: Bundling data with the workflow installer.
Installation options
The final step asks you to indicate whether to install the workflow directly to your Workbench or to create an installer file, which can be used to install the workflow on any compatible CLC Main Workbench or CLC Server (figure 13.80). If you are logged into a CLC Server as a user with appropriate permissions, you will also have the option to install the workflow directly on the CLC Server.
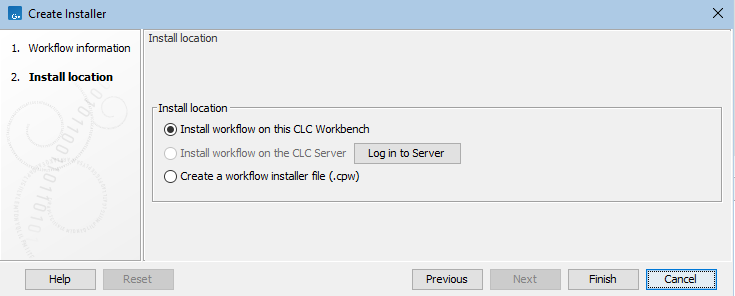
Figure 13.80: Select whether the workflow should be installed to your CLC Workbench or an installer file (.cpw) should be created. Installation to the CLC Server is only available if you are logged in as a user with permission to administer workflows on the CLC Server.
Workflows installed on a CLC Workbench cannot be updated in place. To update such a workflow, make a copy, modify it, and then create a new installer. We recommend that you increase the version number when creating the installer to help track your changes.
When you then install the updated copy of the workflow, a dialog will pop up with the message "Workflow is already installed" (figure 13.81). You have the option to force the installation. This will uninstall the existing workflow and install the modified version of the workflow. If you choose to do this, the configuration of the original workflow will be gone.
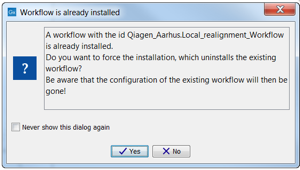
Figure 13.81: Select whether you wish to force the installation of the workflow or keep the original workflow.