Updating workflows
Tools included in a workflow are versioned. They will initially be the same version as in the software that was used to design the workflow. If one or more tools are updated through upgrading the CLC Server or plugins installed on it, then any workflow containing one or more such tools must be updated.
An exclamation mark (![]() ) is presented beside any workflow that needs to be updated. Clicking on the workflow name opens up a view where each element that needs to be updated is also indicated with an exclamation mark. See figure 13.5. Workflows that can be updated directly in the web administrative interface will have a button at the bottom labeled "Update Workflow" enabled. For workflows that cannot be updated this way, a message will appear stating this, and providing some tips of how to proceed. Details of both these situations are outlined below.
) is presented beside any workflow that needs to be updated. Clicking on the workflow name opens up a view where each element that needs to be updated is also indicated with an exclamation mark. See figure 13.5. Workflows that can be updated directly in the web administrative interface will have a button at the bottom labeled "Update Workflow" enabled. For workflows that cannot be updated this way, a message will appear stating this, and providing some tips of how to proceed. Details of both these situations are outlined below.
Updating workflows via the server web administrative interface
A button labeled "Update Workflow" just under the workflow is enabled for workflows that can be updated directly in the web administrative interface. Clicking on this button, or any of the elements with exclamation marks, starts the update. See figure 13.5.
Note! If a tool has been updated with a new parameter, then an updated workflow that includes that tool will have that new parameter configured with the default value.
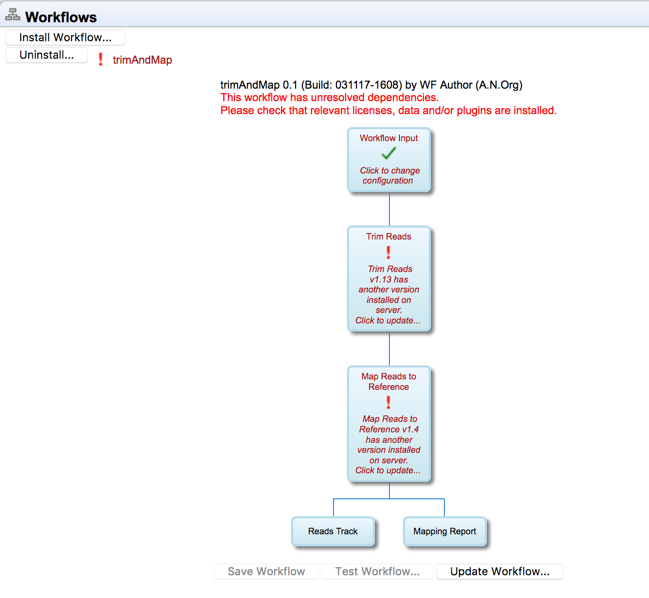
Figure 13.5: Click on the "Update Workflow" button, or on an element marked with an exclamation mark to start the update.
When updating, a window appears containing information about the changes to be enacted if you proceed. If errors have occurred these will also be displayed. See figure 13.6. Accept the changes by pressing the "Update" button. The update can also be canceled at this point if desired.
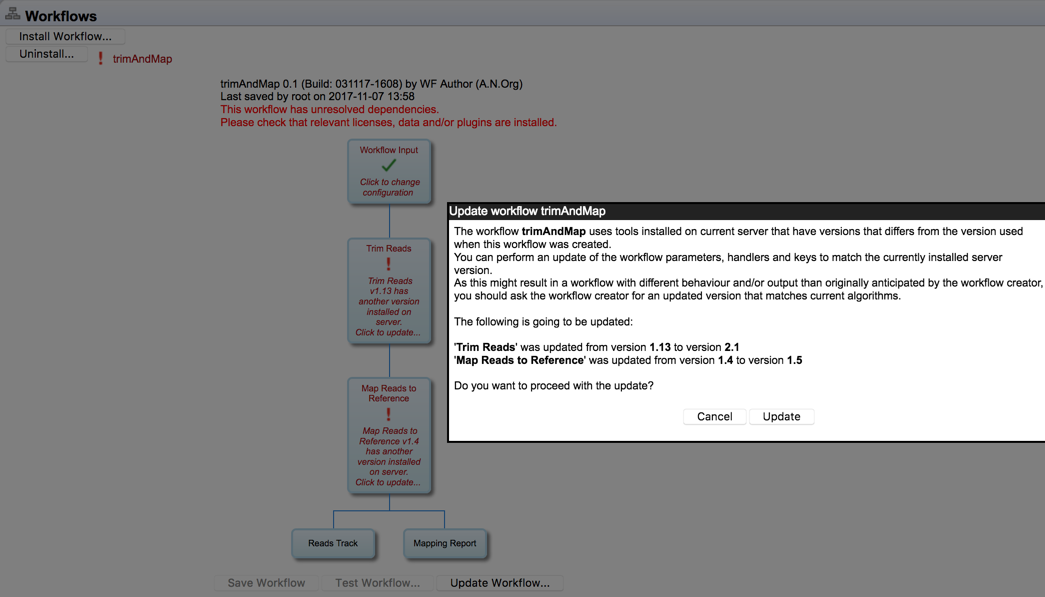
Figure 13.6: Details about the upgrade are presented, and you can choose whether to proceed with the update, or cancel it.
After pressing the "Update" button, the updated workflow will be marked with a green check mark (![]() ). A copy of the original workflow is also kept. It is disabled and has the original name with "-backup (disabled)" appended. An example is shown in figure 13.7.
). A copy of the original workflow is also kept. It is disabled and has the original name with "-backup (disabled)" appended. An example is shown in figure 13.7.
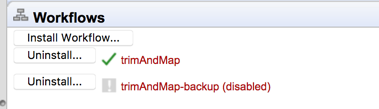
Figure 13.7: In addition to the updated version of the workflow, marked with a green check mark, a copy of the original workflow is kept. It is disabled and has the original name with "-backup (disabled)" appended.
If you click on the copy of the original workflow, a button labeled "Re-enable Workflow" appears (figure 13.8). Clicking on this button re-enables the original workflow and uninstalls the updated version of the workflow.
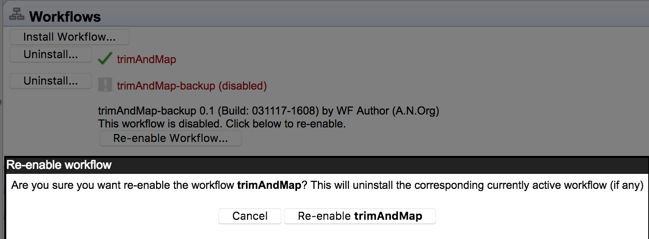
Figure 13.8: After a workflow has been updated, it is possible to re-enable the original workflow.
Updating workflows that cannot be updated via the server web administrative interface
Some installed workflows cannot be updated directly in the web administrative client. Common situations where this can occur include:
- Workflows containing tools provided by plugins not installed on the CLC Server.
- Workflows containing tools from server extensions (commercial plugins) that require a license, but either the license is not present or it does not support the version of the server extension that is installed.
- Workflows containing tools not on the version of the CLC Server running.
- Workflows containing tools that cannot be upgraded directly due to the nature of the changes made to them in the updated CLC Server.
To resolve the first 2 circumstances, check install any needed plugins and licenses, restart the CLC Server, and check the status of workflows under the Workflows tab of the web administrative interface.
To address the third and fourth issues, new versions of the workflows must be made on a CLC Workbench and then installed on the CLC Server. For this, a Workbench version that the installed workflow can be run from is needed, as well as the latest version of the Workbench.
To start, open a copy of the installed workflow in a version of the Workbench it can currently be run on. This is done by selecting the workflow in the Installed Workflows folder of the Toolbox in the bottom left side of the Workbench, then right-clicking on the workflow name and choosing the option "Open Copy of Workflow" (figure 13.9).
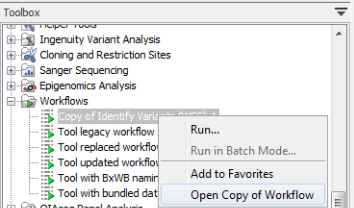
Figure 13.9: Open a copy of an installed workflow by right-clicking on its name in the Workbench Toolbox.
Save the copy of the workflow in the Navigation Area. To do this, you can simply drag and drop the tab to the location of your choice in the Navigation Area.
Open the new version of the Workbench and there, open the workflow that was saved in the Navigation Area. Click on the OK button if you are prompted to update the workflow.
You can now check that the workflow has been updated correctly, including that any reference data is configured as expected. Then save the updated version of the workflow. Finally, click the Installation button to install the worfklow, if desired.
If the above process does not work when upgrading directly from a much older Workbench version, it may be necessary to upgrade step-wise by upgrading the workflow in sequentially higher major versions of the Workbench.
The updated workflow can now be installed on the CLC Server as described in section Installing and configuring workflows.