Rename Elements
Using Rename Elements, you can add or remove characters from element names. You can also replace parts of names, optionally using regular expressions to define the sections to replace.
Replacing spaces or other special characters in element names can be particularly useful before exporting to systems where filenames with those characters are problematic to work with.
Other methods of changing or controlling element names exist: Individual elements can be renamed directly in the Navigation Area by doing a slow double-click on the name, or selecting the element and choosing the menu item Edit | Rename. In workflows, the naming of outputs can be configured, as described in Configuring input and output elements.
To launch the Rename Elements tool, go to:
Toolbox | Utility Tools (![]() ) | Renaming (
) | Renaming (![]() ) |Rename Elements (
) |Rename Elements (![]() )
)
In the first wizard step, select the elements to rename (figure 25.9).
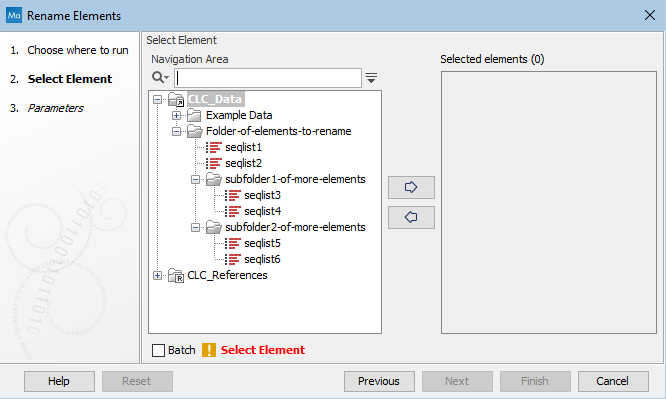
Figure 25.9: Select the elements or folders to be renamed.
Alternatively, you can right-click and select "Add folder contents" or, select "Add folder contents (recursively)" to rename all elements in a folder structure recursively. (figure 25.10).
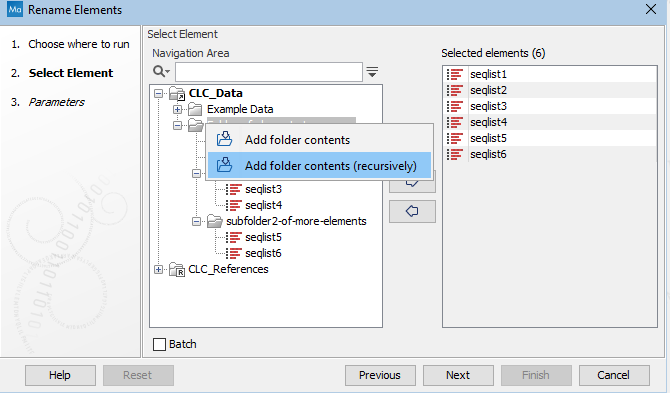
Figure 25.10: Right-click for options to add the contents of folders as inputs. Here, the "Add folder contents (recursively)" option was selected. If "Add folder contents" had been selected, only the elements seqlist1 and seqlist2 would have been added to the Selected elements list on the right.
When multiple elements are supplied as input, each will be renamed. There is no need to check the Batch checkbox for this. However, if you wish to rename only certain elements from the full selection, then checking the Batch box provides the opportunity to do that. When checked, the next wizard step shows the batch overview, where elements can be explicitly included or excluded from those to be renamed, based on text patterns. This step is described in more detail at Batch overview).
Checking the Batch checkbox for this tool also has the following effect when a folder is selected as input:
- With the Batch option checked, the top level contents of that folder will be renamed.
- With the Batch option unchecked, the folder itself will be renamed.
Important notes about renaming elements
- Renaming elements cannot be undone. To alter the names further, the elements must be renamed again.
- The renaming action is recorded in the History (
 ) for the element, but the "Originates from" entries lists the changed element name, rather than the original element name.
Renaming options
This wizard step presents various options for the renaming action (figure 25.15). The Rename Elements is used for illustration in this section, but the options are the same for the Rename Sequences in Lists tool.
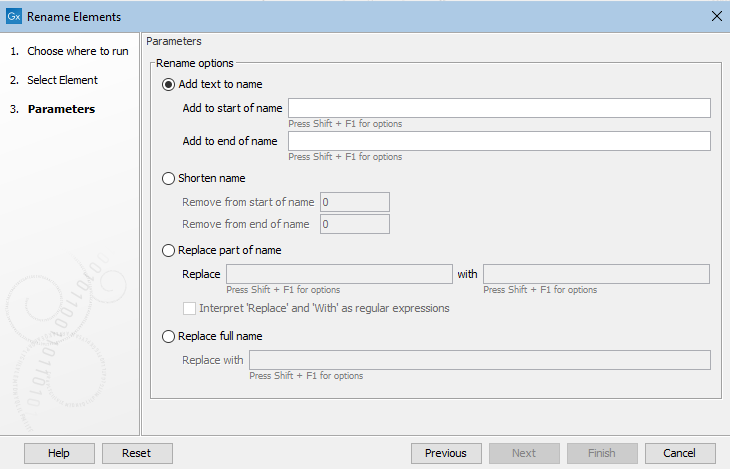
Figure 25.11: Text can be added, removed or replaced in the existing names.
- Add text to name Select this option to add text at the beginning or the end of the existing name.
You can add text directly to these fields, and you can also include placeholders to indicate certain types of information should be added. Multiple placeholders can be used, in combination with other text if desired (figure 25.16). The available placeholders are:
{name}The current name of the element. Usually used when defining a new naming pattern for replacing the full name of elements.{shortname}Truncates the original name to 10 characters. Usually used when replacing the full names of elements.{Parent folder}The name of the folder containing the element.{today}Today's date in the form YYYY-MM-DD{enumeration}Adds a number to the name. This is intended for use when multiple elements are selected as input. Each is assigned a number, starting with the number 1, (added as 0000001) for the first element that was selected, 2 (added as 0000002) for the second element selected, and so on.
Click in a field and use Shift + F1 (Shift + Fn + F1 on Mac) to show the list of available placeholders, as shown in figure 25.16. Click on a placeholder in that list to have it entered into the field.
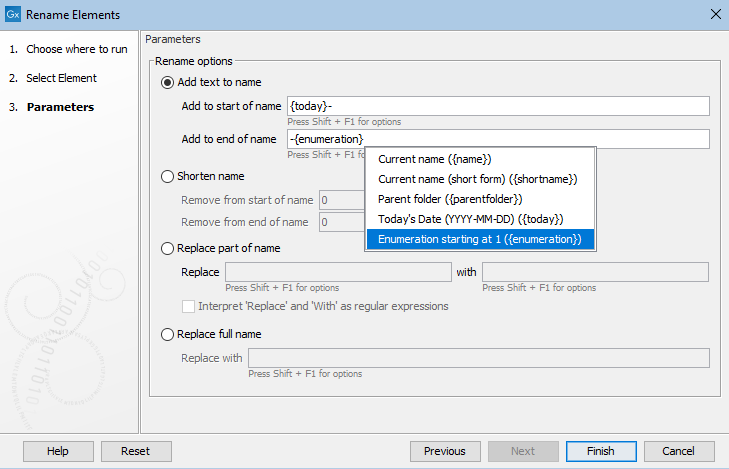
Figure 25.12: Click on Shift+F1 (Shift + Fn + F1 on Mac) to reveal a drop-down list of placeholders that can be used. Here, today's date and a hypen would be prepended, and a hyphen and ascending numeric value appended, to the existing names. - Shorten name Select this option to shorten a name by removing a specified number of characters from the start and/or end of the name.
- Replace part of name Select this option to specify text or regular expressions to define parts of the element names to be replaced. By default, the text entered in the fields is interpreted literally. Check the "Interpret 'Replace' as regular expression" option to indicate that the terms provided in the "Replace" field should be treated as regular expressions. Information on regular expressions can be found at http://docs.oracle.com/javase/tutorial/essential/regex/.
By clicking in either the "Replace" or "with" field and pressing Shift + F1 (Shift + Fn + F1 on Mac), a drop down list of renaming possibilities is presented. The options listed for the Replace field are some commonly used regular expressions. Other standard regular expressions are also admissible in this field. The placeholders described above for adding text to names are available for use in the "with" field. Note: We recommend caution when using these placeholders in combination with regular expressions in the Replace field. Please run a small test to ensure it works as you intend.
- Replace full name Select this option to replace the full element name. Text and placeholders can be used in this field. The placeholders described above for adding text to names are available for use. Use Shift + F1 (Shift + Fn + F1 on Mac) to see a list.
Examples using regular expressions to replace parts of element names
The following are examples to illustrate using regular expressions for renaming. The same principles apply for renaming using the Rename Elements and Rename Sequences in Lists tools.
- Replacing part of an element's name with today's date and an underscore. Details are shown in figure 25.17.
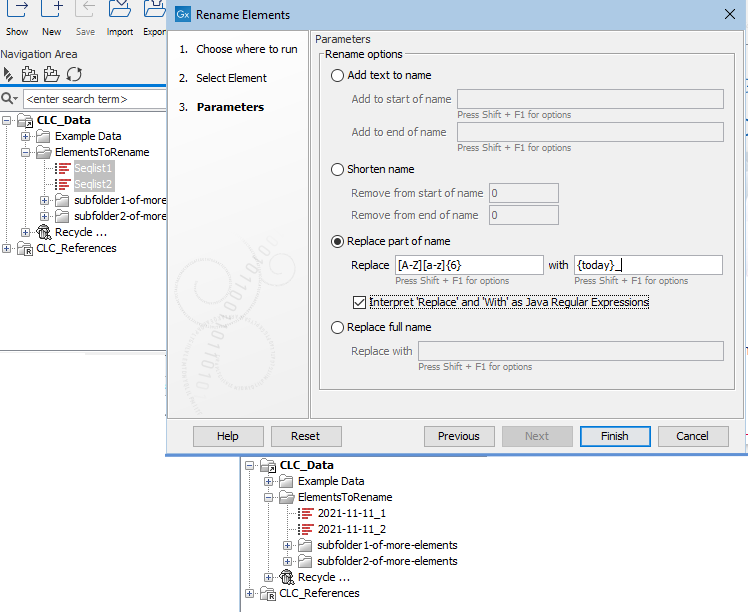
Figure 25.13: Elements with names Seqlist1 and Seqlist2 each start with a capital letter, followed by 6 small letters. Using the settings shown, their names are updated to be the date the renaming was done, followed by a hypen, and the remaining parts of the original name, here, the integer at the end of each name. - Rename using the first 4 non-whitespace characters from names that start with 2 characters, then have a space, then have multiple characters following, such as
1N R1\_0001.- Check the box beside "Interpret 'Replace' and 'with' as Java regular expressions".
- Enter
([\w]{2})\s([\w]{2}).*into the "Replaces" field. - Enter
$1$2into the "with" field.
- Keep only the last 4 characters of the name.
- Check the box beside "Interpret 'Replace' and 'with' as Java regular expressions".
- Enter
(.*)(.{4}$)into the "Replaces" field. - Enter
$2into the "with" field.
- Replace a set pattern of text with the name of the parent folder. Here, we start with the name
p140101034_1R_AMRand replace the first letter and 9 numbers with the parent folder name.- Check the box beside "Interpret 'Replace' and 'with' as Java regular expressions".
- Enter
([a-z]\d{9})(.*)into the "Replaces" field. - Enter
{parentfolder}$2into the "with" field.
- Rename using just the text between the first and second underscores in
1234_sample-code_5678.- Check the box beside "Interpret 'Replace' and 'with' as Java regular expressions".
- Enter
(^[^_]+)_([^_]+)_(.*)into the "Replaces" field. - Enter
$2into the "with" field.
