Configuring your setup
If you have not already, please download and install your license to the master node. (See Downloading a License.) Do not install license files on the job nodes. The licensing information, including how many job nodes you can run, are all included in the license on the master node.
To configure your master/execution node setup, go to the Job distribution tab in the web administrative interface on the master node:
Admin (![]() ) | Job distribution (
) | Job distribution (![]() )
)
Then enter the following information:
- Server mode - select
MASTER_NODE. - Master node host - Enter the master node host name. Click on the "Show suggestions" text next to this field to see information about the server that can be useful when configuring this option.
- Master node port - usually 7777
- Master node display name - the name shown in the top bar of the web interface for the CLC Server
- CPU limit - The maximum number of CPU the CLC Server should use. This is set to unlimited by default, meaning that up to all cores of the system can be used.

Figure 6.2: Setting up a master server.
If the Attach Node button in the Job nodes section is greyed out, please ensure that the server mode selected is MASTER_NODE and that you have clicked on the Save Configuration button to save your configuration changes.
Then, for each job node:
- Click on the Attach Node button to specify a job node to attach. See figure 6.2.
- Enter information about the node in the fields (see figure 6.3).
- Optionally, click on the button labeled "Manage Job Types" to specify the types of jobs that can be run on each node. See figure 6.4. The default is "Any installed Server Command". If you choose instead "Only selected Server Commands", a search field and a list of all server command names and types will appear. The search field can be used to narrow down the server commands by name or type. Only the tools selected can then be run on that particular job node. Click Modify when you are done.
- Click Create.
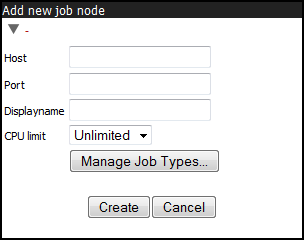
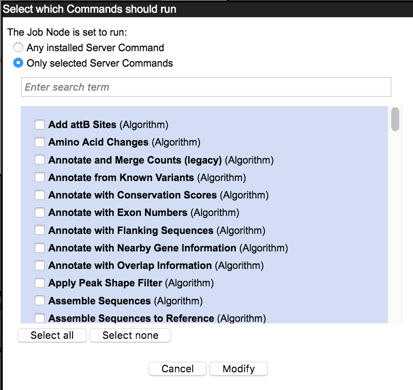
Figure 6.4: Select Server Commands to run on the job node.
Repeat this process for each job node you wish to attach and click Save Configuration when you are done.
You will get a warning dialog if there are types of jobs that are not enabled on any of the nodes.
Note that when a node has finished a job, it will take the first job in the queue that is of a type the node is configured to process. This then means that, depending on how you have configured your system, the job that is number one in the queue will not necessarily be processed first.
To test that access works for both job nodes and the master node, you can click "check setup" in the upper right corner as described in Check set-up.
One relatively common problem that can arise is root squashing. This often needs to be disabled, because it prevents the servers from writing and accessing the files as the same user - read more about this at http://nfs.sourceforge.net/#faq_b11.
Once set up, job nodes automatically inherit all configurations on the master node. If one of the job nodes gets out of sync with the master, click the Resync job nodes button, shown in figure 6.2. This should not be done while jobs are running on any nodes. The server can be put into Maintenance Mode to allow current jobs to complete before maintenance tasks are carried out. See section Server maintenance.