Configure a containerized MAFFT external application
In this section, we focus on how to determine the command to be configured for an individual containerized external application, and then step through configuring an external application for the Docker container containing MAFFT.
We assume that the containerized execution environment has already been enabled and configured, as described in Configuring the containerized execution environment.
Determining the containerized external application command line
When configuring containerized external applications, only the part of the docker command specific to this particular application is included in the Command line field of the external application configuration. Parts of the command general to running all containerized external applications are specified in the Containerized execution environment area, as described in Configuring the containerized execution environment.
The full command we want to run takes this form:
docker run -v <import-export-dir>:<mount-point-in-image> \
<image-identifier> <command-to-run-from-image> <input-data>
With default settings for the containerized execution environment, the first part,
docker run -v <import-export-dir>:<mount-point-in-image>
is already defined for every containerized external application.
Thus, only the rest of the command needs to be specified when configuring the individual external application, i.e.
<image-identifier> <command-to-run-from-image> <input-data>
For our MAFFT example, that command would have the form:
example/mafft:0.0.1 /mafft-linux64/mafft.bat <inputdata>
How to specify this command, including how to specify that users should able to select the data to be aligned when they launch the tool, is described in detail below.
Settings under the External command tab
To create a new external application, click on the New configuration... button under the External Applications Configurations section in the CLC Server web administrative interface.
We focus on settings under the "External command" and "Stream handling" tabs in the window that appears.
Configure the following under the External command tab:
- In the External application name field, type "MAFFT".
Reminder: This name is displayed in the CLC Workbench Toolbox menu when the external application is made available for use. It is also the name used for the corresponding workflow element and it forms the basis of the name used for launching the external application using the CLC Server Command Line Tools.
- In the Command line field, type the following, where the parameter value to be substituted at runtime is indicated by typing its name inside {curly brackets}.
example/mafft:0.0.1 /mafft-linux64/mafft.bat {Sequences to align}The text inside the curly brackets, here "Sequences to align" will be the label on the input field in the wizard that CLC Workbench users see when they launch the MAFFT external application, as shown in figure 12.25. It also forms the basis of a command line parameter when using the CLC Server Command Line Tools.
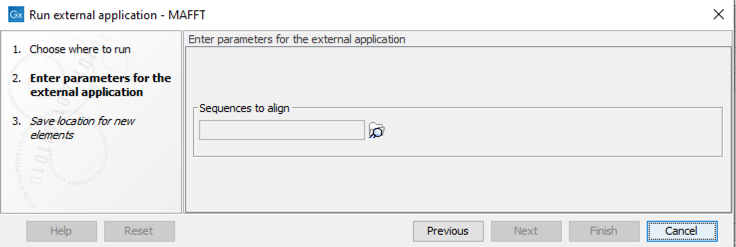
Figure 12.20: The external application name is presented as the name of the corresponding workflow element. Output channels and elements connected to them also reflect names specified in the external application configuration.
When a parameter is written into the Command line field in curly brackets, that parameter will be listed in the General configuration area below. There, the type of value expected for this parameter is configured.
We want users to select data to be aligned from a CLC location, and as MAFFT accepts data in FASTA format, we need to specify that the selected data should be exported in that format, so:
- In the Sequences to align section of the General configuration area, select "User-selected input data (CLC data location)" in the first drop-down menu, and select the exporter: "FASTA (.fa/.fsa/.fasta)" from the second drop-down menu.
The exported file will be placed in the shared working directory configured for the containerized execution environment of the CLC Server, and the path to this exported file will be substituted into the docker command at runtime.
We now specify that the external application is containerized:
- For the External application type, select the potion "Containerized: Docker".
Figure 12.21 shows the configuration window after the above steps have been taken.
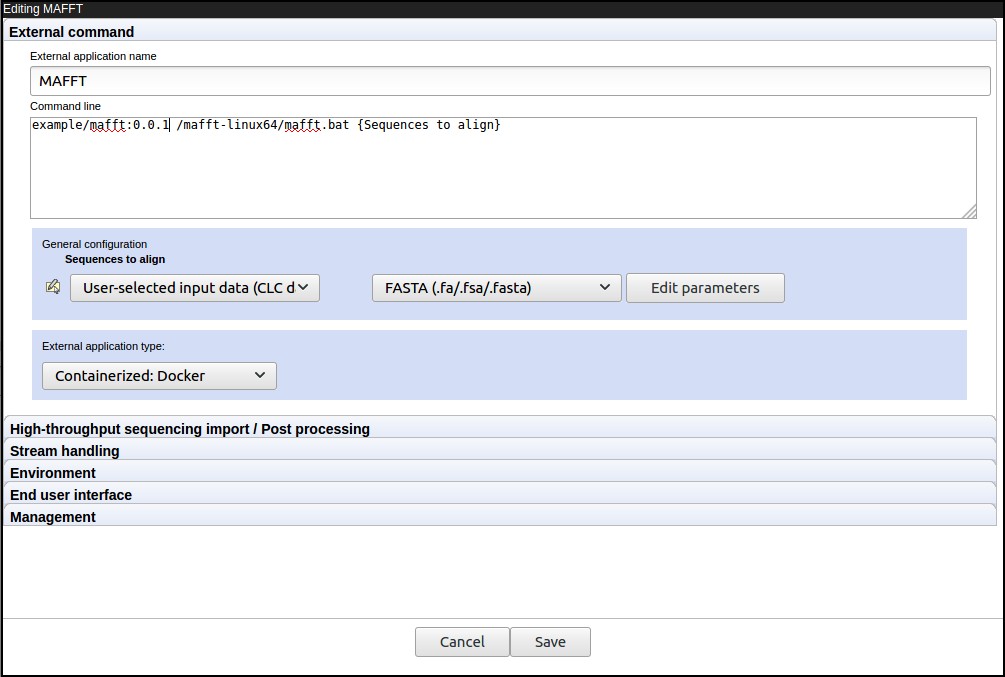
Figure 12.21: Defining the MAFFT containerized external application: setting up the command.
Settings under the Stream handling tab
The MAFFT application produces its output on standard out and standard error, so we configure the result handling under the Stream handling tab, as shown in figure 12.22.
- MAFFT reports alignments in FASTA format to standard out, so in the Standard out handling drop-down menu, select the the option: "FASTA Alignment (.fa/.fsa/.fasta)" option, which specifies the CLC Server importer to use.
In the File name field, enter "MAFFT-alignment.fa".
- In the Standard error handling section, select the option: "Do not stop execution or show error dialogs".
In left hand, drop-down menu, select the importer: "Plain text (.txt/.text)", and in the File name field, enter "MAFFT-log.txt".
MAFFT reports the progress of the alignment to standard error, and docker reports any problems here also. Thus this information can be useful for troubleshooting.
The file names specified for collecting information sent to standard out and standard error are used for the raw files that capture the contents of these streams, and their base names are seen by end users, as illustrated in 12.23 and 12.24 for this external application.
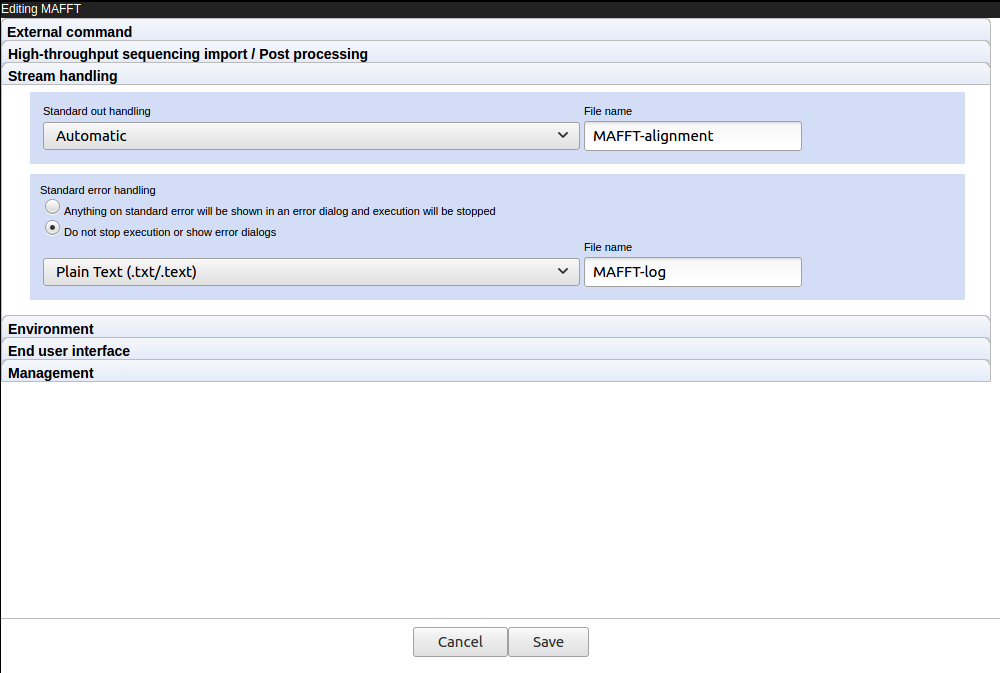
Figure 12.22: Defining the MAFFT containerized external application: output handling.
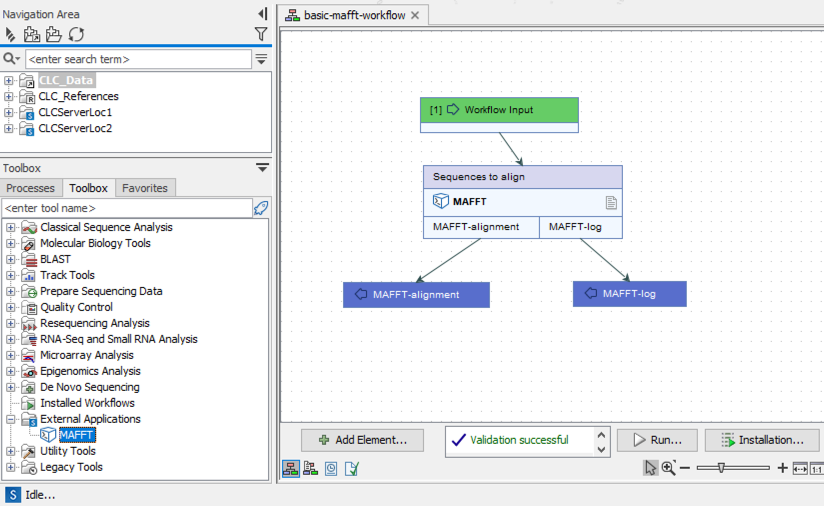
Figure 12.23: The names entered in the external application configuration are used as the name of the corresponding workflow element, the names of the output channels and input channels, and the default names of output elements attached to the output channels.
Figure 12.24: The external application was configured to generate output files named "MAFFT-alignment.fa" and "MAFFT-log.txt", which were then imported into the CLC Server, where those names are then reflected in the names of the imported data elements.
Save the external application
Click on the Save button at the bottom of the editor. By default, the external application will now be available directly under the "External Applications" menu of any CLC Workbench logged into this CLC Server.
If you want the external application to be listed in subfolder instead, go to the End user interface tab of the editor and specify a subfolder name there.
The configuration is now at a point where we can test this external application from a CLC Workbench or the CLC Server Command Line Tools. See Configuring external applications for further information about configuring external applications.
Launching the MAFFT external application from a CLC Workbench
From a CLC Workbench logged into the CLC Server, launch the external application directly by going to:
Toolbox | External Applications (![]() ) | MAFFT (
) | MAFFT (![]() )
)
A wizard should appear. When you get to the step labeled "Enter parameters for the external application", you should see a field labeled "Sequences to align" (figure 12.25), reflecting the name given to that parameter in the external application command configuration.
Figure 12.25: The Workbench user sees an option in the wizard named "Sequences to align". That label is taken from the external application command configuration.
To create a workflow that includes the MAFFT external application, open the Workflow Editor of a CLC Workbench logged into the CLC Server. The MAFFT element should be available to add from dialog that opens when you click on the "Add Element" button.
If the external application configuration has been exported to S3 from a CLC Server with the Cloud Server Plugin installed, then a CLC Workbench with the Cloud Plugin can also be used. See Import and export of external application configurations for further information about this aspect.
Note: To run external applications on a CLC Genomics Cloud Engine, they must be included in a workflow, and then that workflow submitted. To submit jobs to a CLC Genomics Cloud Engine from the CLC Server, it must have the Cloud Server Plugin installed. If submitting the workflow from a CLC Workbench, it must have the Cloud Plugin installed.