Identify QIAseq DNA Somatic and Germline Variants from Tumor Normal Pair (Illumina)
The ability to rapidly sequence matched tumor and normal samples enables integrated analysis of germline and somatic variants. This in turn allows for increased understanding of how each genome contributes to the disease.
Using matched tumor and normal samples as input, the Identify QIAseq DNA Somatic and Germline Variants from Tumor Normal Pair (Illumina) ready-to-use workflow detects and reports somatic variants and germline variants. To ensure that no somatic variants are filtered out due to field effects in apparently normal tissue, or tumor cells being present in matched blood specimens used as germline DNA, this workflow also reports somatic variants found at low frequency in germline sample in a separate output.
The workflow can be used with all QIAseq DNA panels and before running the workflow, you must first open the Reference Data Manager, select QIAseq DNA Panels hg19, download the set, if you have not done so already, and close the References management window. Please note that two reference data sets are available for this workflow; an ENSEMBL set and a RefSeq set, both matching the hg19 genome assembly.
The Identify QIAseq DNA Somatic and Germline Variants from Tumor Normal Pair (Illumina) ready-to-use workflow can be found at:
Ready-to-Use Workflows | QIAseq Panel Analysis (![]() ) | QIAseq Analysis workflows (
) | QIAseq Analysis workflows (![]() ) | Identify QIAseq DNA Somatic and Germline Variants from Tumor Normal Pair (Illumina)
) | Identify QIAseq DNA Somatic and Germline Variants from Tumor Normal Pair (Illumina)
Note: If you have more than one matched tumor-normal pair that you would like to analyze, you can consider analyzing them in one workflow run. To be able to do this, the matched samples must be paired correctly. This is done using metadata, which, in essence, is a table containing information that can match the samples based on sample IDs and information about whether a sample is of tumor or normal origin. A description of how to import a metadata table or create a metadata table in the workbench can be found by following this link http://resources.qiagenbioinformatics.com/manuals/clcgenomicsworkbench/current/index.php?manual=Creating_metadata_tables.html.
Double-click on the Identify QIAseq DNA Somatic and Germline Variants from Tumor Normal Pair (Illumina) to run the analysis.
If you are connected to a CLC Server via your Workbench, you will be asked where you would like to run the analysis. We recommend that you run the analysis on a CLC Server when possible.
The next two dialogs allow you to select the tumor sequencing reads (figure 6.13) and matching normal sequencing reads (figure 6.14) that you wish to analyze.
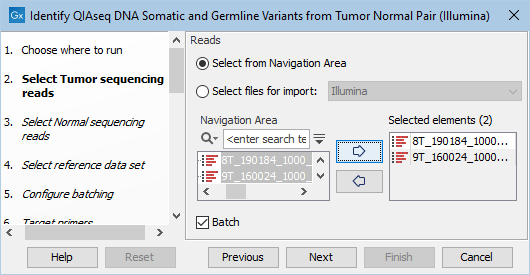
Figure 6.13: Select the tumor sequencing reads by double-clicking on the file name or by clicking once on the file name and then on the arrow pointing to the right hand side.
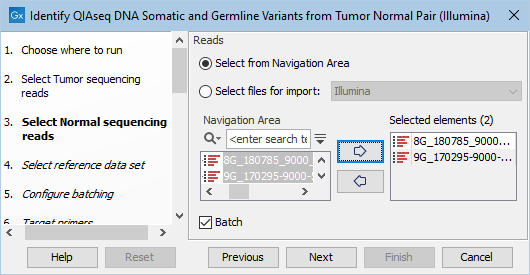
Figure 6.14: Select the normal sequencing reads by double-clicking on the file name or by clicking once on the file name and then on the arrow pointing to the right hand side. If you want to analyze multiple samples in one analysis run, the Batch option should be checked in the lower left corner of the dialog.
If you would like to analyze multiple matched tumor-normal samples in one analysis run, you must use the batch option. This is described in the CLC Workbench user manual http://resources.qiagenbioinformatics.com/manuals/clcgenomicsworkbench/current/index.php?manual=Running_workflows_in_batch_mode.html.
The following dialog helps you set up the relevant Reference Data Set. If you have not downloaded the Reference Data Set yet, the dialog will suggest the relevant data set and offer the opportunity to download it using the Download to Workbench button. This is shown in figure 6.15.
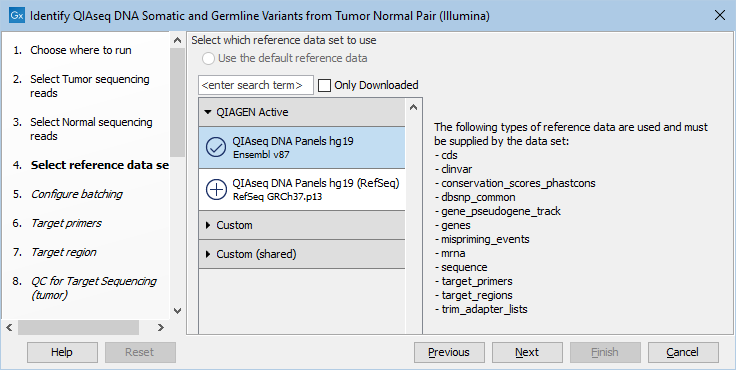
Figure 6.15: In the central part of the dialog, the relevant Reference Data Set is highlighted. In the right-hand side, the types of references needed by the workflow are listed.
Note that if you wish to Cancel or Resume the Download, you can close the ready to use workflow and open the Reference Data Manager where the Cancel, Pause and Resume buttons are available.
If the Reference Data Set was previously downloaded, the option "Use the default reference data" is available and will ensure the relevant data set is used. You can always check the "Select a reference set to use" option to be able to specify another Reference Data Set than the one suggested.
If you have chosen to run more than one matched tumor-normal pair and have checked the batch box when selecting tumor and normal sequencing reads, you will now be asked to configure the batching as shown in figure 6.16.

Figure 6.16: Define the batch units using metadata if you are analyzing more than one matched tumor-normal pair in a workflow run.
A metadata table must be provided for both the tumor and normal sequencing reads. The metadata table can be one table that holds information about both the tumor and normal samples, or it can be two individual metadata tables, one with information about the tumor samples and one with information about the normal samples. In this step you must also define the Workflow-level batching:
- Primary input For this workflow it makes no difference whether the primary input is tumor or normal as the primary input determines the number of times the workflow should be run and the number of tumor and normal samples is the same when working with matched samples.
- Define batch units using metadata column The column in the metadata table specifying the group the data belongs to. Each group makes up a single batch unit.
- Match Tumor sequencing reads and Normal sequencing reads using The column in the metadata file(s) that is used to ensure that the correct data from each workflow input are included together in a given batch run. A column with this name must be present in the metadata file(s) or table(s).
For more information about running the workflow using metadata, please see http://resources.qiagenbioinformatics.com/manuals/clcgenomicsworkbench/current/index.php?manual=Batching_workflows_with_more_than_one_input_changing_per_run.html.
The next dialog allows you to check how the tumor and normal samples are being matched based on the batch configuration done in the previous step (figure 6.17).

Figure 6.17: Check how the tumor and normal samples are being matched in batch units and proceed to the next step if everything looks as expected.
In the next dialog, specify the relevant target primer from the drop down list (figure 6.18).
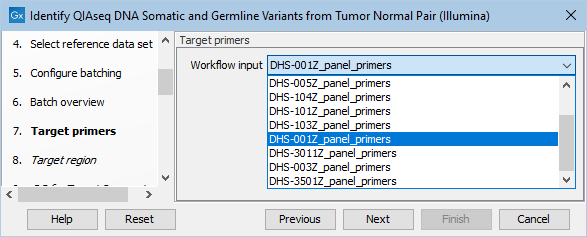
Figure 6.18: Select the target primer file specific to the panel used.
Next, specify the relevant target region from the drop down list (figure 6.19).
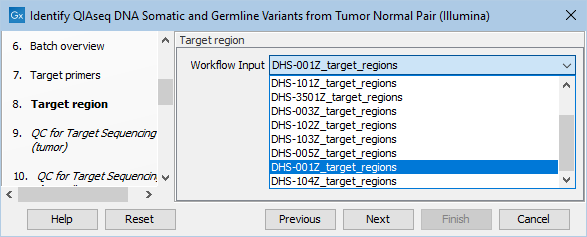
Figure 6.19: Select the target regions file specific to the panel used.
In the dialog called QC for Target Sequencing (tumor), you can modify the Minimum coverage for the tumor sample, which is the minimum coverage needed on all positions in a target for this target to be considered covered. This is shown in figure 6.20.

Figure 6.20: Setting the Minimum coverage parameter of the QC for Target Sequencing for the tumor sample.
In the dialog called QC for Target Sequencing (normal), you can modify the Minimum coverage for the normal sample, which is the minimum coverage needed on all positions in a target for this target to be considered covered. This is shown in figure 6.21.
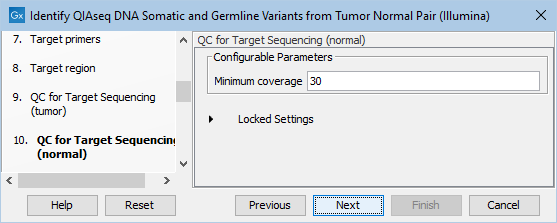
Figure 6.21: Setting the Minimum coverage parameter of the QC for Target Sequencing for the normal sample.
The Identify candidate variants (Low average quality variants) (germline) dialog allows adjustment of the cutoff for the average base quality score of the bases supporting a variant for germline variants (figure 6.22). Variants below the specified cutoff will be filtered out.
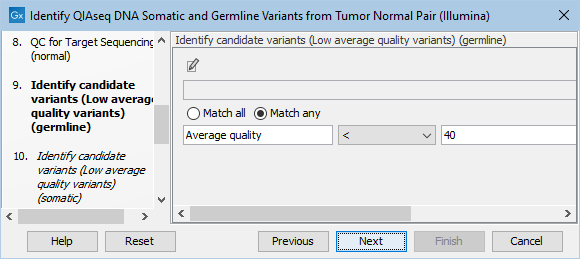
Figure 6.22: Setting the cutoff for the minimum average quality for germline variants.
Likewise, the Identify candidate variants (Low average quality variants) (somatic) dialog allows adjustment of the cutoff for the average base quality score of the bases supporting a variant for somatic variants (figure 6.23). Variants below the specified cutoff will be filtered out.
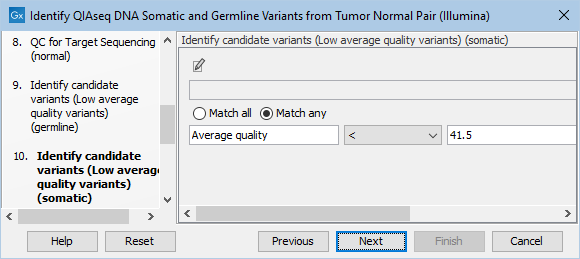
Figure 6.23: Setting the cutoff for the minimum average quality for somatic variants.
The Identify candidate variants (Low count variants likely due to artifacts) (somatic) dialog allows adjustment of the cutoff for the average quality for somatic variants as well as the read direction test probability (figure 6.24). Variants below either of the specified cutoffs will be filtered out.
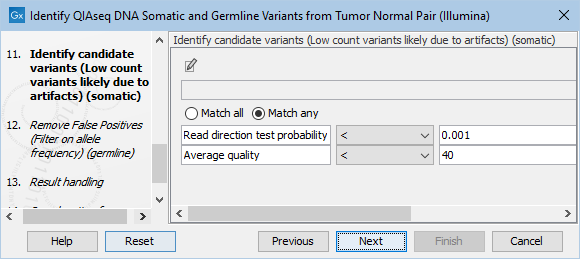
Figure 6.24: Setting the cutoff for the minimum average quality and read direction test probability for low count variants.
The Remove False Positives (Filter on allele frequency) (germline) dialog allows adjustment of the cutoff for the minimum frequency required for reporting a germline variant (figure 6.25). Variants below the specified frequency cutoff will be filtered out.
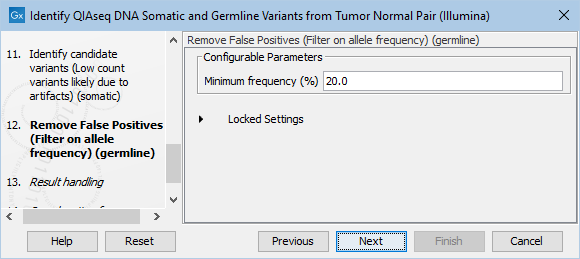
Figure 6.25: Setting the cutoff for the minimum average quality and read direction test probability for low count variants.
Finally, you can specify where to save the data. If you are analyzing more than one matched tumor-normal pair in one run, make sure that you check the box Create subfolders per batch unit in the Result handling step (figure 6.26) to get a separate folder for the results from each individual matched tumor-normal pair.
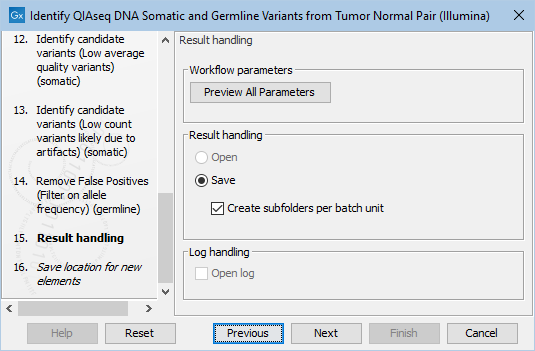
Figure 6.26: In the Results handling step you can choose to save the analysis results in subfolders if you check the Create subfolders per batch unit box.