Perform QIAseq Multimodal Analysis with TMB and MSI (Illumina) ready-to-use workflow
The Perform QIAseq Multimodal Analysis TMB and MSI (Illumina) ready-to-use workflow is a copy of the Perform QIAseq Multimodal Analysis (Illumina) ready-to-use workflow, described above, extended with the functionality to calculate a TMB score as well as assess MSI status. The panel related to the workflow is the QIAseq Multimodal Pan Cancer panel (UHS-5000Z).
The Perform QIAseq Multimodal Analysis TMB and MSI (Illumina) ready-to-use workflow is can be found at:
Ready-to-Use Workflows | QIAseq Panel Analysis (![]() ) | QIAseq Analysis workflows (
) | QIAseq Analysis workflows (![]() ) | Perform QIAseq Multimodal Analysis TMB and MSI (Illumina) (
) | Perform QIAseq Multimodal Analysis TMB and MSI (Illumina) (![]() )
)
Double-click on Perform QIAseq Multimodal Analysis TMB and MSI (Illumina) and start an analysis.
If you are connected to a CLC Server via your Workbench, you will be asked where you would like to run the analysis. We recommend that you run the analysis on a CLC Server when possible. Click Next, and then select the DNA reads to analyze (figure 9.6).
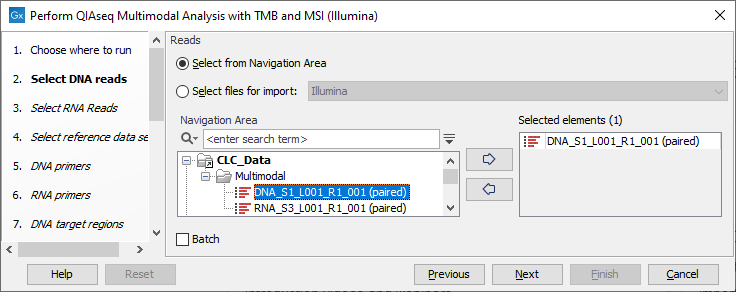
Figure 9.6: Select the sequencing reads by double-clicking on the file name or by clicking once on the file name and then on the arrow pointing to the right hand side.
Select the RNA reads in the next dialog (figure 9.7).

Figure 9.7: Select the sequencing reads by double-clicking on the file name or by clicking once on the file name and then on the arrow pointing to the right hand side.
The following dialog helps you set up the relevant Reference Data Set. If you have not downloaded the Reference Data Set yet, the dialog will suggest the relevant data set and offer the opportunity to download it using the Download to Workbench button. (figure 9.8).
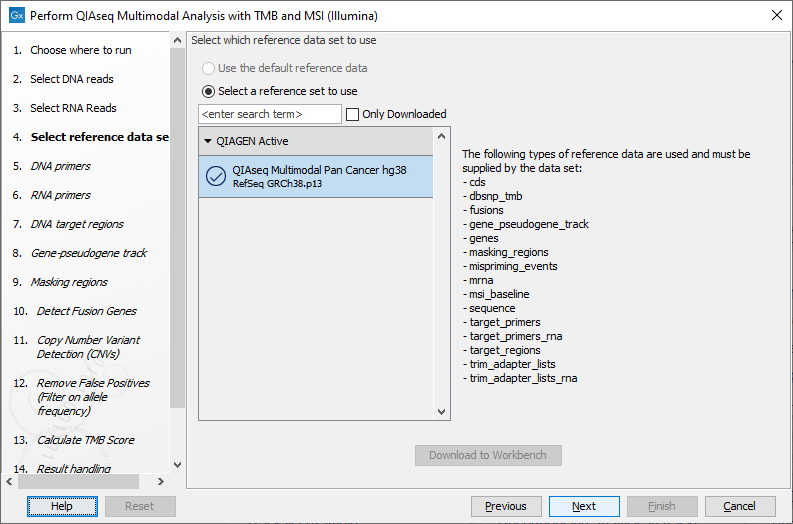
Figure 9.8: The relevant Reference Data Set is highlighted; in the text to the right, the types of reference needed by the workflow are listed.
Note that if you wish to Cancel or Resume the Download, you can close the ready to use workflow and open the Reference Data Manager where the Cancel, Pause and Resume buttons are available.
If the Reference Data Set was previously downloaded, the option "Use the default reference data" is available and will ensure the relevant data set is used. You can always check the "Select a reference set to use" option to be able to specify another Reference Data Set than the one suggested.
In the next three dialogs, you are asked to select the DNA and RNA primers and the DNA target regions from the available catalog panels. The panel is pre-configured with the multimodal pan cancer panel. For custom datasets usually only one option is available.
Next, the gene-pseudogene track can be selected and after that a masking track; both tracks are help reduce the number of False Positives (FP) variant calls. These tracks should match the panels being analyzed and can be selected when custom panels are being analyzed.
In the Detect Fusion Genes dialog, it is possible to change the Promiscuity threshold, i.e., the maximum number of different fusion partners reported for a gene. You can also check for exon skippings by enabling the Detect exon skippings option, as well as check for fusions with novel exon boundaries by enabeling the Detect fusions with novel exon boundaries option.This dialog is shown in figure 9.9
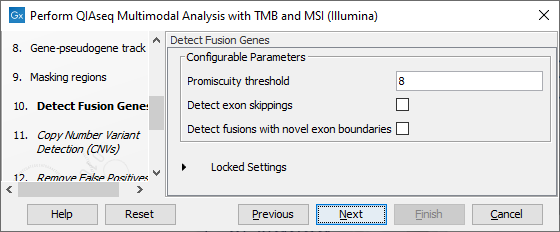
Figure 9.9: The Detect Fusion Genes dialog.
The QC for Target Sequencing cannot be modified in this workflow and the coverage restriction is kept at 100x for calculating TMB score.
The dialog for Copy Number Variant Detection allows you to specify a control mapping against which the coverage pattern in your sample will be compared in order to call CNVs. If you do not specify a control mapping, or if the target region files contains fewer than 50 regions, the Copy Number Variation analysis will not be carried out.
Please note that if you want the copy number variation analysis to be done, it is important that the control mapping supplied is a meaningful control for the sample being analyzed. Mapping of control samples for the CNV analysis can be done using the workflow described in Create QIAseq DNA CNV Control Mapping workflows.
A meaningful control must satisfy two conditions: (1) It must have a copy number status that it is meaningful for you to compare your sample against. For panels with targets on the X and Y chromosomes, the control and sample should be matched for gender. (2) The control read mapping must result from the same type of processing that will be applied to the sample. One way to achieve this is to process the control using the workflow (without providing a control mapping for the CNV detection component) and then to use the resulting UMI reads track as the control in subsequent workflow runs.
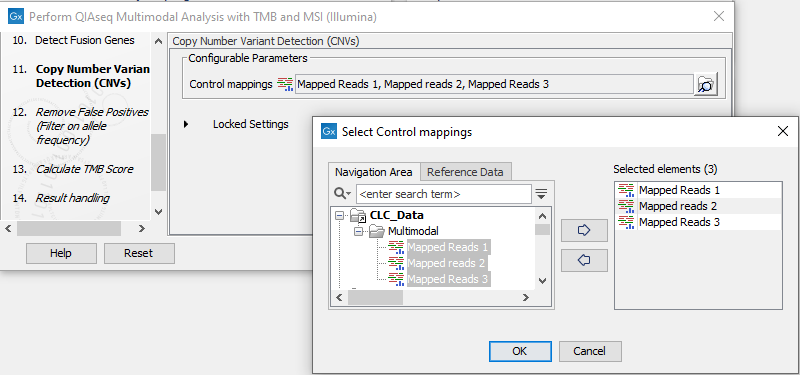
Figure 9.10: The Copy Number Variation Detection dialog. Here 3 control samples have been selected. In practice it is recommended to either use a matched control sample, or to use at least 5 control samples. Increasing the number of samples beyond this does not typically improve results.
The parameters for variant detection are not adjustable and have been set to generate an initial pool of all potential variants. These are then passed through a series of filters to remove variants that are suspected artifacts. Variants failing to meet the (adjustable) thresholds for quality, read direction bias, location (low frequency indels within homopolymer stretches), frequency or coverage would not be included in the filtered output.
Some filters only remove alternative alleles - and not reference alleles - as this potentially leads to wrong interpretation of variants by the VCF exporter where such variants could be misinterpreted as hemizygote when the reference allele is missing.
The frequency cutoff is the only open parameter in this workflow and the workflow can detect down to 1% variant frequency. Even when setting the frequency lower it will not output lower frequencies as the variant calling is initially done down to 1% by the variant caller in this workflow. Further adjustments needs to be done by opening a copy of the workflow.
Configure the result handling and in the last wizard step, choose to Save the results of the workflow and specify a location in the Navigation Area.
Subsections