Create Sample Report
Create Sample Report takes reports relating to a single sample as input and summarizes their contents. A single summary report is generated containing an overview of the analysis of that sample. The report content and its order is configurable. Summary items can be added to a "Quality control" subsection of the sample report, offering a quick overview of the most important quality control metrics.
Creating a sample report
To create a sample report, go to:
Tools | Utility Tools (![]() ) | Reports (
) | Reports (![]() ) | Create Sample Report (
) | Create Sample Report (![]() )
)
To see a list of tools that produce reports that can be used as input, click on the (![]() ) icon in the top right corner of the input selection wizard (figure 37.16).
) icon in the top right corner of the input selection wizard (figure 37.16).
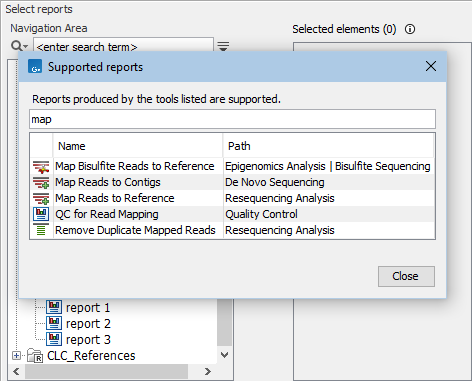
Figure 37.16: Clicking on the info icon at the top right corner of the input selection wizard opens a window showing a list of tools that produce supported reports. Text entered in the field at the top limits the list to just tools with names containing the search term.
One section is included for each report type provided as input, with the type determining the title of the corresponding section. See Report types and sample report content below for further details.
Specifying the order of the sections in the report
When more than one report type is provided as input, the order of the sections in the output report is configurable in the "Set order" wizard step:
- Order of inputs Use the order that the input reports were specified in.
- Define order Explicitly define the section order by moving items up and down in the listing.
Defining the order is recommended when the tool is being launched in batch mode with folders of reports provided as the batch units. Doing this avoids reliance on the order of the elements within the folders being the same.
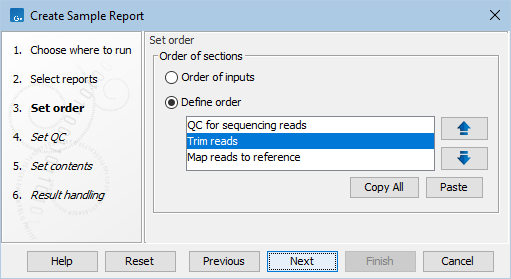
Figure 37.17: When more than one report type is provided as input, the order of the sections can be configured in the "Set order" wizard step.
The section order is also reflected in the "Quality control" subsection.
When Create Sample Report is included in a workflow, sections are ordered according to the order of the inputs. See Ordering inputs for information about ordering inputs in workflows.
Defining quality control metrics
The "Quality control" subsection can be configured in the "Set QC" wizard step (figure 37.19). The section will not be included in the sample report when no summary items are added. The Add button opens a dialog where summary items can be selected (figure 37.18).
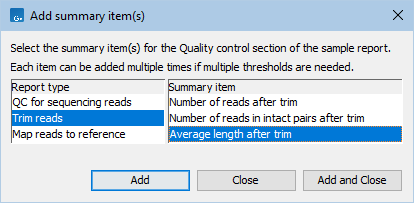
Figure 37.18: Adding summary items to the "Quality control" subsection. To the left are the report types for which summary items can be added. To the right are the available summary items for the selected report type.
Quality control conditions can be specified for summary items if desired (figure 37.19). When a condition is met, that item will be highlighted in green in the "Quality control" subsection of the sample report. If the condition is not met, that item will be highlighted in yellow or red, depending on how the condition has been configured.
To configure a condition for a summary item, supply a threshold value and the operator to use to perform the comparison, and the color to use in the report if the condition is not met.
Summary items can be added more than once, and different conditions can be configured for each instance.
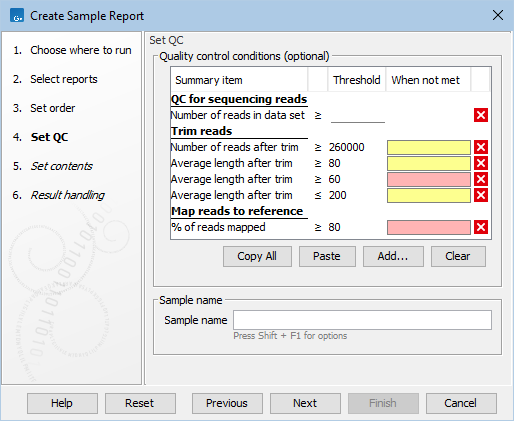
Figure 37.19: Configuring conditions for the "Quality control" subsection. Summary items can be included without conditions (e.g., "Number of reads in data set"), or have multiple conditions defined (e.g. "Average length after trim").
An example: The following would be added to the "Quality control" subsection for the configuration shown in figure 37.19:
- Number of reads in data set Since no condition is specified, colors will not be used.
- Number of reads after trim The sample will be marked yellow if there are less than 260,000 reads left after trimming, and green otherwise.
- Average length after trim Multiple conditions are specified and the sample will be marked
- Red, if the length is less than 60.
- Yellow, if the length is less than 80 (but at least 60) or above 200.
- Green, if the length is between 80 and 200.
- Percentage of reads mapped The sample will be marked red if less than 80% of the reads mapped, and green otherwise.
See Create Sample Report output for more details.
Setting the sample name
The name of the sample for which the sample report is created is used when combining sample reports (see Combine Reports). This can be customized in the "Set QC" wizard step (figure 37.19):
- Sample name If empty and the tool is run
- From the Tools menu,
{basename}is used: the sample name is set to the basename of the first input report, i.e. the prefix of the name until the last(for names that end in(...). - As part of a workflow,
{metadata}is used: the sample name is set to the batch unit identifier.
The sample name can be set to
- An explicit name, such as
S234. - A pattern, such as
Sample {basename}. Different patterns are available when running the tool from the Tools menu or as part of a workflow. Consult the tooltip and see Configuring Workflow Output and Export elements for details.
- From the Tools menu,
Specifying the content of the report
The sections to include in the report are configured in the "Set contents" wizard step (figure 37.20). This includes a general summary section that appears at the top of the report when included.
Where available, individual subsections and summary items can also be specified. Where only some subsections or summary items are excluded, the checkbox for the parent section(s) are highlighted in for visibility.
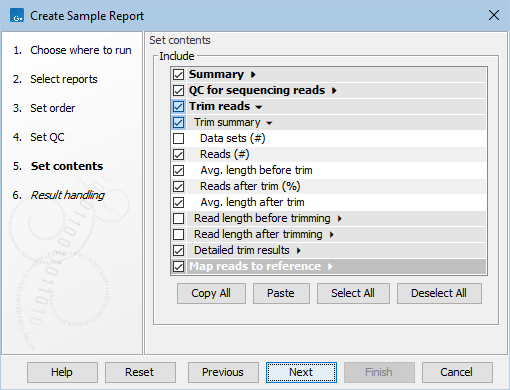
Figure 37.20: The content of the sample report is configured in the "Set contents" wizard step. Sections with a check in the box are included, while those without a check are excluded from the sample report. For visibility, sections where some contents have been excluded have checkboxes highlighted.
Reusing configurations
Configurations defined previously can be used in subsequent runs.
Configurations can be copied in two ways:
- Copy the configuration defined in the relevant wizard step using the Copy all button.
- Copy the configuration used in previous runs of the tool from the History (
 ) view of the output, described further below.
Copied configurations can be pasted into a text file for later use.
A copied configuration can be pasted into the wizard step using the Paste button.
Pasting has the following effects:
- In the "Set QC" wizard step: Conditions referring to summary items included in any input report are added to any conditions already configured. Conditions that refer to summary items not present in any input report are not added.
- In the "Set order" and "Set contents" wizard steps: All existing configuration is overwritten with the new information.
The history of a report output by Create Sample Report contains the order of the sections (Order reports), the summary items to be added to the "Quality control" subsection (Metrics), and the excluded sections/subsections/summary items (Exclude) (figure 37.21). These can be selected, copied, and then pasted into the "Set order"/"Set QC"/"Set contents" wizard steps wizard steps, respectively, in a subsequent run. Alternatively, the entire history can be selected, copied, and then pasted in each wizard step. Only the relevant configuration is pasted into each step.
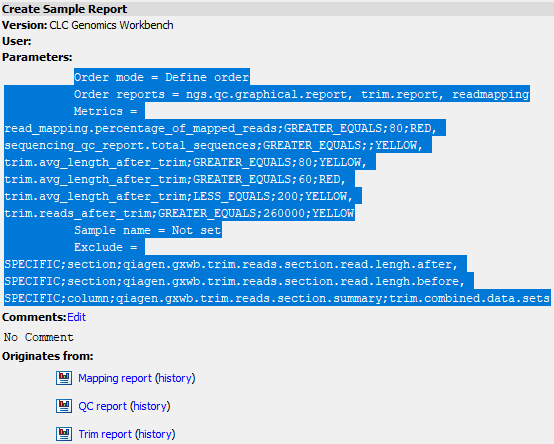
Figure 37.21: The history of a report output by Create Sample Report with the parameters selected, ready to be copied.
Report types and sample report content
Reports that can be supplied as input have a report type. The type of a report affects the placement of its summary information in the output. Specifically:
- Reports with the same type that are generated by the same tool are summarized into a single section, named according to the type.
This is useful when the aim is to compare the values from those reports, for example results from different samples or different analysis runs. However, if a particular tool has been used more than once in an analysis, for different purposes, then placing the summary of these results in different sections may be desirable. This can be done by editing the report type in some of the reports (see Modify Report Type.).
- Reports with different types are summarized in separate sections, named according to the types.
The report type assigned by a particular tool is unique, so reports generated by different tools have different types.
If reports generated by different tools are later modified so their report types are the same, those reports will still be summarized in different sections, although each of these sections will have the same name.
The type of a report can be seen in the Element Info (![]() ) view for that report.
) view for that report.
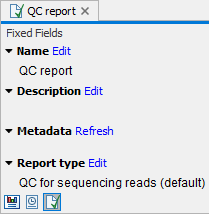
Figure 37.22: The type of a report can be found in the Element Info view of reports that are supported as input for tools that summarize reports.
Subsections
